Picture this: a Saturday night, a bag of stale pizza crusts, and a craving that refuses to be ignored. I had just finished a marathon of the latest streaming binge and my kitchen smelled like burnt onions and forgotten spices. I opened the fridge, stared at a block of ground beef that had been there for weeks, and thought, “What if I could turn this into something spectacular?” That moment sparked the idea for the ultimate Philly Cheesesteak Sliders.
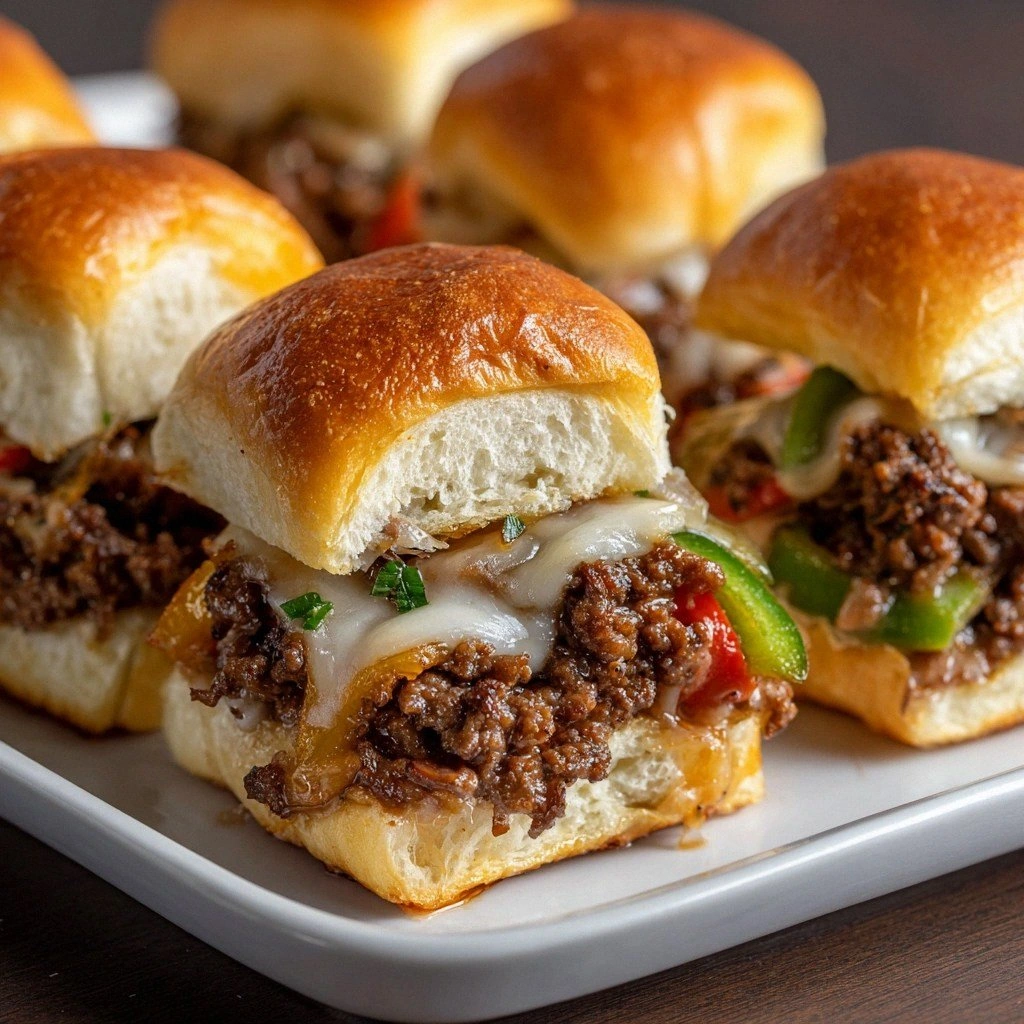
I remember the first sizzle of the beef hitting the pan—an audible pop that sent a wave of anticipation through the room. The aroma of garlic powder and Worcestershire sauce mingled with the sweet scent of caramelized onions, creating a heady perfume that made my mouth water. I could almost taste the creamy provolone melting over the savory beef, the pepper’s bright crunch, and the soft, buttery slider rolls giving each bite a comforting hug. The kitchen felt like a stage and I was ready to perform a culinary show.
What makes this version stand out is that it’s not just a mash‑up of flavors; it’s a symphony of textures and a testament to the power of a few high‑quality ingredients. I dared you to taste this and not go back for seconds. I’ll be honest—half the batch disappeared before anyone else could even try. Most recipes get this completely wrong by over‑cooking the meat or using cheap cheese, but here, every element shines. The result? A bite‑size masterpiece that feels like a pocket‑sized deli dream.
The secret twist? A splash of Worcestershire sauce that adds umami depth, and a thin layer of provolone that melts into the beef like velvet. Picture yourself pulling these sliders out of the oven, the whole kitchen smelling incredible, and watching the cheese stretch as you bite into a perfectly seasoned bite. Let me walk you through every single step—by the end, you’ll wonder how you ever made it any other way.
What Makes This Version Stand Out
- Flavor: The combination of garlic powder, onion powder, and Worcestershire sauce creates a layered, savory profile that feels authentic and indulgent.
- Texture: The beef stays juicy, the onions are caramelized to a sweet finish, and the bell pepper adds a crisp bite that breaks the monotony.
- Simplicity: With only eight ingredients, this recipe is a breeze to assemble, making it perfect for busy weeknights.
- Quality: Using fresh slider rolls and real provolone cheese elevates the dish beyond a generic sandwich.
- Crowd‑pleaser: The sliders are bite‑size and shareable, ideal for parties, game nights, or a casual dinner.
- Make‑ahead: The filling can be pre‑cooked and stored, while the sliders can be assembled just before serving.
- Visual Appeal: The golden brown edges of the beef and the melty cheese create a mouth‑watering look.
- Versatility: Swap out the beef for turkey or plant‑based meat to adjust the dish to any dietary preference.
Alright, let's break down exactly what goes into this masterpiece…
Inside the Ingredient List
The Flavor Base
Ground beef is the star of the show. It provides a rich, savory foundation that carries the other flavors. If you skip it, you lose the hearty core that makes the sliders satisfying. A lean cut ensures the meat stays juicy, while a fattier blend offers a more robust taste.
The Texture Crew
Olive oil is used for sautéing the vegetables. It adds a touch of richness and helps the onions and bell pepper caramelize beautifully. A splash of olive oil also prevents the veggies from sticking and creates a silky coating that enhances the overall mouthfeel.
The Unexpected Star
Worcestershire sauce is the secret weapon that brings depth and umami. It adds a subtle tang that balances the sweetness of the onions and the richness of the beef. Without it, the filling would feel flat and lacking complexity.
The Final Flourish
Provolone cheese melts into a silky layer that coats the beef and adds a mild, creamy finish. The cheese’s smooth meltability ensures it doesn’t overpower the other ingredients. If you prefer a sharper flavor, a sprinkle of sharp cheddar can be added on top of the provolone.
Everything's prepped? Good. Let's get into the real action…
The Method — Step by Step
- Start by heating a large skillet over medium‑high heat. Add two tablespoons of olive oil, letting it shimmer before the oil is hot. Once the oil glows, introduce the ground beef in a single layer, allowing it to sear without stirring for 2 minutes. This creates a golden crust that locks in flavor. Let the beef sit until it develops a deep brown color before breaking it apart with a wooden spoon. The aroma at this point should be unmistakably savory, making your mouth water in anticipation.
- Add the diced onion and bell pepper to the skillet. Sauté until the onions become translucent and the peppers soften, about 4–5 minutes. Stir occasionally to ensure even cooking. The mixture should emit a sweet, caramelizing scent that signals the onions are ready. This step is crucial; over‑cooking can make the veggies mushy, while under‑cooking leaves them crunchy.
- Season the mixture with one teaspoon of garlic powder, one teaspoon of onion powder, and a splash of Worcestershire sauce. Stir to distribute the seasonings evenly. The beef should now carry a complex, umami‑rich profile. Taste a small spoonful; it should be balanced with a hint of sweetness from the onions and a subtle tang from the sauce.
- Reduce the heat to medium and let the filling simmer for 5 minutes. This allows the flavors to meld and the liquid to evaporate, concentrating the taste. Keep the lid off so the mixture doesn’t steam; you want a thicker, saucy consistency. The beef should still hold its shape, not turning into a mush.
- While the filling simmers, prepare the slider rolls. Slice each roll horizontally, leaving a hinge on one side. Toast the cut sides in a dry skillet for 1–2 minutes until they’re lightly golden. This step prevents the rolls from becoming soggy once the beef is added. The toast should have a crisp edge that contrasts nicely with the soft interior.
- Fill each toasted roll with the beef mixture, packing it snugly but not too tight. Place a slice of provolone on top of the hot filling; the residual heat will melt the cheese in seconds. The cheese should ooze slightly, creating a luscious, gooey surface. This is the moment of truth—watch the cheese stretch as you lift the slider.
- Place the assembled sliders on a baking sheet and bake at 375°F (190°C) for 5–7 minutes. The goal is to warm the sliders and allow the cheese to melt fully without overcooking the beef. Keep an eye on the sliders; they should be golden and the cheese should be bubbly.
- Remove from the oven and let the sliders rest for 2 minutes before serving. This short rest allows the flavors to settle and the cheese to set just enough for a clean bite. Serve immediately with your favorite dipping sauce or a side of pickles for extra crunch.
That's it — you did it. But hold on, I've got a few more tricks that'll take this to another level…
Insider Tricks for Flawless Results
The Temperature Rule Nobody Follows
Cooking the beef at medium‑high heat before reducing the temperature is key. This technique ensures a caramelized crust that locks in moisture and flavor. A friend once tried cooking the meat at low heat from the start and ended up with a dry, bland filling. The high‑heat sear is the secret to a juicy, flavorful base.
Why Your Nose Knows Best
Smell the beef as it cooks; a faint, sweet aroma indicates that the onions are caramelizing properly. If the scent is too sharp or metallic, the onions are over‑cooked or the skillet is too hot. Trusting your nose will help you adjust timing on the fly and keep the flavor profile balanced.
The 5‑Minute Rest That Changes Everything
Letting the sliders rest after baking is often overlooked but critical. The rest period allows the cheese to set slightly, preventing a gooey mess when you bite in. A friend once cut into a slider immediately and the cheese splattered everywhere; the rest period saved the day.
The Slice‑Size Secret
Use a serrated knife to cut the slider rolls to keep the structure intact. A straight knife can compress the roll, making it difficult to bite. The serrated edge creates a clean slice that holds the filling in place.
The One‑Minute Warm‑Up Trick
If you’re serving the sliders cold or after a delay, place them on a low‑heat plate for a minute to warm them gently. This technique reactivates the cheese’s meltiness without over‑cooking the beef. It’s perfect for late‑night snack sessions.
Creative Twists and Variations
This recipe is a playground. Here are some of my favorite ways to switch things up:
Spicy Jalapeño Kick
Add sliced jalapeños to the sautéed onions and peppers for a fiery edge. The heat pairs wonderfully with the mild provolone, creating a contrast that excites the palate. Ideal for guests who love a little spice.
Smoky Chipotle Flavor
Stir in a teaspoon of chipotle in adobo sauce during the simmering step. The smoky undertone complements the beef’s natural richness. This variation is perfect for autumn gatherings.
Herb‑Infused Delight
Sprinkle fresh chopped parsley or oregano over the filling before adding the cheese. The herbs add a bright, fresh note that cuts through the savory heaviness. Great for a lighter, garden‑inspired version.
Plant‑Based Power
Replace the ground beef with crumbled tempeh or textured vegetable protein. Use a vegan cheese alternative for a dairy‑free option. The texture remains satisfying, and the flavor profile stays true to the classic.
Cheesy Jalapeño Popper Slider
Fill the sliders with a mixture of ground beef and cream cheese, then top with a slice of provolone and a dash of hot sauce. The creamy interior and sharp cheese create a popper‑inspired experience. Perfect for parties.
Breakfast Breakfast‑Style
Add a fried egg on top of the cheese before baking. The runny yolk adds richness and turns the sliders into a hearty breakfast item. Serve with a side of hash browns for a complete morning meal.
Storing and Bringing It Back to Life
Fridge Storage
Store the assembled sliders in an airtight container for up to 2 days. Keep them in the refrigerator to preserve freshness. When ready to serve, reheat in a skillet or microwave until the cheese is melted and the beef is heated through.
Freezer Friendly
Wrap each slider individually in parchment paper and place them in a freezer bag. Freeze for up to 3 months. Thaw overnight in the refrigerator before reheating. This method keeps the rolls from becoming soggy.
Best Reheating Method
Reheat the sliders in a 350°F (175°C) oven for 10 minutes, or until the cheese is bubbly. Add a tiny splash of water before reheating to create steam that helps the cheese melt evenly. This trick restores the sliders’ original texture and flavor.