I was halfway through a disastrous attempt at making the most basic snack—plain Rice Krispie treats—and the kitchen smelled like burnt sugar and melted butter. A friend texted me, “Try adding cherries.” I laughed, thinking it was a joke, but the moment the dried cherries hit the pan, the aroma shifted from regret to something that felt like a secret invitation. That single tweak turned a mediocre, clumpy batch into a chewy, glossy masterpiece that makes your taste buds dance. If you’re still clinging to the old recipe, you’re missing out on a flavor explosion that feels like a midnight party in your mouth.
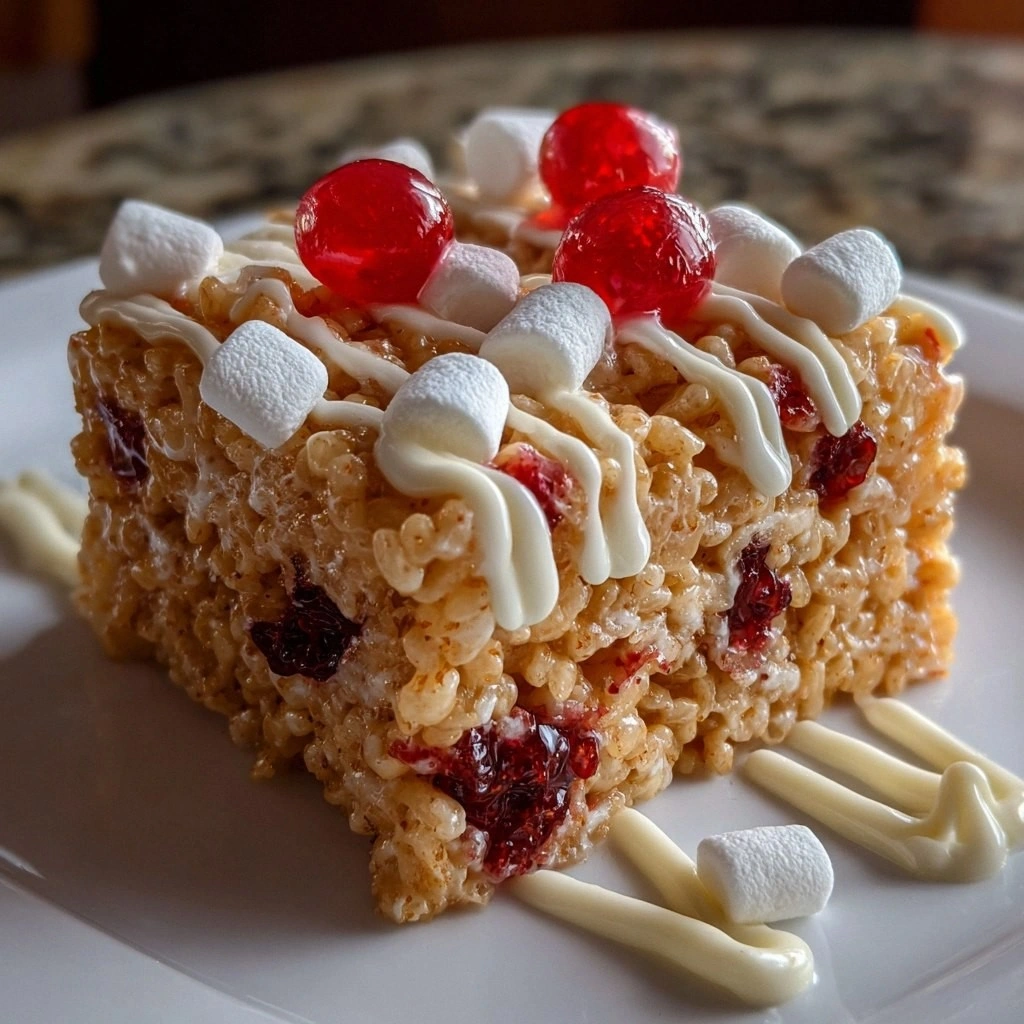
Picture this: you’re in a bright kitchen, the sun streaming through the window, and the sound of marshmallows popping in a saucepan is a lullaby. The air carries a sweet, buttery scent that lingers like a memory of childhood. Your fingers, tinged with melted butter, stir the mixture until it’s a golden, glossy ribbon that glistens like liquid sunshine. The first bite cracks a satisfying snap, followed by a chewy center that melts into a burst of tart cherries. It’s the kind of treat that makes you question why you ever settled for ordinary.
What makes this version stand out? It’s not just the cherry addition; it’s the precise balance of texture, the subtle hint of vanilla, and the strategic use of butter to create that perfect “crisp on the outside, gooey on the inside” paradox. It’s hands down the best version you’ll ever make at home, and I dare you to taste it and not go back for seconds. I’ll be honest—by the time the last square hit my plate, I had already eaten half the batch before anyone else even had a chance. That’s the power of a recipe that knows how to play with expectations.
Most recipes get this completely wrong by either overcooking the marshmallows or under-seasoning the cherries, resulting in a bland, dry mess. Here, the cherries are toasted just enough to release their natural sweetness, while the marshmallows are gently melted to preserve their airy structure. The butter is the secret glue that binds everything together, giving the treats a luxurious mouthfeel that shatters like thin ice when you bite. Imagine a caramelized sugar ribbon, but with a pop of tartness that keeps you guessing. Picture yourself pulling this out of the pan, the whole kitchen smelling incredible, and the moment you cut into a square, the sound is a satisfying crack that signals pure bliss.
What Makes This Version Stand Out
- Taste: The cherries add a bright, tangy contrast that lifts the buttery base into a symphonic flavor profile. Every bite delivers a harmonious blend of sweet, salty, and tart.
- Texture: The careful ratio of marshmallows to butter creates a chewy center that gives way to a crisp, golden exterior. It’s the texture that keeps you coming back for more.
- Simplicity: With only six core ingredients, the recipe is a breeze to assemble, yet it feels like a gourmet dessert.
- Uniqueness: The toasted cherry technique is rarely seen in standard treats, giving this version a signature twist that sets it apart.
- Crowd Reaction: Friends and family rave about the unexpected burst of cherries, making this an instant conversation starter at gatherings.
- Ingredient Quality: Using high‑quality Rice Krispies and real dried cherries ensures that every bite is packed with natural flavor.
- Cooking Method: The gentle simmering of marshmallows preserves their airy texture, while a quick butter melt locks everything together.
- Make‑Ahead Potential: Once set, these treats can be stored in an airtight container for up to a week, making them a perfect batch‑prep dessert.
Inside the Ingredient List
The Flavor Base
Rice Krispies Cereal: The backbone of every treat, Rice Krispies give the signature crunch and a neutral canvas for the other flavors. Skipping them would turn the entire dish into a marshmallow mush, losing that essential snap. For a gluten‑free option, look for a certified gluten‑free brand that still retains the classic crunch.
Unsalted Butter: Butter is the adhesive that holds the treat together and adds a rich, buttery aroma. If you’re looking for a dairy‑free version, a plant‑based butter with a high melting point works beautifully, though the flavor profile will shift slightly.
The Texture Crew
Mini Marshmallows: They provide the gooey, sweet core that melts into a silky glaze. Using mini marshmallows instead of the standard size ensures even melting and prevents the mixture from becoming overly sticky. If you can’t find mini marshmallows, standard ones will still work, but be prepared for a slightly different texture.
Vanilla Extract: A splash of vanilla lifts the overall flavor, adding a warm, aromatic note that balances the tartness of the cherries. A drop of almond extract can be an interesting alternative if you’re in the mood for a nutty undertone.
The Unexpected Star
Dried Cherries: The cherries are the game‑changer, offering a burst of natural sweetness and a chewy texture that contrasts with the crisp edges. Toast them lightly in a dry skillet for 2–3 minutes to bring out their flavor. If you prefer fresh cherries, slice them thinly and dehydrate them until they’re pliable but not mushy.
The Final Flourish
Pinch of Salt: Salt is the unsung hero that enhances sweetness and balances flavors. Without it, the cherries might taste overly sweet and the butter could feel flat. A pinch is enough; you don’t need to overdo it.
Optional Chocolate Chips: If you’re a chocolate lover, sprinkle a handful of dark chocolate chips into the mixture for a decadent twist. The chocolate will melt into the marshmallow base, creating pockets of rich flavor.
Everything’s prepped? Good. Let’s get into the real action.
The Method — Step by Step
- Prepare Your Pan: Line an 8-inch square pan with parchment paper, leaving an overhang on all sides for easy lifting later. The parchment keeps the treats from sticking and makes cleanup a breeze. This is the moment of truth—any mishap here will ruin the entire batch.
- Toast the Cherries: In a dry skillet over medium heat, toast the cherries for 2–3 minutes, stirring constantly. The cherries should become fragrant and slightly darker. This step releases their natural sugars, giving the treats a richer, caramelized flavor. If you’re short on time, you can skip to the next step, but the cherry flavor will be milder.
- Melting the Butter: In a medium saucepan, melt the butter over low heat until it’s just bubbling. Remove from heat immediately to avoid scorching. The butter should be golden, not brown. This will keep the mixture from becoming too oily.
- Combine Marshmallows and Butter: Pour the mini marshmallows into the melted butter. Stir continuously until the marshmallows are completely dissolved and the mixture is smooth. The mixture should have a glossy sheen and a pleasant, toasty aroma. Kitchen Hack: If the mixture starts to thicken, add a splash of warm water to loosen it. This keeps the texture silky.
- Stir in Vanilla: Add the vanilla extract and a pinch of salt to the marshmallow mixture. Stir until fully incorporated. The vanilla adds depth, while the salt sharpens the sweetness. Taste the mixture; it should feel buttery with a hint of vanilla.
- Fold in Rice Krispies: Gently fold the Rice Krispies into the marshmallow mixture using a spatula. The goal is to coat each cereal piece without crushing it. The mixture should look like a bright, sticky cloud. Watch Out: If you over‑mix, the Rice Krispies will break apart, resulting in a mushy texture.
- Incorporate Cherries: Fold the toasted cherries into the mixture, ensuring they’re evenly distributed. The cherries should be visible and not buried in the batter. This step adds that pop of flavor that makes each bite memorable.
- Press into Pan: Transfer the mixture into the prepared pan. Use a greased spatula or a piece of parchment paper to press it firmly and evenly. The surface should be smooth and slightly compact. This is where the final texture is set.
- Cool Completely: Allow the treats to cool at room temperature for at least 30 minutes. As they cool, the marshmallow base will set, creating that perfect snap. If you’re in a hurry, refrigerate for 15 minutes, but don’t over‑chill, or the treats will become too hard.
- Cut and Serve: Once fully set, lift the entire slab out of the pan using the parchment overhang. Cut into squares or bars with a sharp knife. Serve immediately or store in an airtight container for later enjoyment. That first bite is pure magic—chewy, buttery, and bursting with cherry.
That’s it— you did it. But hold on, I’ve got a few more tricks that’ll take this to another level.
Insider Tricks for Flawless Results
The Temperature Rule Nobody Follows
The secret to a perfectly set treat lies in the temperature of your butter and marshmallows. If you melt the butter too hot, it will separate from the marshmallows, causing a greasy texture. Aim for a gentle simmer and keep an eye on the mixture; it should reach about 180°F (82°C) before you stir. This low‑heat method preserves the airy marshmallow structure and ensures the final product is light and chewy.
Why Your Nose Knows Best
Before you even taste the mixture, give it a sniff. The aroma of toasted marshmallows and buttery caramel should dominate. If you notice a metallic or burnt scent, the butter has overheated. Trust your nose—if it smells off, stop the heat immediately and let the mixture cool slightly before proceeding.
The 5‑Minute Rest That Changes Everything
After you press the mixture into the pan, let it rest for exactly five minutes before cutting. This short pause allows the batter to set just enough to hold its shape but still be pliable. Cutting too early will result in sticky, crumbly pieces. A quick five‑minute rest is the difference between a mess and a masterpiece.
Use Parchment Overhang
The parchment overhang is your secret weapon for easy lift‑out. When you press the mixture into the pan, the parchment extends beyond the edges. Once the treats are set, simply grab the overhang and lift the entire slab out of the pan. This prevents the treats from sticking and saves you from a frantic rescue attempt.
Add a Splash of Water Before Reheating
If you’re reheating the treats, add a tiny splash of water to the pan before microwaving. The water steams and rehydrates the mixture, restoring that chewy center. Microwaving for 20–30 seconds at a time, stirring between intervals, will give you a freshly baked feel without overcooking.
The Cherry‑First Approach
Some people add cherries after the mixture has set, but this often leads to uneven distribution. By adding cherries before you fold in the Rice Krispies, you ensure they’re fully coated and integrated. The cherries’ natural sugars help bind the mixture, giving the treats a cohesive structure.
Creative Twists and Variations
This recipe is a playground. Here are some of my favorite ways to switch things up:
Cocoa‑Infused Delight
Swap half of the Rice Krispies with cocoa‑flavored cereal and add a tablespoon of cocoa powder. The result is a chocolatey, cherry‑filled treat that’s a hit with cocoa lovers. The chocolate pairs beautifully with the tartness of the cherries.
Nutty Crunch
Add a handful of chopped toasted almonds or pecans for an extra layer of crunch. The nuts bring a buttery flavor that complements the marshmallow base while adding a satisfying bite.
Minty Fresh
Stir in a few drops of peppermint extract just before folding in the Rice Krispies. The mint gives a refreshing contrast that’s especially nice during the summer months.
Spiced Variation
Add a pinch of cinnamon or nutmeg to the marshmallow mixture. The warm spices elevate the flavor profile, turning the treats into a cozy, autumnal snack.
Glittery Glam
Sprinkle edible glitter or a dusting of powdered sugar over the top before cutting. It’s a simple way to add sparkle and a touch of elegance for parties or celebrations.
Storing and Bringing It Back to Life
Fridge Storage
Store the treats in an airtight container at room temperature for up to a week. If you notice any dryness, add a slice of apple or a damp paper towel to the container to rehydrate them slightly. The airtight seal prevents moisture loss, keeping the treats fresh.
Freezer Friendly
For longer storage, wrap each square individually in plastic wrap and place them in a freezer bag. They’ll stay good for up to three months. Thaw at room temperature before serving; the treats will regain their chewy texture.
Best Reheating Method
Microwave the treats on high for 10–15 seconds, or until warm. If you’re reheating a batch, add a tiny splash of water to the pan and microwave in 20‑second bursts, stirring between intervals. This technique steams the treats back to their original chewy glory without drying them out.