I was in the middle of a frantic week, juggling conference calls, a broken dishwasher, and a sudden craving for something that would slap my taste buds awake. I tossed a few scallions into a hot pan, and the moment they hit the iron, they started to blacken like tiny fireworks. The kitchen filled with a sweet‑smoky perfume that made my neighbor’s cat stare at the window. I thought, “What if I could capture that exact moment and bottle it up in a dip?” That was the spark for this recipe.
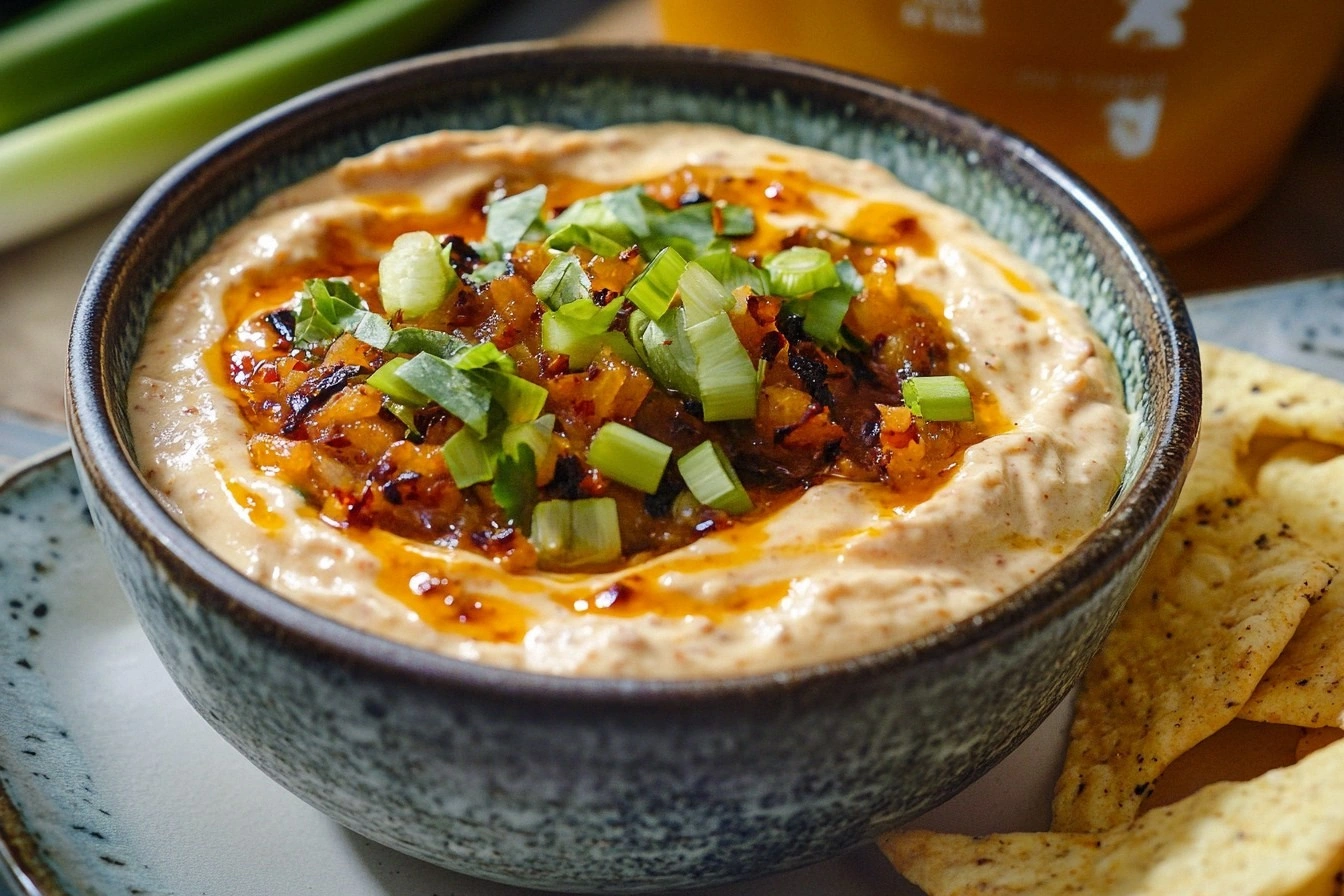
Picture this: a bowl of creamy mayo that shimmers like sunrise, speckled with charred scallion ribbons that crackle with a whisper of smoke, and a drizzle of chili crisp oil that clings like crunchy confetti. The first bite hits you with a buttery silk, then a punch of heat that makes your eyes widen, followed by a tangy zing from rice vinegar that brightens everything. The texture? Imagine biting into a cloud that’s been tossed with toasted peanuts – you get that satisfying crunch without the heaviness of a fried garnish.
Most recipes for chili crisp dips either drown the flavor in oil or forget the magic of charred scallions. I’ve tried a dozen versions that left me with a soggy mess or a bland aftertaste. This version, however, is hands down the best you’ll ever make at home because it balances three pillars: smoky depth, bright acidity, and a creamy base that never feels greasy. The secret? A quick char on the scallions that unlocks a caramelized sweetness you won’t find in any store‑bought version.
I’ll be honest — I ate half the batch before anyone else got to try it, and that’s a confession you’ll hear a lot from anyone who’s ever tasted something this good. I dare you to taste this and not go back for seconds; the flavor is addictive, the texture is unforgettable, and the aroma will have you bragging to anyone who walks through your door. Okay, ready for the game‑changer? Let me walk you through every single step — by the end, you’ll wonder how you ever made it any other way.
What Makes This Version Stand Out
- Smoky Depth: Charred scallions bring a caramel‑sweet, slightly bitter edge that mimics a wood‑fire grill, turning a simple dip into a flavor adventure.
- Crispy Crunch: Chili crisp oil adds toasted chili flakes and peanuts that give you that satisfying snap you crave in a dip.
- Creamy Balance: Mayonnaise acts as the perfect canvas, mellowing heat while letting every spice shine.
- Umami Boost: Soy sauce injects a salty, savory backbone that makes the dip taste richer than it actually is.
- Bright Finish: Rice vinegar cuts through the richness, delivering a clean, acidic lift that keeps the palate refreshed.
- Nutty Aroma: A whisper of sesame oil rounds everything off with a toasty, lingering fragrance.
- Speedy Assembly: You can have this ready in under 30 minutes, making it perfect for last‑minute gatherings.
- Make‑Ahead Magic: The flavors meld beautifully after a few hours, so you can prep it ahead and still impress.
Inside the Ingredient List
The Flavor Base
Scallions are the heart of this dip. Char them just until the tips turn a deep, almost ebony hue; this process triggers the Maillard reaction, releasing sugars that turn sweet and smoky. If you skip the char, you lose that signature depth and end up with a flat, green‑onion taste that feels out of place. For the best results, choose thick‑stalked scallions – they hold up better to high heat and provide more texture.
Mayonnaise is the creamy vehicle that carries every other flavor. I recommend using a full‑fat, egg‑based mayo because it emulsifies better and has a richer mouthfeel. Low‑fat versions will separate when mixed with the hot oil, leading to a watery dip. If you’re feeling adventurous, you can substitute half the mayo with Greek yogurt for a tangier twist, but expect a thinner consistency.
The Texture Crew
Chili crisp oil is the star of the show when it comes to crunch. It’s a mixture of fried chili flakes, peanuts, and aromatics suspended in oil. The oil adds heat, while the solid bits give you that delightful crunch that makes you want to keep digging. If you can’t find a pre‑made version, you can whip up your own by frying dried chilies, garlic, and crushed peanuts in neutral oil until fragrant, then straining and reserving the bits.
Garlic, freshly minced, adds a pungent kick that cuts through the richness. Its sulfur compounds awaken the palate, making the dip feel alive. Don’t over‑process it; a coarse mince preserves a bit of texture and prevents the garlic from turning bitter during the brief sauté.
The Unexpected Star
Soy sauce brings a deep, salty umami that anchors the dip. A light drizzle is enough; too much will overwhelm the delicate balance. Opt for a naturally brewed soy sauce rather than the chemically processed kind for a smoother finish. If you’re watching sodium, use a low‑sodium version, but remember to taste before adding extra salt.
Rice vinegar is the bright, acidic counterpart that lifts the entire composition. Its subtle sweetness prevents the dip from tasting sharp, and its low acidity compared to white vinegar makes it more harmonious with the mayo. A splash of rice vinegar also helps to thin the dip just enough for a drizzleable consistency.
The Final Flourish
Sesame oil is the whisper that rounds everything out. Only a teaspoon is needed because its aroma is potent; too much will dominate the profile. Toasted sesame oil, in particular, adds a nutty depth that complements the chili crisp’s peanuts. For those allergic to sesame, a drizzle of avocado oil can substitute without compromising the silky texture.
Everything's prepped? Good. Let's get into the real action…
The Method — Step by Step
Heat a large cast‑iron skillet over medium‑high heat until it starts to shimmer. Add a splash of neutral oil (just enough to coat the bottom). Toss the scallion stalks in, spreading them out so each piece contacts the pan. You’ll hear a lively sizzle that signals the start of flavor development. Keep the scallions moving; after about 2‑3 minutes they should develop charred tips that are dark brown but not burnt. That sizzle when it hits the pan? Absolute perfection.
Kitchen Hack: If you’re short on time, use a kitchen torch to char the scallions after they’re sliced; it’s faster and gives a uniform blackened edge.While the scallions are charing, mince the garlic finely. Transfer the garlic to a small bowl, then add the soy sauce and rice vinegar. Stir until the mixture looks glossy. This is your “flavor splash” that will later mingle with the mayo. Let it sit for a minute; the acid will start to mellow the raw bite of the garlic.
In a separate medium bowl, combine the mayonnaise with the sesame oil. Whisk vigorously until the oil is fully incorporated and the mixture takes on a slightly lighter hue. The sesame oil should be barely perceptible in color but will soon perfume the entire dip.
Now, drizzle the chili crisp oil into the mayo‑sesame blend. Use a spatula to fold it in, preserving the crunchy bits. The oil should coat the mayo like a glossy veil, while the chili flakes and peanuts remain suspended, ready to bite into. I dare you to taste this and not go back for seconds.
Add the charred scallions to the bowl. Toss gently, ensuring each piece is coated with the creamy‑spicy mixture. The char will soften slightly from the mayo’s heat, but you’ll still feel a firm, smoky bite.
Watch Out: Do not over‑mix once the scallions are added, or they’ll lose their charred texture and become mushy.Pour the garlic‑soy‑vinegar mixture over the combined ingredients. This is the moment of truth: the acidity should instantly brighten the dip, making the colors pop and the aromas rise. Stir just enough to distribute the liquid evenly; you want pockets of tang throughout, not a uniform slurry.
Taste the dip and adjust seasoning. If you crave more salt, add a pinch of soy sauce; if you want extra heat, drizzle a little more chili crisp oil. Remember, the dip will mellow a bit as it rests, so aim for a slightly bolder profile now.
Transfer the dip to a serving bowl, then drizzle a final swirl of chili crisp oil on top for visual drama. Sprinkle a few extra scallion ribbons and a sprinkle of toasted sesame seeds if you have them on hand. This final garnish adds a pop of color and an extra crunch that makes the dip look restaurant‑ready.
Cover the bowl with plastic wrap and let it sit at room temperature for 15‑20 minutes before serving. This short rest allows the flavors to meld, and the charred scallions will absorb a whisper of the mayo, creating a cohesive bite. Serve with steamed bao buns, crispy wonton chips, or even raw veggie sticks. Picture yourself pulling this out of the bowl, the whole kitchen smelling incredible…
That's it — you did it. But hold on, I've got a few more tricks that'll take this to another level…
Insider Tricks for Flawless Results
The Temperature Rule Nobody Follows
Keep your skillet hot enough that the scallions sizzle immediately, but not so hot that they burn in seconds. Medium‑high is the sweet spot; you’ll hear a steady pop, not a frantic crackle. If the pan cools down, the scallions will steam instead of char, losing that smoky edge. I once let the pan cool for a minute and ended up with bland, limp greens – a lesson learned the hard way.
Why Your Nose Knows Best
Your sense of smell is a reliable guide for doneness. When the scallions turn dark, you should also detect a sweet, almost caramel aroma. If the scent stays green and vegetal, the char isn’t deep enough. Trust that nose; it’s more accurate than a timer. A friend once relied on a timer alone and ended up with burnt tips that tasted bitter.
The 5‑Minute Rest That Changes Everything
Allowing the dip to rest for just 5‑10 minutes after mixing lets the mayo absorb the acidity and the oil distribute evenly. This short pause transforms a disjointed mixture into a cohesive sauce where every bite feels balanced. Skipping this step leaves you with a dip that feels “layered” rather than integrated.
The Crunch Preservation Technique
If you need to store the dip for more than a day, keep the crunchy chili crisp bits separate until you’re ready to serve. Mix them in just before plating to retain that satisfying snap. I once stored the whole thing together and the crunch turned soggy – a disappointing texture that ruined the experience.
The Secret Salt Balance
Soy sauce brings salt, but the mayo already contains a modest amount of sodium. Taste before adding extra salt; over‑salting masks the subtle acidity and smoky notes. If you’re on a low‑sodium diet, use a light soy sauce and finish with a pinch of flaky sea salt right before serving for a controlled crunch.
Creative Twists and Variations
This recipe is a playground. Here are some of my favorite ways to switch things up:
Szechuan Pepper Punch
Add a teaspoon of toasted Szechuan peppercorn powder to the mayo base. The numbing spice adds a tongue‑tingling dimension that pairs beautifully with the smoky scallions. Ideal for guests who love a multi‑layered heat.
Coconut Lime Fusion
Swap half the mayo for coconut cream and replace rice vinegar with fresh lime juice. This gives the dip a tropical tang and a subtle sweetness, perfect for summer barbecues or pairing with grilled shrimp.
Umami Mushroom Boost
Finely dice shiitake mushrooms, sauté them until they’re caramelized, and fold them in with the scallions. The earthy mushroom notes deepen the umami profile, making the dip a robust accompaniment to grilled meats.
Garlic‑Infused Chili Oil
Before adding the chili crisp oil, gently warm it with an extra clove of smashed garlic for 30 seconds. This infuses the oil with a mellow garlic aroma that rounds out the heat without overpowering the scallions.
Herbaceous Green Twist
Stir in a tablespoon of finely chopped cilantro and a dash of fresh mint. The herbaceous freshness lifts the dip, making it a perfect match for spring rolls or fresh spring salads.
Storing and Bringing It Back to Life
Fridge Storage
Transfer the dip to an airtight glass jar and refrigerate. It will keep for up to 5 days. Before each use, give it a quick stir and add a splash of rice vinegar if the flavor has dulled. The chill helps the mayo firm up, preserving that creamy texture.
Freezer Friendly
For longer storage, portion the dip into freezer‑safe containers, leaving a little headspace for expansion. Freeze for up to 2 months. Thaw overnight in the fridge, then whisk in a teaspoon of fresh chili crisp oil to revive the crunch.
Best Reheating Method
When you need the dip warm (for example, as a sauce for noodles), place it in a microwave‑safe bowl, add a teaspoon of water, and heat in 15‑second bursts, stirring in between. The water creates steam that restores the dip’s silkiness without separating the oil.