Picture this: it’s a Saturday evening, the kitchen lights are low, and the air is thick with the scent of chocolate and fresh cream. I’m standing in front of a bag of Oreos, half‑filled with the idea that I could turn a simple snack into a showstopper. I’m not joking—after a week of burnt pancakes and over‑seasoned sauces, my culinary confidence was at its lowest. The moment I cracked open that bag and smelled the buttery crunch, I knew I was about to rewrite the rules of dessert.
I dare you to taste this and not go back for seconds. The first bite is a marriage of crunchy cookie crumbs, silky cream cheese, and glossy chocolate that melts instantly, releasing a burst of sweet‑salty harmony that feels like a secret handshake between flavors. The texture is a delightful paradox: the cookie’s bite gives way to the cream’s smoothness, while the chocolate’s glossy finish offers a silky, almost velvety aftertaste that lingers on the tongue. That sizzle when the chocolate hits the heat? Absolute perfection. It’s a flavor journey that starts with a bite and ends with a sigh.
Most recipes get this completely wrong. They either over‑chill the mixture, under‑melt the chocolate, or forget that the cream cheese should be at room temperature to blend seamlessly with the cookie crumbs. The result is a clumpy mess or a rubbery texture that feels like a failed experiment. I’ve spent countless hours perfecting the balance of moisture and crunch, and this version is hands down the best you’ll ever make at home. The secret? A meticulous blend of ingredients and a few small, but critical, tweaks that elevate the entire experience.
If you’ve ever struggled with truffles that are too dry or too runny, you’re not alone—and I’ve got the fix. I’ll walk you through every single step, from the initial crunch to the final sprinkle, so by the end you’ll wonder how you ever made it any other way. The next part? Pure magic.
What Makes This Version Stand Out
- Texture: The cookie crumbs are crushed fine enough to be almost invisible, yet still provide a satisfying crunch that breaks in the mouth like thin ice. The result is a smooth, creamy bite that feels indulgent without being heavy.
- Balance: Sweet meets salty in a dance that’s perfectly calibrated; the cream cheese adds a subtle tang that cuts through the chocolate’s richness, creating a layered flavor profile that keeps you coming back for more.
- Convenience: No baking, no oven—just a few minutes of melting and mixing. This recipe is ideal for those last‑minute dinner parties or a quick sweet treat after a long day.
- Make‑ahead: You can prepare the truffles up to 24 hours in advance; just wrap them in plastic and chill. The flavors only deepen, and the chocolate hardens into a glossy finish that’s perfect for gifting.
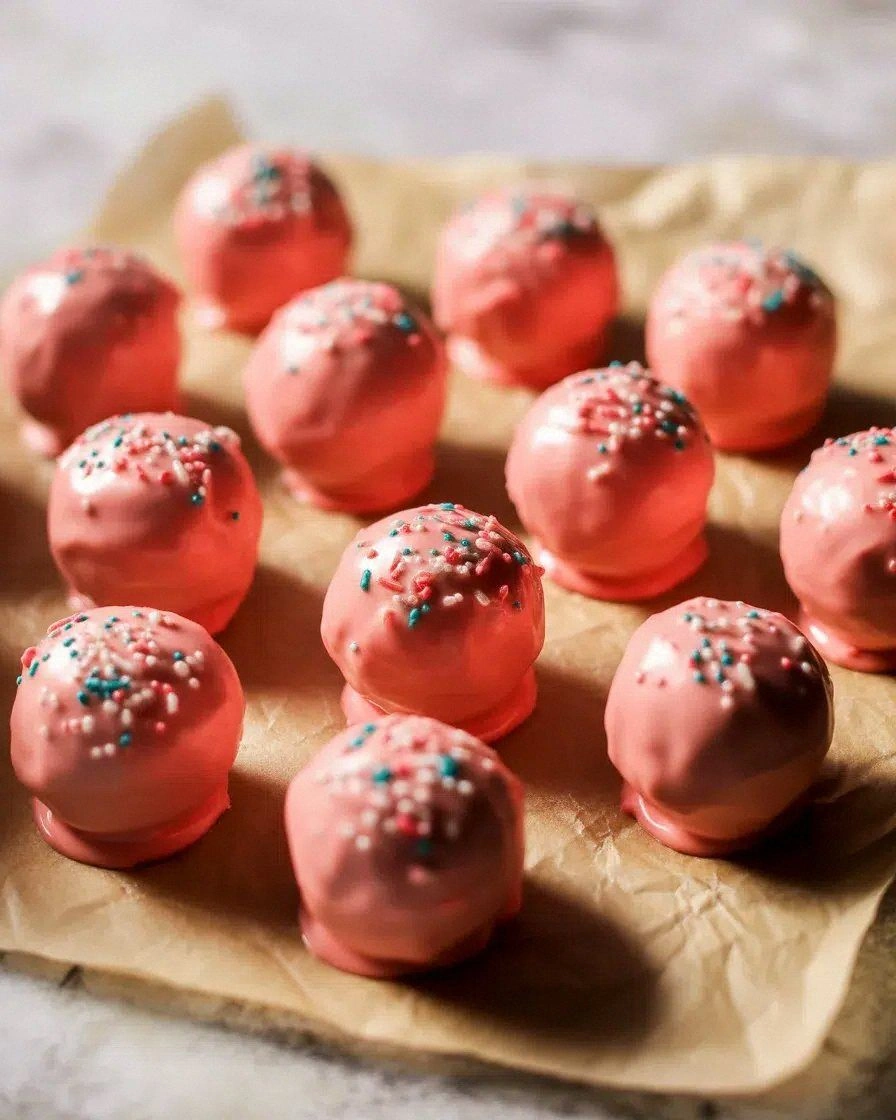
- Visual Appeal: The bright, colorful sprinkles or crushed candy hearts add a festive pop that makes each truffle look like a tiny piece of art. The glossy chocolate coating catches the light, giving them a premium look.
- Ingredient Quality: Using a high‑quality chocolate (white or milk) and freshly softened cream cheese ensures the truffles taste luxurious rather than generic. The Oreos provide authentic cookie flavor that no other brand can replicate.
Alright, let’s break down exactly what goes into this masterpiece…
Inside the Ingredient List
The Flavor Base
The 36 regular Oreo cookies are the backbone of this dessert. They provide the sweet, chocolatey crunch that is instantly recognizable and deeply comforting. If you skip them, the truffles lose their signature texture and become a mushy mess. For a different twist, try using chocolate sandwich cookies from a different brand; the flavor will shift slightly but remain delicious.
The Texture Crew
The 8 ounces of softened cream cheese are essential for achieving that silky interior. Cream cheese brings a slight tang that balances the sweetness of the Oreos and chocolate. If you’re vegan, a high‑fat coconut cream can mimic the same creamy texture. Keep the cream cheese at room temperature; if it’s too cold, it won’t blend properly with the crumbs.
The Unexpected Star
The 12 ounces of melting chocolate—white or milk—acts as the glossy, sweet coating that seals the truffles. The choice between white and milk chocolate changes the flavor profile dramatically; white chocolate offers a buttery sweetness, while milk chocolate gives a richer, deeper chocolate taste. If you’re looking for a more intense flavor, use a high‑cocoa dark chocolate, but be careful not to overpower the other ingredients.
The Final Flourish
Sprinkles or crushed candy hearts add a pop of color and a playful crunch that makes each truffle feel like a piece of candy art. They’re optional, but they elevate the dessert from simple to celebratory. If you’re hosting a Valentine’s Day dinner, a heart‑shaped sprinkles set is a must. For a more subtle look, opt for rainbow sugar crystals that melt into the chocolate.
Everything’s prepped? Good. Let’s get into the real action…
The Method — Step by Step
- Begin by placing the Oreo cookies in a sturdy plastic bag. Seal the bag tightly and use a rolling pin to crush them into fine crumbs, ensuring no large pieces remain. This step is crucial for a smooth texture; if you leave chunks, the truffles will feel uneven. While crushing, let the aroma of chocolate fill the kitchen, creating anticipation.
- Transfer the crushed Oreos into a medium mixing bowl. Add the softened cream cheese and mash together until the mixture is uniform and the crumbs are fully coated. The cream cheese should be at room temperature; if it’s too cold, the mixture will be lumpy. This blending process should feel like a velvety mousse forming in your hands.
- Place a microwave‑safe bowl in the refrigerator for about 5 minutes. While the mixture chills, melt the chocolate in a double boiler or microwave in 20‑second intervals, stirring each time until smooth. The chocolate should be glossy and pourable, not too runny or too thick. If using a microwave, watch it closely to avoid scorching.
- Once the chocolate is melted, pour it over the Oreo‑cream mixture. Gently fold the mixture together, ensuring the chocolate coats every crumb. The mixture should have a glossy sheen and a slightly sticky consistency. This is the moment of truth—if you can’t see the chocolate clinging to each crumb, it’s not ready.
- Roll the mixture into 1‑inch balls using a melon baller or spoon. Place them on a parchment‑lined tray, spacing them about an inch apart. The size can be adjusted to your preference—smaller truffles are perfect for bite‑size desserts, while larger ones make for a more substantial treat.
- Coat each truffle in sprinkles or crushed candy hearts. Gently press the decorations into the chocolate coating so they stick firmly. If you’re using crushed hearts, toss them in a small bowl of warm water for 10 seconds to make them slightly tacky, which helps them adhere.
- Place the tray in the refrigerator for at least 30 minutes, or until the chocolate hardens completely. The truffles should feel firm to the touch, with a glossy finish that gleams like polished gems. This chilling step is essential for the perfect snap when biting into them.
- Serve immediately or store in an airtight container at room temperature for up to 3 days. If you prefer a chilled treat, keep them in the fridge; they’ll stay firm and delicious. When ready to serve, let them sit at room temperature for 5 minutes to soften slightly before eating.
That’s it — you did it. But hold on, I’ve got a few more tricks that will take this to another level.
Insider Tricks for Flawless Results
The Temperature Rule Nobody Follows
The chocolate must be melted to a precise temperature range—between 86°F and 90°F for milk chocolate, and 80°F to 86°F for white chocolate. If it’s too hot, the chocolate will seize and become grainy; too cool, and it won’t set properly. Use a kitchen thermometer to keep the chocolate in the sweet spot, and always stir gently to maintain a uniform temperature.
Why Your Nose Knows Best
The aroma of the freshly melted chocolate is a reliable indicator of readiness. A faint, sweet scent that lingers in the air tells you the chocolate has reached the right viscosity. If you notice a metallic or burnt smell, stop the heating immediately and discard the batch—better to start over than to ruin the entire dessert.
The 5‑Minute Rest That Changes Everything
After mixing the chocolate with the Oreo mixture, let the mixture rest for 5 minutes before rolling the truffles. This short pause allows the chocolate to set slightly, making it easier to shape the truffles without them sticking to your hands. I once tried skipping this step and ended up with a sticky mess that didn’t hold its shape.
Use a Silicone Mat for Easy Release
Instead of parchment paper, lay a silicone baking mat on your tray. The truffles will slide off effortlessly, preventing them from breaking or sticking. This small change saves time and reduces cleanup, especially when you’re making a large batch.
The Perfect Chill
Refrigerate the truffles for at least 30 minutes, but don’t over‑chill them. If they sit in the fridge for too long, the chocolate can become too hard, making them difficult to bite. For a softer bite, let them sit at room temperature for a few minutes before serving.
Add a Splash of Water Before Reheating
If you need to reheat the truffles for a party, add a tiny splash of water to the chocolate before melting it again. The water creates steam that brings the chocolate back to a silky, glossy finish. This trick ensures your truffles stay moist and not brittle after reheating.
Creative Twists and Variations
This recipe is a playground. Here are some of my favorite ways to switch things up:
Chocolate‑Covered Peanut Butter
Swap the cream cheese for peanut butter and add a pinch of sea salt. The nutty flavor pairs beautifully with the chocolate coating, creating a rich, indulgent treat that feels like a chocolate peanut butter cup.
Minty Freshness
Add a few drops of peppermint extract to the melted chocolate. The mint undertone gives a refreshing bite that’s especially delightful in the summer months, turning the truffles into a cool, sweet snack.
Spiced Caramel Twist
Incorporate a teaspoon of caramel sauce into the chocolate mixture. The caramel’s buttery sweetness adds depth, while a pinch of cinnamon or nutmeg introduces a warm, aromatic note.
Sea Salt & Caramel
After coating the truffles, sprinkle a light dusting of flaky sea salt on top. The salty crystals contrast with the sweet chocolate, creating a complex flavor profile that’s both simple and sophisticated.
Vegan Variation
Use dairy‑free chocolate and a coconut‑based cream cheese alternative. The result is a creamy, coconut‑flavored truffle that still delivers the iconic Oreo crunch and chocolate finish.
Storing and Bringing It Back to Life
Fridge Storage
Place the truffles in an airtight container and store them in the refrigerator for up to 5 days. The cold environment keeps the chocolate firm and the flavors well‑sealed. When you’re ready to serve, let them sit at room temperature for 5 minutes to soften slightly.
Freezer Friendly
Wrap each truffle individually in plastic wrap and place them in a freezer bag. They can be stored for up to 3 months. When you’re ready to enjoy, thaw them at room temperature for 10 minutes, then chill again briefly to restore the glossy finish.
Best Reheating Method
If you need to warm the truffles for a special occasion, gently melt the chocolate in a double boiler, then re‑coat the truffles. Add a splash of water to the melted chocolate to maintain moisture. Re‑chill for 15 minutes to set the coating before serving.