I was standing in my kitchen, half‑heartedly scrolling through endless snack ideas when a sudden dare from my roommate hit me like a splash of cold water: “Make me something that’ll make my coworkers forget they have a meeting tomorrow.” I laughed, grabbed a box of Ritz crackers, and thought, why not turn these buttery little clouds into a party‑ready masterpiece? The result? A sandwich that crunches, melts, and sings all at once. I swear I heard the crackers whisper, “We’re about to become legends.”
Picture this: the buttery aroma of freshly toasted Ritz crackers drifting through the air, mingling with the tang of lemon juice and the earthy whisper of fresh herbs. You hear the faint crackle as the crackers hit the oven, the soft thud of a spoon stirring mayo, and the occasional giggle of a friend daring you to take the first bite. The texture? A buttery crunch that shatters like thin ice, followed by a creamy, velvety filling that coats the palate like silk. The taste? A perfect balance of salty, savory, and just a hint of citrus that makes your tongue do a little happy dance.
Most recipes for “cracker sandwiches” end up soggy or bland, because they either drown the crackers in a watery mix or skip the crucial step of crisping them up. This version stands out because I treat the cracker like a delicate canvas, not a soggy sponge. I toast them just enough to lock in that buttery flavor, then sandwich a luscious chicken‑mayonnaise blend that’s seasoned with fresh herbs and a splash of lemon. The result is a bite that feels like a celebration in your mouth, and I dare you to taste this and not go back for seconds.
But there’s a twist you won’t see coming: I fold a pinch of shredded cheese into the filling, letting it melt ever so slightly when the warm crackers meet the creamy mixture. This creates a subtle, buttery‑cheese thread that pulls the whole thing together. Okay, ready for the game‑changer? Stay with me here — the secret is in the timing, the temperature, and the tiny dash of fresh herbs that elevate the whole dish from “snack” to “showstopper.” Let me walk you through every single step — by the end, you’ll wonder how you ever made it any other way.
What Makes This Version Stand Out
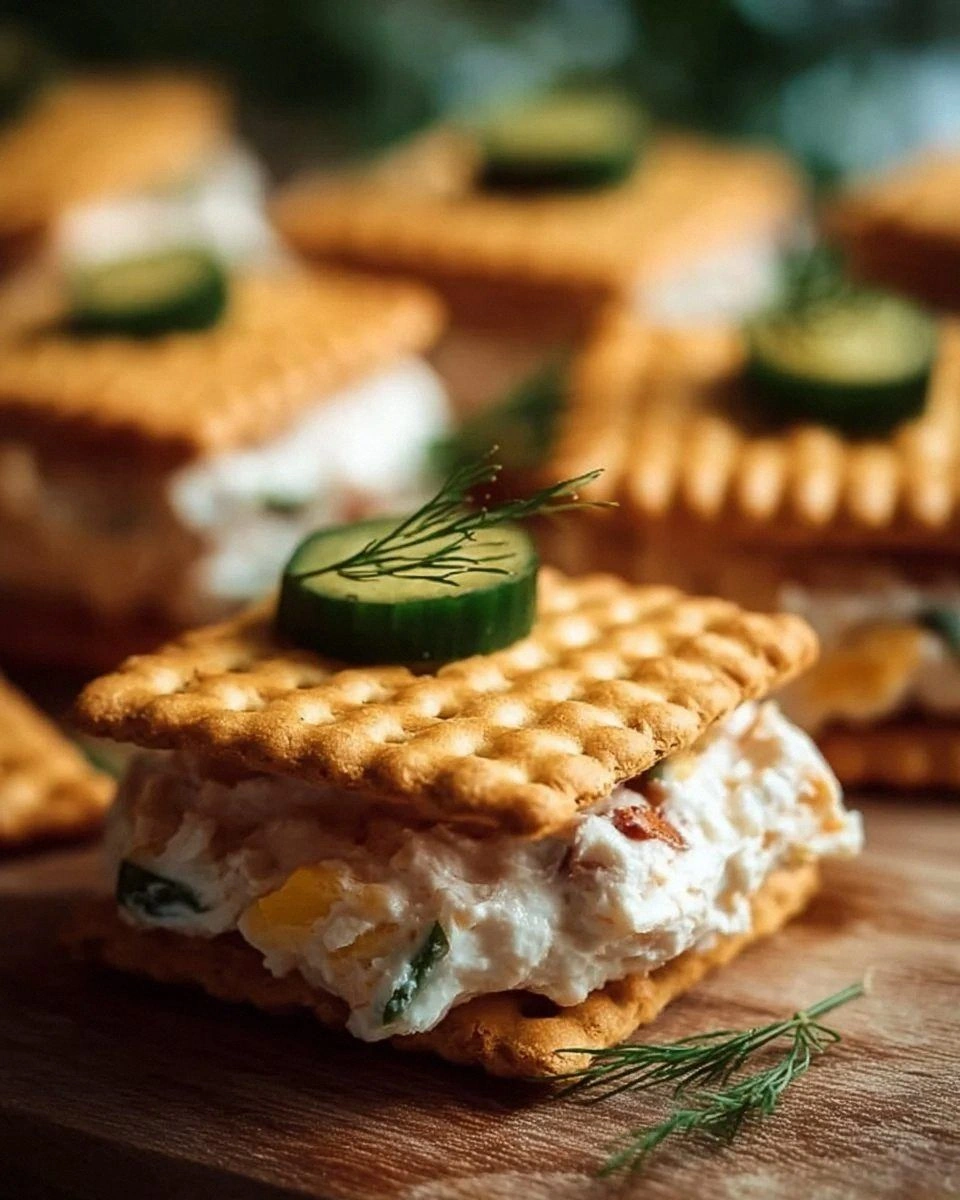
- Crunch Factor: Toasted Ritz crackers stay crisp even after the filling is added, because the mayo base is thick enough to act as a barrier, not a soggy soak.
- Creamy Balance: The mayo‑chicken blend is seasoned with lemon juice and fresh herbs, giving it a bright, herbaceous lift that never feels heavy.
- Cheese Whisper: A half‑cup of shredded cheddar melts just enough to add a buttery silkiness without overwhelming the delicate cracker.
- Simplicity Meets Sophistication: Only eight core ingredients, all pantry‑friendly, yet the flavor profile feels like it belongs on a fancy cocktail party.
- Crowd Reaction: People who try these immediately start bragging, “I’ve never seen a cracker sandwich this good!”—the perfect ice‑breaker.
- Make‑Ahead Magic: Assemble the filling a day ahead; the flavors meld, and you can toast the crackers right before serving for ultimate freshness.
- Ingredient Quality: Using real butter‑rich Ritz crackers and fresh herbs makes the difference between “okay” and “wow!”
- Versatile Base: Swap chicken for chickpeas for a vegetarian version that still delivers that creamy, satisfying bite.
Inside the Ingredient List
The Flavor Base
The mayonnaise is the glue that holds everything together. It provides a luxurious mouthfeel that coats each bite like velvet, while also mellowing the sharpness of the lemon juice. If you skip the mayo, you’ll end up with a dry, crumbly sandwich that feels more like a snack gone wrong than a party triumph. For a lighter version, try Greek yogurt, but expect a tangier, less buttery finish.
Fun Fact: Did you know that the original Ritz cracker recipe was created in 1934 to give people a “light, buttery, melt‑in‑your‑mouth” experience during the Great Depression? The same buttery philosophy lives on in our sandwich, only now we pair it with a creamy filling for an elevated bite.
The Protein Powerhouse
Diced cooked chicken (or chickpeas for a veggie twist) supplies the hearty bite that makes these sandwiches feel substantial. The chicken’s mild flavor absorbs the lemon‑herb mayo, turning each morsel into a mini‑burst of savory goodness. If you use chickpeas, mash them lightly to keep a pleasant texture while still offering a protein punch. Skipping this element would leave you with a sandwich that feels more like a cracker topped with dip—delicious, but not as satisfying.
The Texture Crew
Diced celery adds that essential crunch that contrasts the buttery cracker and creamy filling. Its crispness is like a tiny surprise that keeps the palate from getting bored. If you’re not a celery fan, finely diced cucumber works, but remember cucumber releases water, so pat it dry first. Without celery, the sandwich loses its layered texture and becomes a one‑dimensional bite.
Shredded cheese (cheddar is my go‑to) introduces a subtle melt that binds the mayo and chicken together. The cheese’s richness rounds out the lemon’s acidity, creating a harmonious balance. Feel free to experiment with pepper jack for a spicy kick or mozzarella for a milder profile. Omit the cheese, and you’ll miss that buttery, slightly stretchy finish that makes each bite unforgettable.
The Final Flourish
Lemon juice is the bright spark that cuts through the richness of mayo and cheese, preventing the sandwich from feeling cloying. Just a tablespoon is enough to awaken the other flavors without turning the mixture sour. If you’re out of lemon, a splash of white wine vinegar works, but the citrus note will be less pronounced.
Fresh herbs like dill or parsley add a fragrant, garden‑fresh finish. They’re the secret handshake that tells your guests “I put thought into this.” If you’re feeling adventurous, try tarragon for a slightly anise‑like twist. Skipping herbs leaves the sandwich flat and missing that aromatic lift.
Salt and pepper to taste are the final seasoning layer. They enhance every other ingredient, making the flavors pop. Remember, a pinch of pepper adds a gentle heat that pairs beautifully with the cheese.
Ritz crackers (two sleeves) are the foundation. Their buttery, slightly salty profile is the perfect canvas for the creamy filling. Choose the original flavor for classic results, or go bold with garlic‑and‑herb Ritz for an extra punch. If you over‑toast them, you’ll end up with a burnt taste; under‑toast, and they’ll get soggy too quickly.
Everything's prepped? Good. Let's get into the real action…
The Method — Step by Step
- Preheat and Prepare: Set your oven to 350°F (175°C). While it warms up, line a large baking sheet with parchment paper. This is the moment of truth—if the oven’s not hot enough, the crackers won’t achieve that perfect golden crunch. I always like to give the oven a minute extra to really hit the temperature, because patience here pays off in texture.
- Toast the Ritz: Spread the two sleeves of Ritz crackers in a single layer on the sheet. Slide them into the oven for 5‑7 minutes, or until the edges turn a light amber and you can smell that buttery perfume. Let them cool completely on a wire rack; this prevents steam from making them soggy later.Kitchen Hack: Flip the crackers halfway through the toasting time for an even, all‑around crunch.
- Mix the Creamy Base: In a large bowl, combine 1 cup mayonnaise, 1 cup diced cooked chicken (or chickpeas), ½ cup diced celery, and ½ cup shredded cheese. Stir until everything is evenly coated. The mixture should look glossy, not dry—if it feels too thick, add a splash of lemon juice; if too loose, a spoonful more mayo does the trick.
- Brighten with Lemon and Herbs: Add 1 tablespoon lemon juice, a generous pinch of salt and pepper, and a handful of chopped fresh herbs. Mix again, tasting as you go. This step is where the flavors truly marry, and the aroma should make your kitchen feel like a high‑end bistro.Watch Out: Over‑mixing can cause the cheese to clump together, turning the filling grainy. Stir gently until just combined.
- Assemble the Sandwiches: Take a toasted Ritz cracker, spoon a generous dollop of the filling onto the flat side, then top with another cracker, pressing lightly. The filling should be thick enough to stay put but not so much that it spills over the edges. This is the part where you get to be a sandwich architect—make each layer uniform for that picture‑perfect look.
- Optional Warm‑Up: If you love a slightly melty cheese experience, place the assembled sandwiches on a baking sheet and pop them back into the oven for 2‑3 minutes, just until the cheese softens. Watch the cheese melt like sunrise over a calm sea—pure magic.
- Plate and Garnish: Transfer the sandwiches to a serving platter. Sprinkle a few extra fresh herbs on top for color and a burst of fragrance. If you want a pop of color, a few thin lemon zest ribbons add a classy finish. This is the moment to step back and admire your handiwork—your guests will be impressed before they even take a bite.
- Serve Immediately: Serve while the crackers are still crisp and the filling is cool and creamy. The contrast of temperatures makes each bite exciting. If you need to hold them for a short while, keep the assembled sandwiches in a single layer under a paper towel to absorb any stray moisture.
That's it — you did it. But hold on, I've got a few more tricks that'll take this to another level. Trust me, these insider tips will make your next batch even more unforgettable, and your friends will start asking for the secret recipe (which you can keep to yourself, of course).
Insider Tricks for Flawless Results
The Temperature Rule Nobody Follows
Never underestimate the power of a perfectly preheated oven. A hot oven creates a quick, even browning that locks in flavor without drying out the crackers. I once tried a “low‑and‑slow” method at 300°F and ended up with limp crackers that felt like soggy toast. The rule of thumb: 350°F for 5‑7 minutes, then a quick 2‑minute finish if you want that cheese melt. This tiny temperature tweak can be the difference between “good” and “legendary.”
Why Your Nose Knows Best
Your sense of smell is a secret weapon in the kitchen. When the crackers start to emit a nutty, buttery aroma, that’s the cue they’re ready. If you rely solely on the timer, you might miss the perfect golden moment. Trust that nose—when the scent hits a sweet spot, pull them out. It’s a sensory shortcut that even seasoned chefs swear by.
The 5‑Minute Rest That Changes Everything
After mixing the filling, let it sit for five minutes. This brief rest allows the lemon juice to brighten the mayo and the herbs to release their essential oils. I once rushed this step and got a filling that tasted flat. The rest period is like a mini‑marinade, turning a good filling into a flavor‑exploding one.
The “One‑Hand” Assembly Trick
Use your dominant hand to hold the bottom cracker steady while the other hand dollops the filling. This prevents the cracker from sliding and keeps the layers even. I once tried a two‑handed approach and ended up with a mess of crumbs. The one‑hand method also speeds up the process, so you can assemble more sandwiches in less time—perfect for a party crowd.
Avoid the Soggy Slip‑Up
If you’re planning to make these ahead of time, keep the crackers and filling separate until the last minute. Store the filling in an airtight container and the crackers in a paper bag to retain crispness. A friend once pre‑assembled the sandwiches and left them out for an hour; they turned into a soggy pancake. Follow this tip, and your sandwiches will stay crunchy for hours.
Creative Twists and Variations
This recipe is a playground. Here are some of my favorite ways to switch things up:
Spicy Sriracha Kick
Add a tablespoon of sriracha to the mayo mixture and swap cheddar for pepper jack. The heat pairs beautifully with the buttery cracker, creating a sweet‑heat balance that makes taste buds tingle. Perfect for anyone who loves a little fire.
Mediterranean Olive Delight
Stir in chopped kalamata olives and a pinch of oregano, then replace the cheddar with feta. The salty olive brine and tangy feta add a Mediterranean flair that transports you to a sunny terrace in Greece.
Apple‑Curry Fusion
Dice a small Granny Smith apple and mix it into the filling with a dash of curry powder. The crisp apple adds sweetness, while the curry brings warmth—an unexpected duo that works like a charm.
Vegan Chickpea Magic
Swap the chicken for chickpeas, use vegan mayo, and choose a plant‑based cheese. The texture remains satisfying, and the herb‑lemon profile stays bright. This version proves you don’t need animal products to achieve that luxurious bite.
Smoked Salmon Luxe
Replace chicken with smoked salmon, add a dollop of dill‑infused cream cheese, and garnish with capers. The smoky, salty salmon elevates the sandwich to brunch‑worthy status, perfect for a lazy Sunday gathering.
Storing and Bringing It Back to Life
Fridge Storage
Store the filling in an airtight container for up to three days. Keep the toasted crackers in a separate zip‑top bag or a paper bag to maintain crunch. When you’re ready to serve, simply assemble fresh sandwiches—this ensures each bite stays crisp.
Freezer Friendly
The filling freezes beautifully. Portion it into freezer‑safe bags, label with the date, and freeze for up to two months. Thaw in the refrigerator overnight, give it a quick stir, and you’re ready to assemble. The crackers don’t freeze well, so keep them fresh and toast them just before serving.
Best Reheating Method
If you’ve pre‑assembled and need to reheat, place the sandwiches on a baking sheet, add a tiny splash of water (about a teaspoon) to the edge of each cracker, and warm in a 300°F oven for 5‑7 minutes. The steam revives the cracker’s crunch while gently melting the cheese—no soggy disasters here.