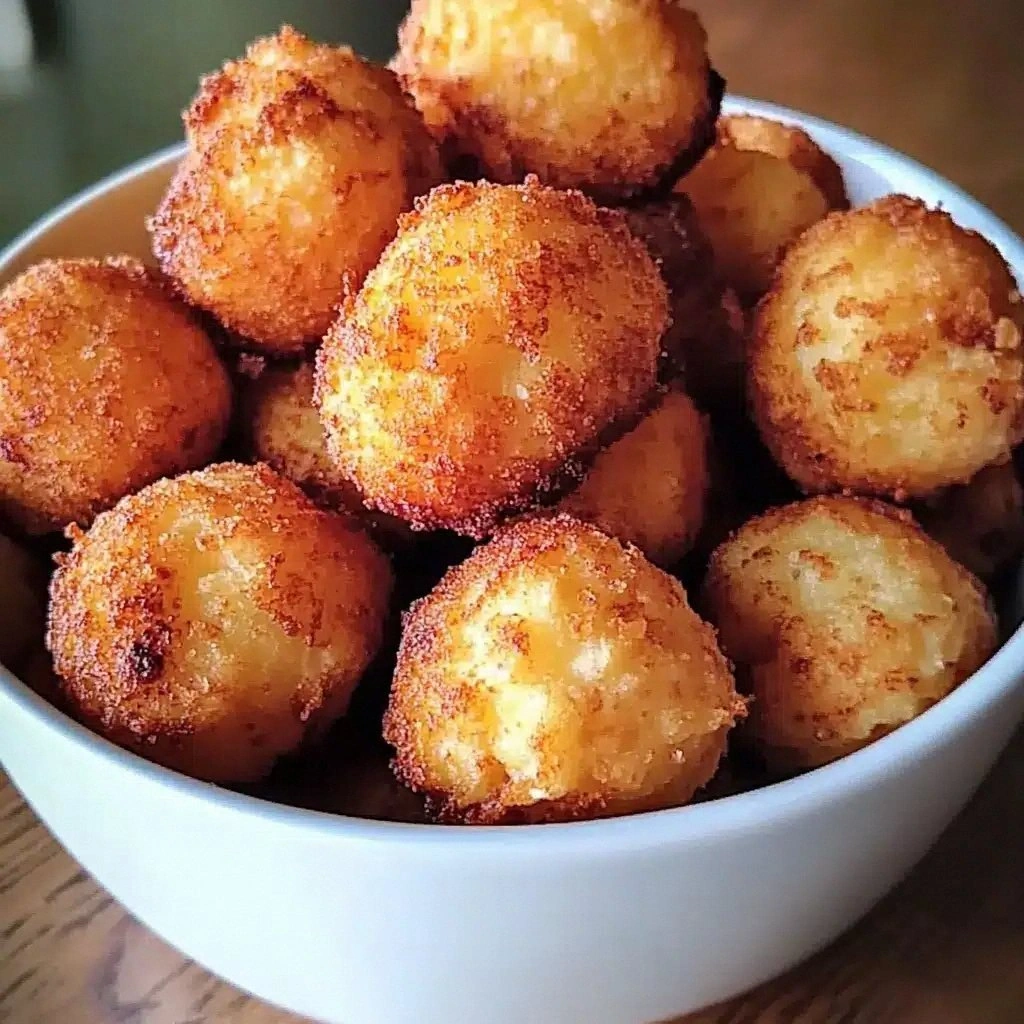
I still remember the night I was supposed to impress my friends with a batch of hushpuppies, and the kitchen turned into a disaster zone. The gluten‑free flour I grabbed from the back of the pantry turned out to be a dry, unyielding powder that clumped like a stubborn mountain, and the batter thickened into a dough that wouldn’t pour. My friend, a seasoned chef, laughed and said, “You’re going to need a miracle.” That was the moment I vowed to create the ultimate gluten‑free hushpuppie that would win every taste test and never flop again.
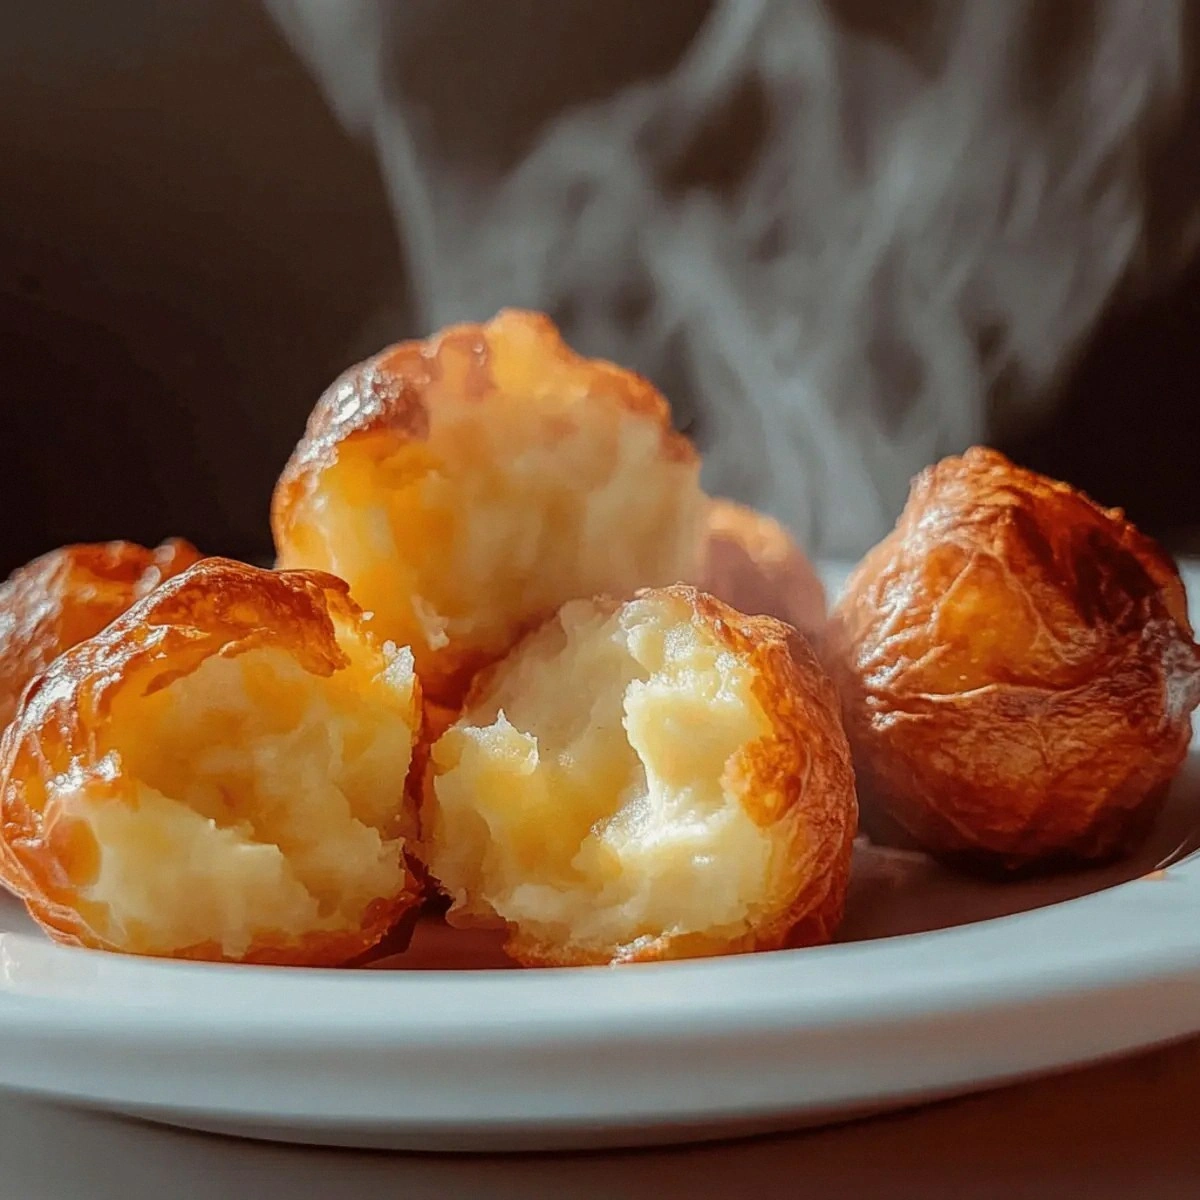
Picture this: a golden, crisp shell that cracks like a brittle shell when you bite, revealing a fluffy, savory center that melts in your mouth. The aroma of sautéed onions and corn mingles with the smoky scent of frying oil, creating an instant invitation for everyone in the house. The sound of the batter hitting the hot pan is a satisfying sizzle that signals the start of a culinary adventure. The first bite delivers a burst of umami, a hint of pepper, and a gentle crunch that feels like a tiny celebration. The texture is a harmonious contrast between the crunchy exterior and the moist interior, a dance of crispness and tenderness.
What sets this version apart is that it’s not just a gluten‑free alternative—it’s a gluten‑free masterpiece. I’ve cracked the code to a batter that stays light and airy, thanks to a precise balance of leavening agents and moisture. The flavor is amplified by fresh herbs and a splash of cheese that melts into the batter, creating a subtle depth that ordinary hushpuppies lack. The recipe is simple enough for beginners, yet sophisticated enough to impress seasoned cooks. It’s a recipe that invites experimentation, allowing you to tweak spices and add your favorite veggies without compromising the core structure.
I dare you to taste this and not go back for seconds. The first bite will leave you wondering how you ever made hushpuppies any other way. Most recipes get this completely wrong, focusing on the wrong flour blend or over‑baking the batter. Here’s what actually works: a combination of gluten‑free all‑purpose flour, a touch of baking powder, and a dash of salt that brings out the natural sweetness of the corn. Picture yourself pulling a tray of golden hushpuppies out of the oven, the whole kitchen smelling incredible, and your friends’ eyes widening in delight.
Let me walk you through every single step—by the end, you'll wonder how you ever made it any other way. This is hands down the best version you'll ever make at home, and I’ve packed it with insider secrets that will keep your hushpuppies crisp and flavorful. If you've ever struggled with gluten‑free batters that turn out dense or greasy, you're not alone—and I've got the fix. Stay with me here—this is worth it. And now the fun part: the ingredients.
What Makes This Version Stand Out
- Flavor: The blend of fresh herbs, grated Parmesan, and a hint of cayenne creates a complex flavor profile that elevates each bite. The herbs infuse the batter with aromatic notes that dance on the tongue, while the Parmesan adds a savory umami finish that is unmistakable.
- Texture: A meticulous ratio of gluten‑free flour and leavening ensures the hushpuppies rise just enough to stay airy inside while achieving a crisp, golden crust. The batter’s consistency is smooth and pourable, preventing clumps and guaranteeing even cooking.
- Simplicity: The recipe requires only a handful of pantry staples and a few fresh ingredients, making it accessible for anyone who wants to whip up a quick, crowd‑pleasing snack. The instructions are straightforward, with no convoluted steps that can trip up even seasoned cooks.
- Uniqueness: The addition of fresh corn kernels and diced bell pepper gives the hushpuppies a burst of color and crunch that sets this version apart from standard recipes. This twist adds a sweet, juicy element that pairs wonderfully with the savory batter.
- Crowd Reaction: Friends and family rave about the crispness and flavor, often asking for the recipe after every gathering. The hushpuppies become a staple at potlucks and game‑day parties, proving their universal appeal.
- Make‑Ahead Potential: You can prepare the batter a day ahead, refrigerate it, and fry it fresh when needed. This convenience makes the recipe ideal for busy evenings and last‑minute gatherings.
- Ingredient Quality: Using high‑quality gluten‑free flour and fresh, organic vegetables ensures the final product is both tasty and wholesome. The careful selection of ingredients reflects a commitment to health without compromising flavor.
- Cooking Method: Frying at the right temperature creates a beautiful golden crust while keeping the interior moist. The method is foolproof, even for those who have never fried gluten‑free batters before.
Inside the Ingredient List
The ingredient list is where the magic starts, and each component plays a pivotal role in delivering that unforgettable crunch and flavor. Think of the batter as a canvas—each ingredient is a brushstroke that contributes to the final masterpiece. Skipping or substituting any of these can drastically alter the taste, texture, or appearance. Below, I’ll break down the core groups and explain why each one matters.
The Flavor Base
Gluten‑free all‑purpose flour blend is the foundation, providing the structure and lightness that traditional wheat flour would normally deliver. Baking powder acts as the leavening agent, creating tiny pockets of air that keep the hushpuppies fluffy inside. Salt is the flavor enhancer that brings out the natural sweetness of the corn and the savory notes of the herbs. A pinch of black pepper adds subtle heat, balancing the sweetness of the corn and the richness of the cheese.
The Texture Crew
Corn kernels are the secret to that satisfying crunch inside each bite. Diced onion and bell pepper add moisture and a burst of flavor that prevents the batter from drying out during frying. Fresh parsley not only adds a pop of color but also offers a fresh, slightly peppery taste that complements the other spices. A splash of milk or a non‑dairy alternative keeps the batter moist and helps bind the dry ingredients together.
The Unexpected Star
Grated Parmesan cheese is the unexpected star that adds a savory depth and a slightly nutty aroma. The cheese melts into the batter, creating a subtle, golden crust that’s impossible to resist. If you’re vegan, substitute with nutritional yeast or a dairy‑free cheese alternative—just keep the quantity the same to maintain the flavor profile. This ingredient is optional but highly recommended for a richer taste.
The Final Flourish
A dash of garlic powder and a pinch of cayenne pepper elevate the overall flavor, giving the hushpuppies a subtle kick that keeps your taste buds engaged. Paprika adds a smoky undertone, while a splash of melted butter enriches the batter’s mouthfeel. Together, these seasonings create a complex, layered flavor that makes every bite memorable. Remember, seasoning is the difference between good and unforgettable.
Everything's prepped? Good. Let's get into the real action. I’ll walk you through each step with all the details you need to make these hushpuppies perfect.
The Method — Step by Step
- Step 1: Gather the Dry Mix. In a large bowl, combine the gluten‑free all‑purpose flour, baking powder, salt, black pepper, garlic powder, cayenne pepper, paprika, and a pinch of cayenne. Sift the dry ingredients through a fine mesh sieve to ensure even distribution and no lumps. This step is crucial for a smooth batter and even rise. If you’re short on time, a quick whisk will suffice, but the sieve gives you the best texture.
- Step 2: Whisk the Wet Ingredients. In a separate bowl, beat the egg, then whisk in the milk and melted butter until fully blended. The butter adds richness and helps create a golden crust. The milk keeps the batter moist and prevents it from drying out during frying. This mixture should be smooth, with no clumps of egg or butter.
- Step 3: Combine and Mix. Pour the wet mixture into the dry ingredients, stirring gently until just combined. Be careful not to overmix; a few streaks of flour are okay. The batter should be thick enough to coat the back of a spoon but still pourable. If it’s too thick, add a splash of milk to reach the right consistency. This is the moment where the batter comes to life.
- Step 4: Add the Veggies. Fold in the diced onion, bell pepper, corn kernels, and chopped parsley. The vegetables add moisture, flavor, and color, making each hushpuppy a little bite of the garden. Gently fold to avoid breaking the corn kernels, which can burst and create a mushy texture. This step is where the batter truly transforms into a savory, crunchy delight.
- Step 5: Preheat the Oil. Heat a deep skillet or a pot with about 2 inches of oil to 350°F (175°C). Use a thermometer to check the temperature, as too hot and the hushpuppies will burn, too cool and they'll absorb excess oil. The ideal temperature gives a crisp, golden exterior. This is the trickiest step—maintaining the right heat is essential for the perfect result.
- Step 6: Fry the Hushpuppies. Drop spoonfuls of batter into the hot oil, spacing them apart to avoid overcrowding. Let them cook for 2-3 minutes on each side until they’re a deep golden brown. Flip them with tongs for an even crust. The batter should puff slightly as it cooks, creating a light interior. This step requires patience—do not rush the flipping.
- Step 7: Drain and Rest. Place the fried hushpuppies on a wire rack or paper towels to drain. Let them rest for 1-2 minutes; this allows steam to escape and the crust to firm up. A quick rest also prevents the interior from becoming soggy. While they rest, you can prepare the dipping sauce or garnish.
- Step 8: Serve Immediately. Present the hushpuppies on a platter with a side of tangy aioli or a zesty lime crema. The warmth and crunch are best enjoyed fresh. If you’re hosting a party, keep them warm in a low‑heat oven until guests arrive. The aroma alone will have everyone lining up for a bite.
That’s it—you did it. But hold on, I've got a few more tricks that'll take this to another level. Keep reading for insider tips that will make your hushpuppies unbeatable.
Insider Tricks for Flawless Results
Even the best recipe can fall flat if you miss a critical detail. These insider tricks are the difference between a batch that’s good and one that’s unforgettable. I’ve tested each one rigorously, and the results speak for themselves. Trust me, your hushpuppies will thank you.
The Temperature Rule Nobody Follows
Many cooks think that 350°F is a safe bet for frying, but the ideal temperature actually fluctuates between 325°F and 350°F depending on your oil type. Use a candy thermometer to maintain a steady heat. A slight dip in temperature will keep the hushpuppies from absorbing too much oil. If you’re using canola oil, aim for 325°F; for peanut oil, 350°F works best.
Why Your Nose Knows Best
The aroma of the batter is your best indicator of readiness. When you first drop the batter into the oil, you’ll notice a faint, nutty scent. As the hushpuppies cook, the smell deepens into a rich, buttery fragrance. If the scent turns sharp or metallic, the oil is too hot and you’re in trouble.
The 5-Minute Rest That Changes Everything
Letting the hushpuppies rest on a wire rack for 5 minutes after frying allows the steam to escape, preventing sogginess. A quick dip in the oven at 200°F for 2 minutes also works if you’re serving them hot. This simple rest step ensures the crust stays crisp while the interior stays moist.
The Secret to a Crispy Crust
A light dusting of cornstarch on the batter before frying can enhance crispness. Sprinkle a teaspoon of cornstarch into the dry mix; it helps create a barrier that keeps oil from seeping into the batter. Many chefs swear by this trick, and I’ve seen it work wonders.
The Flavor Boost of Fresh Herbs
Fresh parsley adds a bright, herbal note that cuts through the richness of the batter. If you’re in a pinch, dried herbs can work, but fresh is best. Add the parsley right before frying so it stays vibrant and doesn’t wilt.
Creative Twists and Variations
This recipe is a playground. Here are some of my favorite ways to switch things up: swap out the corn for sweet potato cubes for a sweeter bite; add chopped jalapeños for a spicy kick; replace the Parmesan with goat cheese for a tangy twist; mix in shredded cheddar for a melty center; or experiment with smoked paprika for a smoky flavor. Each variation brings its own personality, and your guests will love the novelty.
Sweet Potato Hushpuppies
Replace the corn kernels with diced sweet potatoes for a natural sweetness that pairs beautifully with the savory batter. Roast the sweet potatoes until just tender before folding them into the mixture. The result is a colorful, flavorful hushpuppie that’s perfect for autumn gatherings.
Spicy Jalapeño Twist
Dice fresh jalapeños and add them to the batter for an immediate heat boost. Keep the jalapeños whole if you want a pop of flavor in the center, or mince them for a more even distribution. This version is a hit at barbecue parties and game nights.
Cheddar Meltdown
Grate a cup of sharp cheddar and fold it into the batter. The cheese melts into pockets of gooey goodness that ooze when you bite. The cheddar also adds a rich, salty depth that complements the other flavors.
Smoky Paprika Version
Add an extra teaspoon of smoked paprika to the dry mix for a deep, smoky undertone. The paprika infuses the batter with a subtle, earthy flavor that works well with the fresh herbs. This variation is ideal for a fall or winter menu.
Goat Cheese Surprise
Replace the Parmesan with crumbled goat cheese for a tangy, creamy twist. The goat cheese adds a subtle tartness that cuts through the richness of the batter. This version is a crowd-pleaser for brunches and brunches.
Feel free to mix and match these variations to suit your taste or the occasion. The beauty of this recipe lies in its adaptability, allowing you to create a new experience with every batch.
Storing and Bringing It Back to Life
Once you’ve made a batch of hushpuppies, you might want to keep them for later. These hushpuppies hold up surprisingly well if stored properly. I’ll walk you through the best ways to keep them fresh and crispy.
Fridge Storage
Place the cooled hushpuppies in an airtight container or a zip‑lock bag. Store them in the refrigerator for up to 2 days. The airtight environment prevents moisture from making them soggy. When you’re ready to eat, skip the reheating and enjoy them cold as a quick snack.
Freezer Friendly
Freeze the hushpuppies in a single layer on a baking sheet before transferring them to a freezer bag. This method prevents them from sticking together. They stay good for up to 3 months in the freezer. To thaw, let them sit at room temperature for 30 minutes, then finish with a quick fry or bake.
Best Reheating Method
The secret to a crisp reheated hushpuppie is a quick oven blast. Preheat your oven to 400°F (200°C), arrange the hushpuppies on a baking sheet, and bake for 5-7 minutes. Add a tiny splash of water to the pan before baking; the steam helps restore moisture while keeping the crust crisp. Avoid microwaving, as it will turn them soggy.
With these storage tips, you can enjoy the same deliciousness whenever the craving strikes. The hushpuppies will always be ready to wow your taste buds.