I still remember the day I swore off full-sized cheesecakes forever. It was a humid Tuesday, my kitchen looked like a cocoa-dusted crime scene, and I had just watched an entire 9-inch beauty crack down the middle like the San Andreas Fault. In that moment of dessert despair, I grabbed my muffin tin in desperation and muttered, "If I can't have one perfect slice, I'll have twelve perfect bites." Friends, that tantrum birthed the most addictive, lovable, dangerously pop-able mini chocolate cheesecakes I have ever tasted. Fast-forward three years and these little rebels have become my signature party trick, the first thing to vanish at potlucks, and the reason my neighbors randomly "drop by" whenever they smell chocolate in the hallway.
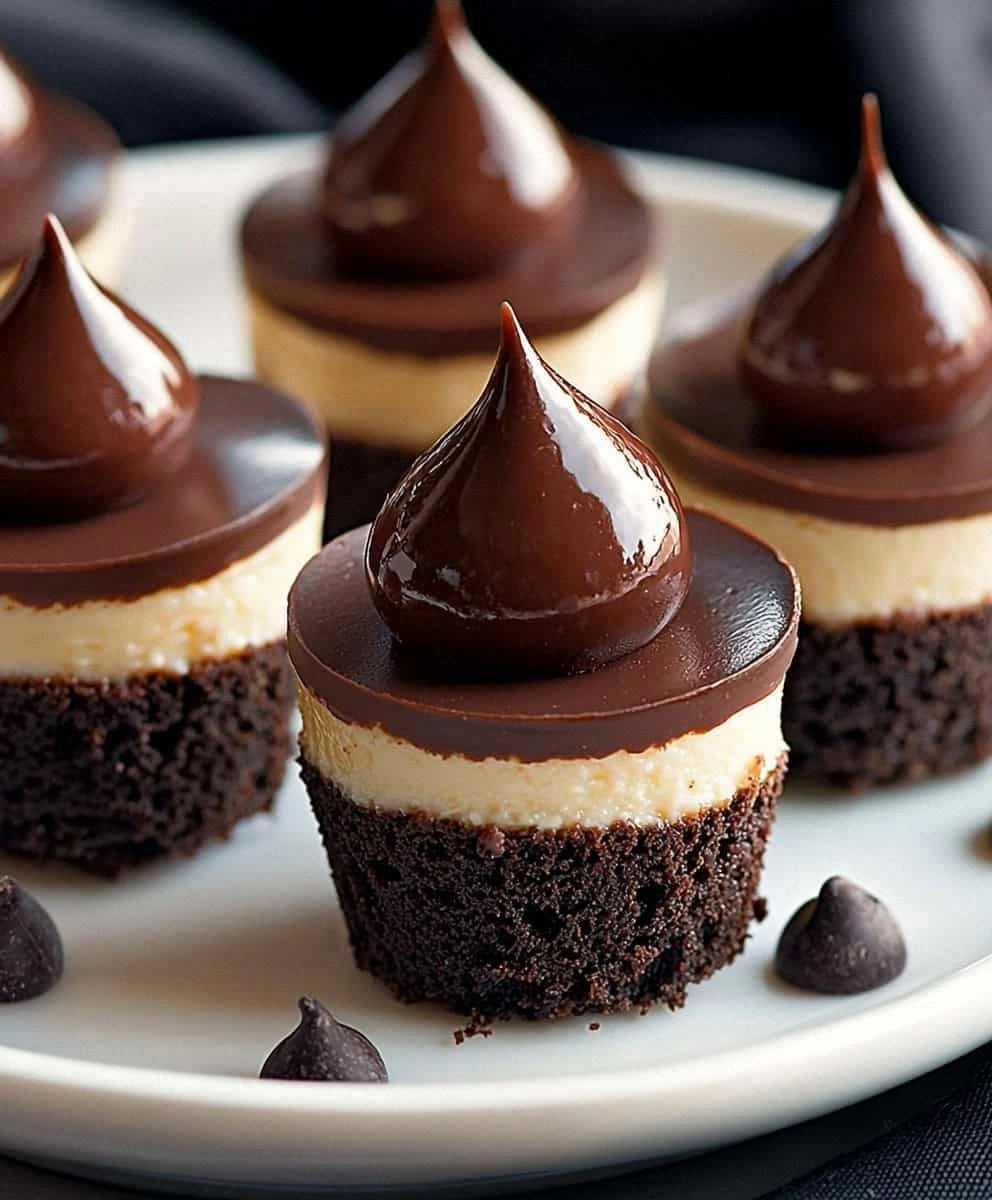
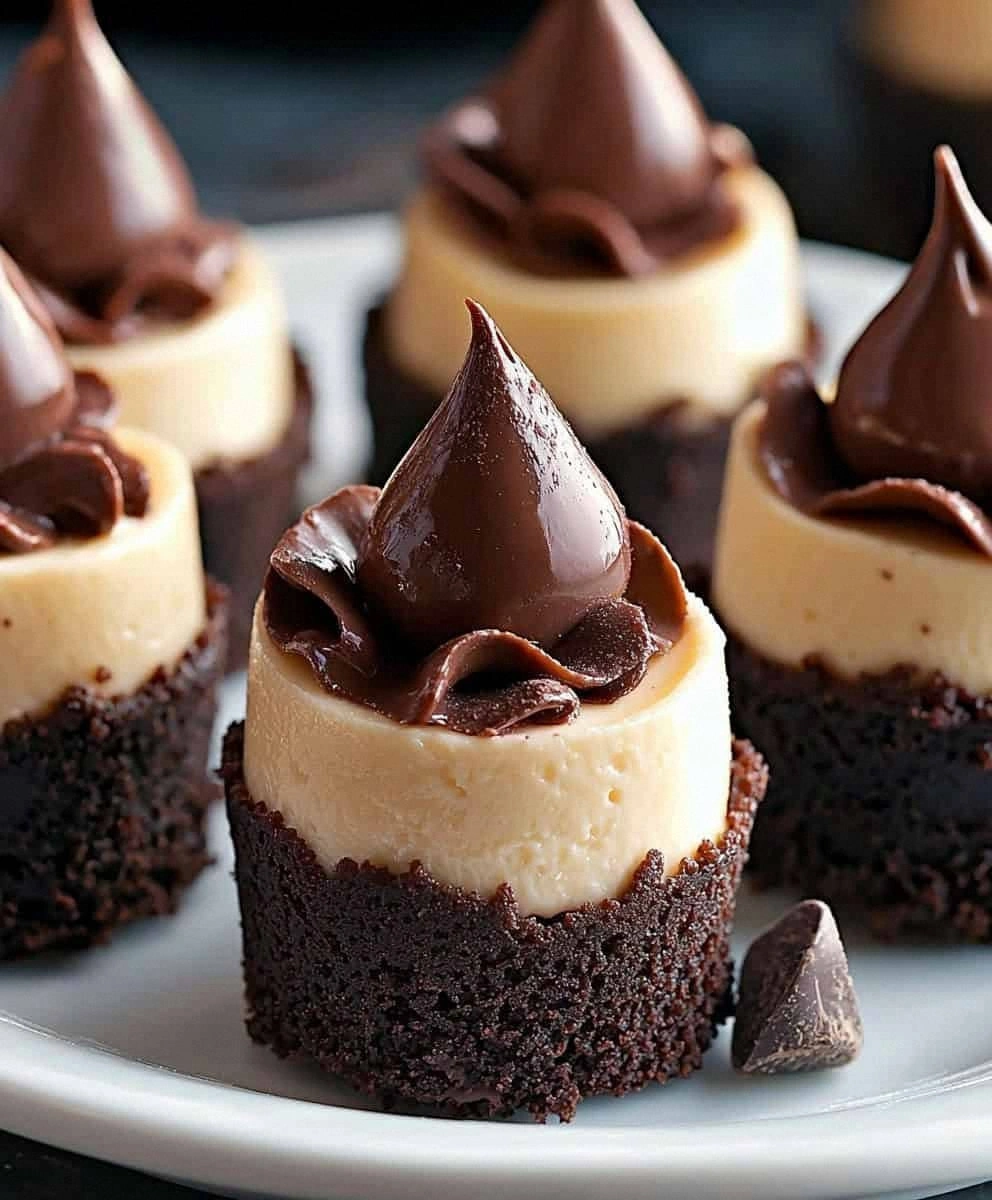
Picture this: a whisper-thin graham crust that shatters like golden stained glass, giving way to a velvet cloud of dark chocolate cheesecake so silky it makes silk feel like sandpaper. The tops bake into the faintest dome, no cracks, no sinkholes, just smooth espresso-colored perfection. When you peel back the paper liner, the cheesecake sighs out a breath of vanilla and cocoa that makes grown adults close their eyes involuntarily. I dare you to taste one and not go back for seconds; I personally have never witnessed such restraint. The best part? No water baths, no overnight chilling, no praying to the dessert gods—just 25 minutes of oven time and you are holding edible happiness.
Okay, ready for the game-changer? We're using cheap, everyday cream cheese but treating it like royalty: room-temp, beaten within an inch of its life, then introduced to melted chocolate that's cooled to precisely 90°F so it marbles instead of seizes. Most recipes get this completely wrong and end up with speckled, sad batter. Not on my watch. Stay with me here—this is worth it—because once you nail that glossy emulsion, you'll get the most intensely chocolatey cheesecake you've ever met, minus the heavy, brick-like texture that plagues so many homemade versions. Future pacing: imagine pulling these out of the oven, the whole kitchen smelling like Willy Wonka's living room, and knowing you have individual portions that freeze like a dream for midnight emergencies.
Let me walk you through every single step—by the end, you'll wonder how you ever made it any other way.
What Makes This Version Stand Out
Silk-Smooth Texture: The batter gets a lazy, 5-minute spa treatment in the food processor, aerating it so gently that the crumb stays mousse-light, never dense or rubbery. No one wants a cheesecake that feels like a workout for your jaw.
Deep Chocolate Flavor: We're folding in melted semi-sweet chips at the perfect lukewarm temp so they stay fluid and marry into the cream cheese instead of turning into flecks. The result is a uniform, truffle-like richness that tastes like it cost six bucks a pop at a boutique bakery.
Zero Cracks, Zero Stress: Mini size equals even heat distribution, so you can ditch the water bath and still get pristine tops. If you've ever struggled with cheesecake that resembles the surface of Mars, you're not alone—and I've got the fix.
Speedy Satisfaction: From pantry to plate in under an hour, including cooling time. No overnight setting, no "will it or won't it slice cleanly" drama. Just pop, peel, devour.
Crowd-Controlled Portions: These babies self-portion, which means no one has to perform open-heart surgery on a giant cake while guests watch in horror. Plus, you can hoard a couple in the freezer and no one ever has to know.
Make-Ahead Magic: Bake on Sunday, refrigerate or freeze, and they still taste like you just pulled them from the oven on Friday night. I always keep a dozen stashed for "I need chocolate now" emergencies, which, if I'm honest, is every Tuesday.
Kid-Approved, Date-Impressing Elegance: They're cute enough for a lunchbox treat yet sophisticated enough to cap off a candle-lit dinner. Try getting that range out of a slab pie.
Alright, let's break down exactly what goes into this masterpiece...
Inside the Ingredient List
The Flavor Base
Graham cracker crumbs are the nostalgic backbone here, but skip the pre-crushed dust in the box—those taste like sawdust mixed with regret. Pulse whole crackers yourself for irregular shards that grab melted butter and sugar like edible Velcro, creating a crust that holds together but still flakes. A quarter-cup of sugar might seem modest, but it balances the bittersweet chocolate topping without turning dessert into candy. Melted butter acts as both glue and flavor booster; use the good European stuff if you want a subtle cultured tang. And that pinch of salt? It's the conductor in this orchestra, waking up every latent cocoa note so the final bite sings instead of whispering.
The Texture Crew
Cream cheese is the diva of this show, and it will not perform cold. Leave it on the counter for a full two hours—yes, impatient soul, two hours—so the fats soften and trap air when beaten, yielding that cheesecake cloud instead of a leaden puck. Sour cream swoops in like a secret agent, thinning the batter just enough to prevent surface craters while adding a gentle tang that makes chocolate taste more chocolatey. Two large eggs are just enough protein to set the custard without turning it into omelet territory; beat them in one at a time so they emulsify instead of scrambling. Vanilla extract is the supporting actor who steals scenes: choose a bourbon-vanilla variety and you'll catch smoky undertones that play off cocoa like jazz riffs.
The Unexpected Star
Here's where I lose half of you and win the other half: semi-sweet chocolate chips, melted and cooled to precisely body temperature. No fancy 70% single-origin bars required. Chips contain stabilizers that help them stay glossy when folded into dairy, so you get fudgy veins rather than waxy streaks. The key is patience—nuke them in 20-second bursts, stir like you're hypnotized, and stop the second you can drizzle a ribbon that holds its shape for two seconds. Too hot and you'll scramble the cream cheese; too cool and you'll chip your mixer blade on seized clumps.
The Final Flourish
Whipped cream is optional in life but mandatory in my house; a dollop hides any micro-crack that dares appear and adds a cool, airy counterpoint to the dense truffle below. Chocolate shavings curl best when you drag a vegetable peeler across a slightly warm bar—warmth softens the edges so they flutter like edible ribbons instead of crumbling into sad dust. If you're feeling reckless, scatter a few micro chips on top right after baking; the residual heat fuses them halfway, creating tiny molten pockets that burst when you bite. And now the fun part: everything's prepped? Good. Let's get into the real action...
The Method — Step by Step
- Preheat your oven to 325°F and position a rack dead center; even heat is the silent guardian of smooth cheesecake tops. Slide a paper liner into each cup of a standard 12-cup muffin tin, then double-line them—yes, two papers per well. This tiny act of overkill insulates the delicate crust and gives you those tall, bakery-style sides that look professionally crimped. While the oven hums to life, melt half a cup of butter and let it lounge on the counter; you want it warm, not scalding, so it coats the crumbs without turning them into paste.
- In a medium bowl, whisk together graham cracker crumbs, sugar, and salt until the mixture looks like sandy beach vacation. Pour in the melted butter and stir with a fork until every crumb glistens like it's been kissed by the sun. The texture should feel like damp sand that holds together when squeezed—if it crumbles apart, drizzle in another teaspoon of butter; if it's greasy, dust in a tablespoon more crumbs. Divide the mixture among the liners, pressing firmly with the bottom of a shot glass or your thumb to create an even, compact layer. Slide the tin into the oven for 8 minutes, just until the crust smells like toasted s'mores and the edges turn one shade darker.
- While the crusts cool, beat the softened cream cheese in a food processor for a full two minutes until it looks like glossy ice cream. Scrape the bowl twice; unmixed streaks are saboteurs that'll bake into lumpy white freckles. Add sugar and vanilla, then whirl another minute until the mixture ribbons off the spatula like melted marshmallow. Crack in the eggs one at a time, processing just until the yellow disappears—over-beating whips in air that later collapses and causes sinkholes. Pulse in the sour cream until the batter looks like satin lingerie; stop and admire the shine for a second, because this next part? Pure magic.
- Melt the chocolate chips in a microwave-safe bowl at 50% power in 20-second bursts, stirring like your life depends on it between zaps. When you can drizzle a ribbon that holds its shape for two heartbeats, you're golden. Let the chocolate cool to 90°F—baby-bottle warm—then pour it into the processor in a slow stream while the motor runs. The batter will transform into a glossy pool of midnight brown that smells like Willy Wonka's living room. Scrape the bowl once more to catch any stubborn cream-cheese streaks; you want a homogenous lava that pours like liquid velvet.
- Set the muffin tin on a rimmed sheet pan for easy ferrying. Divide the batter among the wells, filling each almost to the top; the cheesecakes will puff gently but won't volcano. Tap the pan on the counter five times—yes, five—to dislodge sneaky air bubbles that leave craters. Slide the pan into the oven and bake for 22–25 minutes, rotating once halfway. You're hunting for set edges that barely jiggle and centers that look like just-set Jell-O when you give the pan a gentle shimmy.
- Remove the pan and let the cheesecakes cool in the tin for 10 minutes; they will pull away from the papers like magic, signaling proper doneness. Transfer to a wire rack and resist poking—they're fragile while warm and will firm as they cool. After 30 minutes, refrigerate uncovered for at least an hour; this rapid chill sets the crumb and intensifies the chocolate. Before serving, peel back the paper like you're unwrapping a tiny gift and admire the glossy dome. Top with a rosette of whipped cream and a flutter of chocolate shavings if you're feeling fancy, or just inhale them naked—no judgment.
That's it—you did it. But hold on, I've got a few more tricks that'll take this to another level...
Insider Tricks for Flawless Results
The Temperature Rule Nobody Follows
Room-temperature dairy isn't a polite suggestion; it's the law. Cold cream cheese refuses to emulsify with melted chocolate, leaving you with flecks that look like cookies-and-cream gone rogue. Pull everything out two hours ahead, or cheat: cube the cheese and microwave on 10% power in 30-second bursts, turning often, until barely pliable. Your future self will thank you when the batter whips into satin instead of cottage cheese.
Why Your Nose Knows Best
Don't trust timers—trust aroma. When the kitchen smells like hot cocoa and toasted graham with a whisper of vanilla, start checking. Overbaked cheesecake develops a faint eggy sulfur note; catch it before that happens and you'll maintain the delicate balance between set and creamy. If you've ever struggled with rubbery edges, this is your new superpower.
The 5-Minute Rest That Changes Everything
After baking, let the pan sit on the stovetop with the oven door ajar for exactly five minutes. This gentle transition prevents the dramatic temperature drop that causes centers to collapse, yet avoids carryover cooking that turns edges dry. A friend tried skipping this step once—let's just say it didn't end well, and we still joke about her cheesecake craters.
Chill, Don't Freeze, for Same-Day Serving
If you need them tonight, refrigerate uncovered for 45 minutes, then cover loosely with foil. Rapid chilling sets the starches quickly, preserving that mousse-like center. Freezing same-day causes ice crystals that dull the chocolate's shine, so save the deep freeze for long-term hoarding.
Creative Twists and Variations
This recipe is a playground. Here are some of my favorite ways to switch things up:
Mocha Mayhem
Dissolve 2 teaspoons instant espresso powder into the melted chocolate; the coffee amplifies cocoa notes without tasting like a latte. Top with a single espresso bean for garnish and watch the adults fight over the last one.
Salted Caramel Swirl
Drizzle a teaspoon of thick caramel into each well before baking, then drag a toothpick in figure-eights. Finish with a whisper of flaky salt on the peaks; that sweet-salty ping keeps people guessing.
Raspberry Riot
Press a frozen raspberry into the center of each batter-filled cup; it sinks as it bakes, leaving a molten fruit core that cuts the richness like a laser. Serve with a dot of raspberry coulis for color drama.
Peanut Butter Cloud
Beat ¼ cup creamy peanut butter into the cream cheese stage; the oil in the PB adds extra silkiness. Crown with a mini Reese's cup that melts slightly on contact—kids will trade you their cell phones for one.
Orange Zest Dreams
Microplane the zest of one whole orange into the sugar before mixing; citrus oils perfume the entire cake, giving you a Terry's Chocolate Orange vibe without the artificial wax flavor. A candied orange strip on top turns it into a winter-holiday rock star.
Mint Condition
Swap vanilla for ½ teaspoon peppermint extract and fold in mini chocolate chips that stay melty pockets. Garnish with a fresh mint leaf and suddenly it's Girl-Scout-cookie season in cheesecake form.
Storing and Bringing It Back to Life
Fridge Storage
Refrigerate in an airtight container for up to five days, layering parchment between stacks so the tops don't stamp each other with condensation rings. The flavor actually matures on day two as cocoa and dairy meld into deeper complexity. Bring to room temp for 15 minutes before serving; cold dulls chocolate, and we can't have that tragedy.
Freezer Friendly
Flash-freeze on a sheet pan until solid, then transfer to zip-top bags with the air sucked out. They'll keep for two months without flavor loss—though I've never personally tested that limit because, well, they vanish. Thaw overnight in the fridge, or for impatient souls, microwave on 30% power in 15-second bursts, rotating often.
Best Reheating Method
Room temp is best, but if you must warm them, tent with foil and place in a 275°F oven for 6 minutes. Add a tiny splash of water to the sheet pan; the gentle steam revives the mousse-like center without drying edges. Skip the microwave unless you enjoy rubber—your call.