Picture this: I’m in the middle of a busy Sunday dinner, the kitchen is a whirl of pots and pans, and the aroma of something savory is already teasing my senses. Suddenly, a neighbor drops by and, with a mischievous grin, challenges me to turn a standard meatloaf into a showstopper. I laughed, accepted the dare, and set out to create the most unforgettable stuffed bell pepper experience. The result? A dish that feels like a hug in every bite, with the crunch of a bell pepper, the savory depth of a classic meatloaf, and a glaze that sings on your tongue.
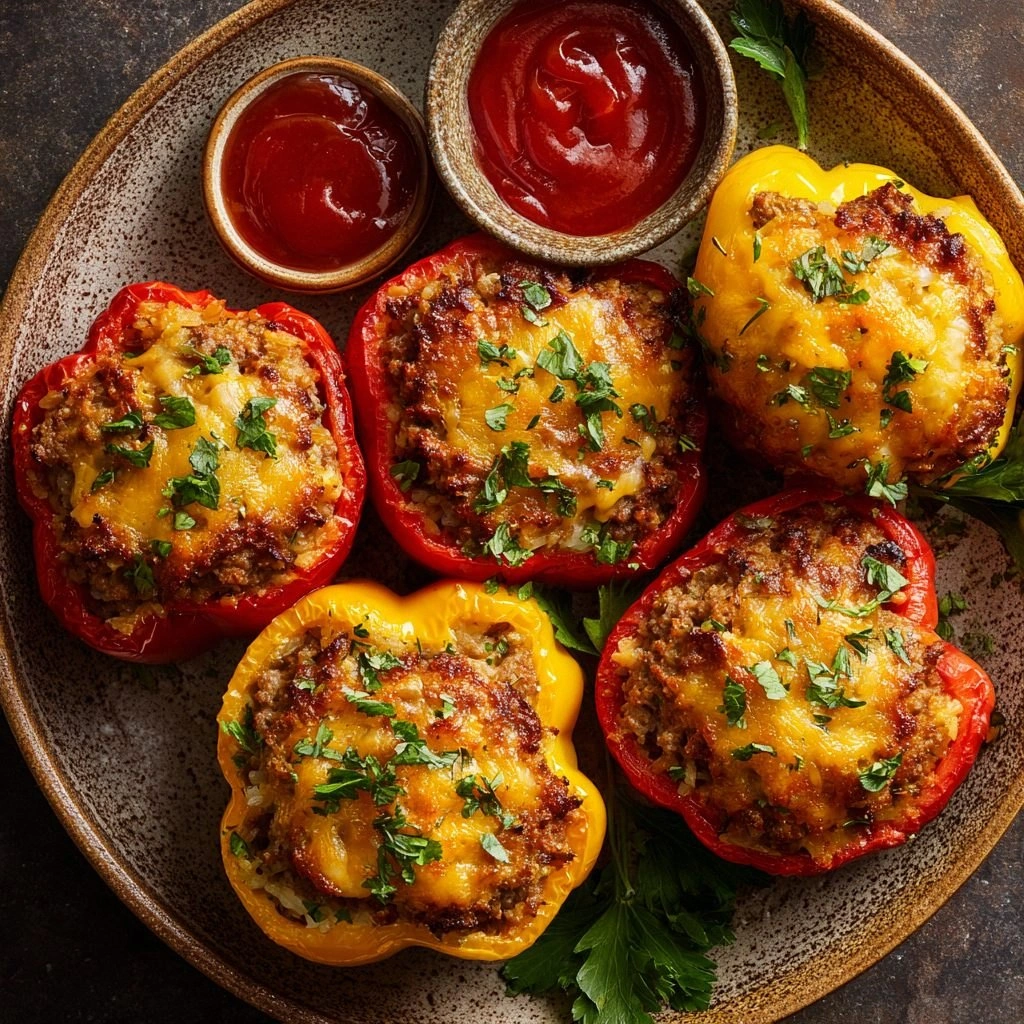
From the first glance at the colorful peppers, your eyes are drawn to the vibrant reds, yellows, and oranges that promise a feast for the senses. The scent that rises as the peppers roast is a warm, caramelized blend of onions, garlic, and tomato, mingling with the subtle smokiness of browned ground meat. When you slice into the finished product, the steam curls around you like a fragrant cloud, revealing a molten center that oozes with melted mozzarella and a hint of Parmesan. The texture is a delightful contrast: the pepper’s crisp exterior meets the tender, moist filling, creating a harmonious bite that lingers long after the last forkful.
What makes this version stand out from the countless meatloaf variations? First, it’s the marriage of two classic comfort foods—meatloaf and stuffed peppers—into a single, cohesive dish that feels both familiar and refreshingly novel. Second, the use of a blended ground beef and pork mix gives the filling a richer, more complex flavor profile that keeps your palate engaged. Third, the addition of Worcestershire sauce and a dash of ketchup introduces subtle umami and sweetness that balance the acidity of the tomato sauce. Fourth, the cheese blend of mozzarella and Parmesan creates a gooey, golden crust that’s simply irresistible. Fifth, the peppers are roasted just enough to develop a smoky char, adding depth without compromising crunch. And finally, the recipe is designed to be forgiving—whether you’re a seasoned chef or a kitchen novice, the steps are clear, the timing is manageable, and the outcome is spectacular.
I dare you to taste this and not go back for seconds—trust me, the first bite will have you craving more. Picture yourself pulling this out of the oven, the whole kitchen smelling incredible, and knowing that this is hands down the best version you’ll ever make at home. If you’ve ever struggled with stuffed peppers that fall apart or meatloaf that’s dry, you’re not alone—and I’ve got the fix. Stay with me here—this is worth it.
What Makes This Version Stand Out
- Flavor Fusion: The blend of beef and pork adds depth that pure beef or pork alone can’t achieve, creating a savory, juicy filling that sings.
- Cheese Chemistry: A combination of mozzarella and Parmesan yields a golden, melty crust that’s both indulgent and flavorful.
- Texture Balance: Roasted peppers provide a crisp bite, while the meatloaf interior stays moist and tender.
- Umami Boost: Worcestershire sauce and a touch of ketchup lift the dish with subtle sweetness and savory complexity.
- Convenience: The recipe is fully assembled in one pan, saving prep time while delivering maximum flavor.
- Make‑Ahead Friendly: You can assemble the peppers ahead of time, refrigerate, and bake right before serving.
Inside the Ingredient List
The Flavor Base
Ground beef and ground pork are the heart of this dish. The beef provides a robust, meaty flavor, while the pork adds fat that keeps the filling moist. Skipping either would result in a less complex taste profile, so keep them both for maximum depth. If you’re a vegetarian, a hearty lentil or textured vegetable protein blend can stand in, though the flavor will shift.
The Texture Crew
Breadcrumbs bind the meat, preventing it from falling apart during baking. A dry, toasted breadcrumb layer adds a subtle crunch to the top. Egg acts as a natural binder, holding everything together while adding a slight richness. If you’re gluten‑free, swap breadcrumbs for almond flour or a gluten‑free breadcrumb mix.
The Unexpected Star
Worcestershire sauce is the secret ingredient that brings a savory, slightly tangy note that elevates the entire dish. It’s often overlooked in stuffed pepper recipes, but it’s what gives the filling that “meatloaf” punch. If you can’t find it, a splash of soy sauce or tamari will work, though the flavor will be slightly different.
The Final Flourish
The cheese blend—mozzarella for gooeyness and Parmesan for a sharp, nutty finish—creates a golden crust that’s impossible to resist. A sprinkle of fresh parsley adds a burst of color and a fresh, herbal note that cuts through the richness. Don’t forget the tomato sauce; it keeps the peppers moist and adds a bright acidity that balances the savory elements.
Everything’s prepped? Good. Let’s get into the real action.
The Method — Step by Step
- Preheat the Oven and Prep the Peppers: Heat your oven to 375°F (190°C). While the oven warms, slice the tops off the bell peppers and carefully remove the seeds and membranes. Wash the peppers under cold water, then pat them dry. Set aside; you’ll be filling them in the next step.
- Sauté the Aromatics: In a large skillet, heat 2 tablespoons of olive oil over medium heat. Add the finely chopped onion and cook until translucent, about 4 minutes. Stir in minced garlic and cook for an additional 30 seconds until fragrant, being careful not to burn it.
- Brown the Meat: Push the aromatics to the side of the pan and add the ground beef and pork. Break the meat apart with a wooden spoon, cooking until browned and no longer pink, about 8 minutes. Drain excess fat if necessary.
- Combine the Filling: Remove the skillet from heat and stir in the breadcrumbs, egg, Worcestershire sauce, ketchup, and a splash of tomato sauce. Mix until everything is well incorporated. Add dried oregano, basil, salt, and pepper to taste. Let the mixture cool slightly before filling the peppers.
- Stuff the Peppers: Spoon the meatloaf mixture into each bell pepper, packing it firmly but not overstuffing. The peppers should be about three-quarters full. Place the stuffed peppers upright in a baking dish, standing on their trimmed tops.
- Top with Sauce and Cheese: Pour the remaining tomato sauce over the stuffed peppers, ensuring each one is covered. Sprinkle shredded mozzarella and grated Parmesan over the sauce. This layer will caramelize and form a golden crust.
- Bake to Perfection: Cover the baking dish with foil and bake for 25 minutes. Remove the foil and bake for an additional 15 minutes, or until the peppers are tender and the cheese is bubbling and lightly browned. The internal temperature of the filling should reach 160°F (71°C).
- Rest and Serve: Let the peppers rest for 5 minutes before serving. This allows the juices to redistribute and makes carving easier. Garnish with fresh parsley for a pop of color and a fresh herbal note. Serve hot, with a side of crusty bread or a light salad.
That’s it — you did it. But hold on, I’ve got a few more tricks that will take this to another level.
Insider Tricks for Flawless Results
The Temperature Rule Nobody Follows
Many people bake stuffed peppers at a high heat, but that can cause the tops to burn before the interior cooks. I recommend a moderate 375°F (190°C) that allows the filling to cook evenly while the sauce thickens. If you’re in a hurry, you can increase the heat to 400°F (200°C) for the last 10 minutes, but watch closely to prevent scorching.
Why Your Nose Knows Best
Before you take the dish out of the oven, give it a quick sniff. If the aroma is sweet, caramelized, and slightly smoky, you’re close to perfection. A strong, tomatoy scent indicates that the sauce has melded well with the meat. Trust your nose; it’s the ultimate judge of flavor.
The 5-Minute Rest That Changes Everything
After baking, let the peppers rest for exactly five minutes. This short pause allows the juices to settle, preventing a soggy bite. It also gives the cheese a chance to firm up slightly, making the dish easier to slice and serve.
Cheese Layer Tricks
If you want an extra gooey top, add a thin layer of shredded cheddar or provolone between the mozzarella and Parmesan. This creates a multi‑textured crust that’s both crispy and molten. Be careful not to over‑cheese, or the filling might become too greasy.
Make-Ahead Magic
To save time, assemble the stuffed peppers the night before, cover tightly, and refrigerate. When you’re ready to bake, simply add the sauce, top with cheese, and bake as directed. The flavors will deepen overnight, giving you a richer taste.
Creative Twists and Variations
This recipe is a playground. Here are some of my favorite ways to switch things up:
Mexican Flair
Swap the standard tomato sauce for a smoky chipotle tomato base, add corn kernels, and sprinkle crumbled cotija cheese on top. Finish with a squeeze of lime and a handful of fresh cilantro for a zesty finish.
Italian Twist
Replace the Worcestershire sauce with marinara and add a handful of chopped sun‑dried tomatoes. Top with a mix of mozzarella and provolone, and finish with a drizzle of basil pesto for a fragrant, herbaceous burst.
Vegetarian Option
Use a lentil or textured vegetable protein mixture in place of meat, and add diced mushrooms for umami. Keep the breadcrumb binder and cheese, and the dish will still deliver that comforting, hearty feel.
Low-Carb Version
Omit the breadcrumbs and replace them with finely chopped cauliflower rice. Use a sugar‑free tomato sauce and reduce the cheese to half a cup. The result is a lighter, keto‑friendly stuffed pepper that still packs flavor.
Breakfast Stuffed Peppers
Fill the peppers with a scrambled egg and sausage mixture, top with cheddar cheese, and bake until the eggs are set. Serve with a side of fresh fruit for a savory‑sweet breakfast that’s both filling and satisfying.
Storing and Bringing It Back to Life
Fridge Storage
Cool the peppers completely, then place them in an airtight container. Store in the refrigerator for up to 3 days. Reheat in the oven at 350°F (175°C) for 10 minutes or until heated through.
Freezer Friendly
Wrap each stuffed pepper tightly in plastic wrap, then place in a freezer bag. They’ll keep for up to 2 months. Thaw overnight in the refrigerator before reheating as described above.
Best Reheating Method
Add a splash of water or broth to the dish before reheating to keep the peppers from drying out. Cover with foil and heat in a 350°F (175°C) oven for 10–15 minutes. The steam will revive the moisture and restore the dish’s original texture.