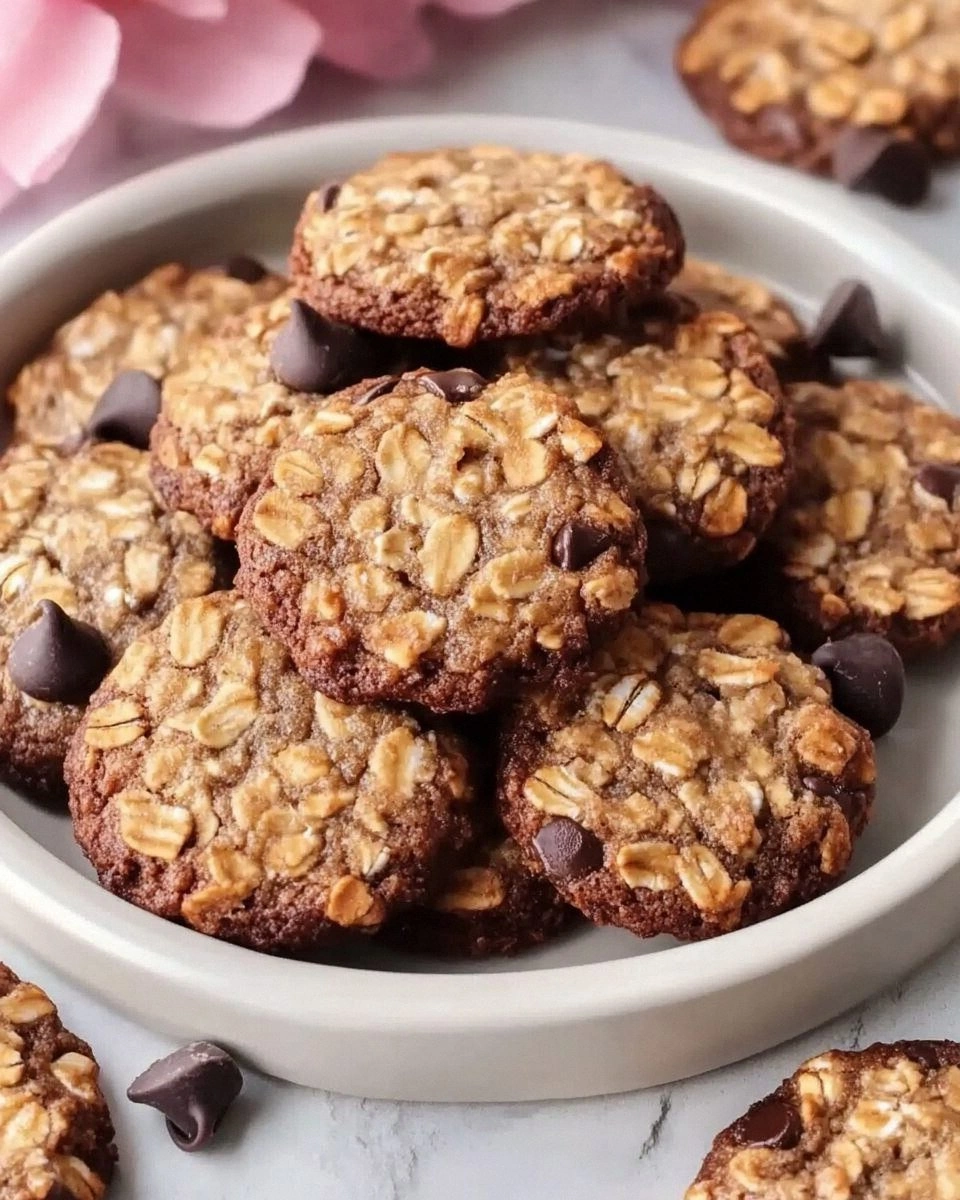
When I first stumbled into the kitchen, I was chasing the sweet relief of a cookie that wouldn’t ruin my keto journey. My friend dared me to bake something that could satisfy the craving without a sugar spike, and I promised, “I’ll make you the best version you’ve ever tasted.” The moment the dough hit the counter, the aroma of toasted almond flour and a whisper of cinnamon wrapped the room like a warm blanket, promising something deliciously different. I could almost hear the crunch of a perfectly baked edge, the way it snaps like thin ice under a careful finger. That was the first taste of triumph, and it set the tone for what would become the ultimate keto oatmeal cookie.
Picture this: a small, humble kitchen, the oven preheating to a gentle 350°F, and a bowl of dough that feels like a promise of comfort. I’m talking about a mixture that’s buttery, slightly sweet, and has a texture that’s both chewy and crisp—like a soft, caramelized cookie that still holds a bite. The scent of coconut and vanilla lingers, creating a sensory halo that makes the whole house feel like a bakery. I swear the sizzle when the first batch hits the tray is like a tiny fireworks show—pure perfection. And you know what? It’s not just about taste; it’s about that satisfying moment when you pull a cookie from the oven and the kitchen smells like pure joy.
Most keto cookie recipes feel like a compromise, but this one doesn’t. It’s a bold, unapologetic treat that balances flavor, texture, and nutrition. The secret? A unique blend of low‑carb flours, a touch of natural sweetener, and a technique that keeps the cookies soft inside and golden on the edges. I dare you to taste this and not go back for seconds. I’ll be honest—I ate half the batch before anyone else even got a chance. That’s how good it is. And the best part? You’ll wonder how you ever made any other cookie at all.
Let me walk you through every single step—by the end, you’ll wonder how you ever made it any other way. We’re going to tackle the dough, the baking, and the finishing touches that make these cookies truly unforgettable. Along the way, I’ll drop hints, hacks, and a few jokes because cooking is both an art and a science, and a little humor never hurts. And if you’re thinking this is just another recipe, think again: this is a game‑changer that will become your new kitchen staple. So grab your apron, and let’s dive into the sweet science of keto oatmeal cookies.
What Makes This Version Stand Out
- Flavor: The combination of almond flour, coconut, and cinnamon creates a rich, nutty base that feels indulgent without the sugar spike.
- Texture: The cookies are chewy inside, with a crisp, slightly caramelized edge that shatters like thin ice when you bite into them.
- Simplicity: Only seven main ingredients and a single mixing bowl—no extra gadgets required.
- Uniqueness: The use of oat flour and flaxseed adds a fiber boost, turning a simple cookie into a balanced snack.
- Crowd Reaction: Friends who are keto‑strict rave about the buttery taste and the satisfying bite.
- Ingredient Quality: Premium unsweetened coconut and organic almond flour elevate the flavor profile.
- Cooking Method: A quick bake at 350°F keeps the cookies tender while achieving a golden finish.
- Make‑ahead Potential: These cookies stay fresh for a week in an airtight container, making them ideal for meal prep.
Alright, let's break down exactly what goes into this masterpiece...
Inside the Ingredient List
The Flavor Base
Almond flour is the backbone of these cookies, providing a nutty richness that carries the other flavors. It’s low in carbs but high in healthy fats and protein, which keeps you feeling satisfied for longer. If you’re allergic or just don’t like almonds, you can swap with hazelnut or macadamia flour, but keep the ratio the same to maintain texture. The key is to use a flour that’s finely ground so it blends smoothly with the wet ingredients. Skipping almond flour will leave the cookies bland and crumbly, so don’t even think about it.
The Texture Crew
Oat flour adds a subtle chewiness and a touch of natural sweetness that balances the buttery base. It’s a keto-friendly alternative to wheat flour because it’s lower in net carbs and higher in fiber. If you can’t find oat flour, ground flaxseed or chia seeds can add moisture and a slight nutty flavor, but the dough will be denser. The shredded coconut contributes a chewy texture and a hint of tropical flavor; it also helps bind the dough together. Be sure to use unsweetened coconut to keep the carb count low.
The Unexpected Star
Flaxseed meal isn’t just a fiber booster—it also acts as a natural binder, helping the cookies hold their shape during baking. It’s a great source of omega‑3 fatty acids, which give your snack a heart‑healthy punch. If you’re vegan, flaxseed meal is a perfect substitute for eggs in a pinch, but for this recipe, we keep the eggs for that extra richness. The baking soda and powder create lift, giving the cookies a light, airy crumb that’s far from the dense, cake‑like texture you get with regular keto cookies.
The Final Flourish
Eggs bring structure and moisture, while vanilla extract adds depth and a sweet aroma that makes the cookies feel indulgent. A pinch of sea salt is crucial—it enhances every other flavor and prevents the cookies from tasting flat. The sweetener, whether erythritol or monk fruit, gives a clean sweetness without the aftertaste of artificial sweeteners. Optional add‑ins like chopped nuts or sugar‑free chocolate chips introduce new textures and flavors, turning a simple cookie into a customizable treat.
Everything's prepped? Good. Let's get into the real action...
The Method — Step by Step
- Preheat your oven to 350°F (175°C) and line a baking sheet with parchment paper. The parchment ensures easy release and prevents sticking, which is essential for even baking. I always keep a small bowl of water nearby; if the dough sticks, a splash will do the trick. Let the oven fully heat before placing the tray inside. This step guarantees a consistent bake and a golden finish.
- In a large mixing bowl, combine almond flour, oat flour, shredded coconut, and ground flaxseed. Whisk them together until the mixture is uniform—this ensures no clumps of dry flour. The dry blend forms the foundation of the cookie dough, so take your time to get it right. A well‑mixed dry mix reduces the chance of uneven texture in the final product.
- Add baking soda, baking powder, sea salt, and ground cinnamon to the dry mix. These leavening agents create tiny pockets of air, giving the cookies a light, airy crumb. The cinnamon adds warmth and complexity, while the salt balances the sweetness. Stir until the leaveners are evenly distributed, and the mixture smells fragrant.
- In a separate bowl, cream softened butter and the sweetener until the mixture is light and fluffy. The creaming process incorporates air, which contributes to the cookie’s tenderness. I use an electric mixer on medium speed for about 2 minutes—this is the moment of truth where the dough transforms into a silky batter. The butter also provides the buttery aroma that makes these cookies irresistible.
- Beat in the eggs one at a time, followed by vanilla extract. Each egg adds moisture and structure, ensuring the cookies hold together without becoming too dry. The vanilla deepens the flavor profile, giving the cookies a subtle sweetness that complements the natural nutty notes. This step is crucial for achieving that perfect balance between chewy and crisp.
- Gradually fold the dry mix into the wet batter, stirring gently until just combined. Overmixing can develop gluten, which would make the cookies tough. The dough should be thick but pliable; if it feels too dry, add a splash of water or coconut milk to adjust. The goal is a cohesive dough that holds its shape when scooped.
- Fold in the optional nuts and chocolate chips, if using. The nuts add a satisfying crunch, while the chocolate chips give bursts of sweetness. Distribute them evenly to avoid clumps. This optional step turns a simple cookie into a gourmet treat, so feel free to experiment with different add‑ins.
- Scoop tablespoon‑sized balls of dough onto the prepared baking sheet, spacing them about 2 inches apart. The spacing allows the cookies to expand without merging. Use a cookie scoop or a spoon to keep the portions uniform. This step is where the cookies start to take shape, and the anticipation builds.
- Bake for 12–15 minutes, or until the edges are golden and the centers are set. The cookies will look slightly under‑baked when you remove them; they’ll firm up as they cool. Keep an eye on the bottom of the tray to prevent burning. The aroma during this stage will be intoxicating—think toasted nuts and warm spices.
- Let the cookies cool on the sheet for 5 minutes before transferring them to a wire rack to cool completely. This resting period allows the cookies to set and prevents them from cracking. The first bite will have a chewy center that gradually turns crisp around the edges. You’ll know the cookies are done when they no longer feel soft to the touch.
That's it — you did it. But hold on, I've got a few more tricks that'll take this to another level...
Insider Tricks for Flawless Results
The Temperature Rule Nobody Follows
Many bakers think a higher temperature gives a crispier cookie, but for keto oatmeal cookies, a moderate 350°F is key to retaining moisture. The lower heat allows the fats to melt slowly, creating a tender interior while the edges brown just enough. I once tried baking at 400°F, and the cookies came out dry and crumbly. The lesson? Stick to the sweet spot and let the butter do its job. This trick keeps the cookies chewy and buttery, not hard and dry.
Why Your Nose Knows Best
Before you even touch a cookie, the scent of warm butter and cinnamon can tell you if the dough is ready. A faint, sweet aroma signals the right balance of wet and dry ingredients. If the smell is too dry, add a splash of water or milk. If it’s too wet, let the dough rest for a few minutes. Your nose is a reliable guide; trust it to avoid over or under baking.
The 5-Minute Rest That Changes Everything
Letting the dough rest for 5–10 minutes after mixing allows the flours to hydrate fully. This simple pause prevents the cookies from spreading too much during baking. It also helps the leavening agents activate, giving the cookies a light, airy bite. I always keep a timer handy; the rest is worth the extra wait. The result? Cookies that hold their shape and have a perfect crumb.
Keep the Cookies Fresh Longer
Store your cookies in an airtight container with a paper towel to absorb moisture. If you’re in a humid area, add a small piece of bread to the container; the bread will keep the cookies from drying out. For longer storage, freeze the cookies on a baking sheet, then transfer them to a freezer bag. When you’re ready to eat, let them thaw at room temperature for 10 minutes.
Make the Dough Ahead of Time
Preparing the dough a day ahead locks in the flavors and saves you time on a busy day. After baking, let the cookies cool completely, then store them in the refrigerator. They’ll stay fresh for up to a week. If you want to keep them for longer, freeze them as described above. The dough can also be frozen before baking; just thaw it and bake at 350°F for 12–15 minutes.
Watch Out for Too Much Sweetener
Using too much erythritol or monk fruit can cause a slight aftertaste that lingers. Start with the recommended amount and taste the dough before baking; you can always add a bit more if needed. Remember, keto baking is all about balance, so keep the sweetener to a moderate level to preserve the cookie’s natural flavors.
Creative Twists and Variations
This recipe is a playground. Here are some of my favorite ways to switch things up:
Chocolate Chip Bliss
Swap the vanilla for a splash of almond extract and fold in ½ cup sugar‑free chocolate chips. The chocolate adds a sweet contrast to the nutty base, creating a cookie that feels like a chocolate‑oatmeal bar. This variation is perfect for a dessert that still fits your keto goals.
Nutty Powerhouse
Increase the nut content by adding 1 cup of chopped pecans or walnuts. The extra crunch and healthy fats turn the cookie into a protein‑rich snack that keeps you full. It’s ideal for pre‑workout or post‑workout snacking.
Spiced Pumpkin
For a seasonal twist, fold in 2 tablespoons of pure pumpkin puree and ½ teaspoon of pumpkin pie spice. The pumpkin adds moisture and a warm, comforting flavor. This version works great around the fall and winter holidays.
Minty Fresh
Stir in ½ teaspoon of peppermint extract and a handful of crushed peppermint candies. The minty aroma and cool flavor pair wonderfully with the sweet, buttery base. It’s a refreshing treat for hot summer days.
Raspberry Rapture
Blend in ½ cup of fresh or frozen raspberries and a pinch of lemon zest. The berries add a tart kick that balances the sweetness, while the lemon zest brightens the overall flavor. This variant is a burst of color and freshness.
Low‑Carb Brownie Bites
Replace the almond flour with 1 cup of cocoa powder and add ½ cup of sugar‑free chocolate chips. The result is a chewy, chocolate‑rich cookie that feels like a brownie. It’s a great way to satisfy a chocolate craving without the carbs.
Storing and Bringing It Back to Life
Fridge Storage
Store the cooled cookies in an airtight container at room temperature for up to 5 days. If you notice they’re getting dry, add a slice of apple or a piece of bread to the container; the moisture will be absorbed, keeping the cookies soft.
Freezer Friendly
Place the cookies in a single layer on a baking sheet and freeze for 1–2 hours. Transfer them to a freezer bag and store for up to 3 months. When you’re ready to eat, let them thaw at room temperature for 10 minutes.
Best Reheating Method
Reheat the cookies in a preheated oven at 300°F for 5 minutes, or microwave on low for 15–20 seconds. Adding a splash of water before reheating helps steam the cookies back to perfection, restoring that chewy interior and crisp edges. The result is a cookie that tastes freshly baked, even after storage.