Last winter I found myself staring at an empty pantry, a half‑finished batch of brownies cooling on the counter, and a lingering craving for something that could actually survive the holiday party onslaught. I tried the usual store‑bought peppermint bark, but it melted into a sugary mess that left my taste buds feeling betrayed. I dared my roommate to a “who can make the most festive treat” showdown, and I lost—because I didn’t have the right recipe. That moment of defeat sparked a kitchen experiment that turned into the ultimate chocolate‑peppermint donut, a treat that makes the whole house smell like a candy‑cane factory on steroids.
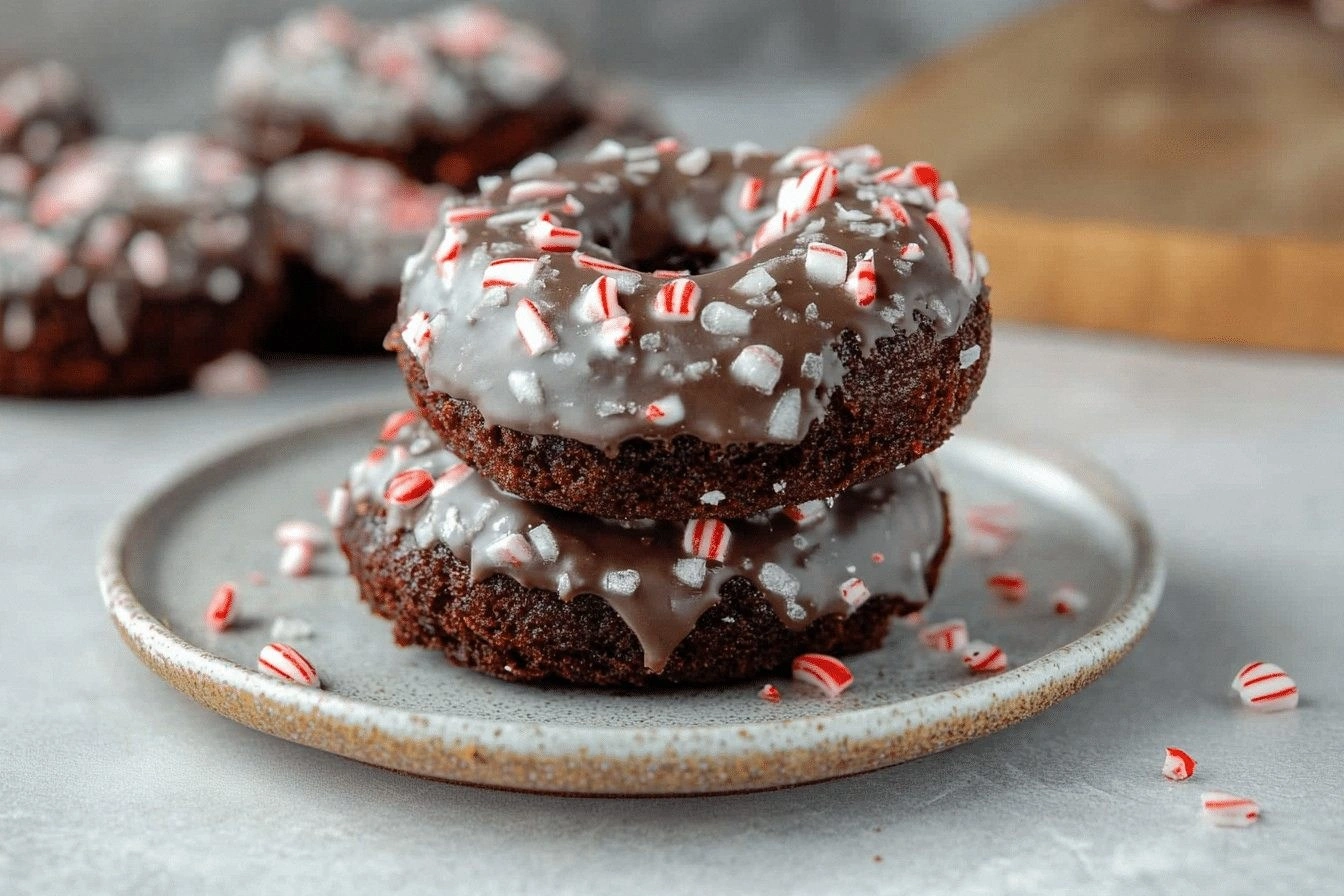
Picture this: you pull a tray of glossy, dark‑chocolate donuts out of the oven, steam still dancing off their tops, and the air is instantly filled with a cool, minty breeze that cuts through the richness like a perfectly timed drum solo. The dough is soft enough to melt on your tongue, yet it holds its shape when you bite, giving you that satisfying “chewy‑but‑fluffy” texture you’ve only ever dreamed of. When you dip your finger into the chocolate glaze, it slides like satin, and the crushed peppermint candies on top crack with a satisfying crunch that screams “holiday cheer”. The first bite is an explosion of deep cocoa, a whisper of mint, and a lingering sweetness that makes you swear you’ve just discovered a new sense of joy.
Most recipes for chocolate‑peppermint donuts either drown in too much sugar or skimp on the chocolate, leaving you with a bland, candy‑coated disappointment. I’ve tried a dozen of them, and they all miss the mark—either the dough is dense like a brick, or the mint flavor is so overpowering it drowns the chocolate. This version, however, balances the two like a seasoned bartender mixes a perfect Manhattan: equal parts bold and refreshing, with a subtle complexity that keeps you coming back for more. I’m about to reveal the secret technique that gives these donuts their airy lift and the exact peppermint extract ratio that makes the flavor sing without screaming.
Okay, ready for the game‑changer? I’m going to walk you through every single step—mixing, proofing, glazing, and the final decorative flourish. By the end, you’ll wonder how you ever settled for store‑bought donuts, and you’ll be daring anyone to taste this and not go back for seconds. Let’s dive in and turn your kitchen into a holiday‑themed dessert wonderland.
What Makes This Version Stand Out
- Flavor Harmony: The deep cocoa is balanced by a precise dash of peppermint extract, creating a cool‑warm duet that dances on the palate.
- Texture Perfection: A light, airy crumb inside contrasts with a crisp, glazed exterior—think cloud‑soft interior with a caramelized crust.
- Simplicity: All ingredients are pantry staples; no fancy equipment, just a whisk, a mixing bowl, and a trusty oven.
- Unique Twist: The optional chocolate glaze adds a glossy finish that intensifies the chocolate flavor while keeping the mint bright.
- Crowd Reaction: Guests often claim they’ve never tasted anything like it—perfect for holiday parties, potlucks, or a cozy night in.
- Ingredient Quality: Using high‑quality cocoa powder and pure peppermint extract makes the flavor sing without artificial aftertaste.
- Cooking Method: Baking, not frying, keeps the donuts light and reduces mess, while still delivering that classic donut shape.
- Make‑Ahead Potential: These donuts freeze beautifully and reheat like fresh‑baked, saving you time on busy mornings.
Inside the Ingredient List
The Flavor Base
All‑purpose flour: The foundation that gives structure and softness to your donuts. It creates the gluten network that holds everything together, ensuring the donuts rise without turning rubbery. If you skip it, you’ll end up with a crumbly mess that can’t hold its shape. For best results, sift the flour with the cocoa powder to aerate it and prevent lumps. Pro tip: Choose a unbleached, high‑protein flour for a slightly chewier bite that still feels light.
Cocoa powder: Provides deep, rich chocolate flavor and a beautiful dark color. It’s the star that makes these donuts unmistakably chocolatey, and using Dutch‑processed cocoa adds a smoother, less acidic taste. Skipping cocoa for melted chocolate can make the batter too wet, leading to a soggy texture. Look for a cocoa with at least 20% cocoa solids for maximum flavor intensity. If you’re out of cocoa, a blend of melted dark chocolate and a little extra flour can work in a pinch.
The Texture Crew
Sugar: Sweetens the batter perfectly, balancing chocolate’s natural bitterness. It also contributes to the caramelization of the crust, giving the donuts that golden edge. Using superfine sugar helps it dissolve faster, preventing a gritty texture. If you prefer a less sweet donut, cut the sugar by a quarter; the mint will still shine through.
Baking powder: Ensures your donuts rise light and fluffy. It creates tiny air pockets that expand in the oven, giving that airy crumb we all love. Too much baking powder can cause a metallic aftertaste, so measure carefully. For a gluten‑free twist, you can swap in a blend of baking soda and cream of tartar, but the rise might be slightly different.
Salt: Enhances the overall flavor profile, especially the chocolate’s depth. A pinch of salt can turn a bland sweet into a complex, satisfying bite. If you’re using salted butter elsewhere in the recipe, you might want to reduce the added salt by half.
The Unexpected Star
Peppermint extract: The star ingredient for that refreshing, cool holiday twist. A little goes a long way—too much will overpower the chocolate, while too little will be lost in the mix. I recommend using a high‑quality, food‑grade extract for a pure, clean mint flavor. If you don’t have extract, crushed peppermint candies dissolved in warm milk can serve as a substitute, though the flavor will be slightly grainier.
Vanilla extract: Balances flavors and adds warmth, rounding out the sharpness of the mint. It also deepens the chocolate’s aroma, making the donuts smell like a bakery on a crisp winter morning. A pure vanilla bean paste can be used for an even richer profile.
The Final Flourish
Egg: Binds ingredients and adds moisture for tender bites. It also contributes to the structure, helping the donuts keep their shape during baking. If you’re avoiding eggs, a flax‑egg (1 tbsp ground flaxseed + 3 tbsp water) works, but the texture will be slightly denser.
Milk: Adds moisture and helps create a smooth batter. Whole milk yields the richest crumb, while low‑fat milk keeps the donuts lighter. For a dairy‑free version, almond or oat milk can replace the dairy without sacrificing flavor.
Vegetable oil: Keeps the donuts moist and soft without heaviness. It coats the flour proteins, limiting gluten formation for a tender crumb. If you prefer a buttery flavor, melt a tablespoon of butter and combine it with half the oil.
Chocolate glaze (optional): A glossy finish that intensifies the chocolate experience. It adds a snap when you bite through the glaze, contrasting with the soft interior. You can make it by melting chocolate with a splash of cream, or use a store‑bought glaze for convenience.
Crushed peppermint candies (optional): Adds crunch and festive decoration on top. The candy pieces melt slightly into the glaze, creating little pockets of minty surprise. If you want a less sweet topping, use crushed candy canes or even a dusting of powdered sugar mixed with a hint of peppermint extract.
Everything's prepped? Good. Let’s get into the real action…
The Method — Step by Step
Preheat your oven to 350°F (175°C) and line a standard donut pan with a light coating of non‑stick spray. The moment the oven clicks on, the kitchen fills with that comforting hum of anticipation—like a pre‑show warm‑up before the main act. While the oven heats, gather all dry ingredients in a large bowl; this includes the sifted flour, cocoa powder, sugar, baking powder, and salt. Give them a quick whisk to ensure even distribution—think of it as a miniature snowstorm swirling in the bowl. This dry mix should look uniformly dark, with no specks of flour peeking through.
In a separate medium bowl, whisk together the wet ingredients: eggs, milk, vegetable oil, peppermint extract, and vanilla extract. The moment you crack the eggs, listen for that satisfying splash; it tells you the eggs are fresh. As you whisk, the mixture will turn a pale, glossy amber—this is the base that will later envelop the cocoa‑infused dry mix. If you’re using a high‑quality peppermint extract, you’ll notice a faint, refreshing aroma that hints at the magic to come. Set this bowl aside for a moment while you combine the two mixtures.
Now, pour the wet mixture into the dry ingredients, and stir with a rubber spatula until just combined.
The batter should be thick yet pourable, resembling a rich, dark pancake batter. It will have a faint sheen from the oil, and you’ll notice tiny air bubbles forming—those are the early signs of lift. If the batter feels too stiff, add a tablespoon of milk; if it’s too runny, sprinkle in a bit more flour, but be careful not to over‑correct.Kitchen Hack: Stop stirring the moment you see no dry flour streaks; over‑mixing will develop gluten and make the donuts tough.Transfer the batter into a piping bag fitted with a large round tip, or simply use a sturdy zip‑top bag with the corner snipped off. This step is where you get to feel like a pastry chef shaping delicate works of art. Fill each donut cavity about three‑quarters full; the batter will rise, and you don’t want it to overflow and create a mess. As you fill, watch the batter settle—if you see any gaps, give the pan a gentle tap on the counter to level the batter.
Slide the pan into the preheated oven and bake for 12‑15 minutes, or until the donuts have a firm top and a faint spring when lightly pressed. The kitchen will start to fill with a chocolatey aroma that’s instantly comforting, while a subtle mint note wafts up like a winter breeze. Around the 10‑minute mark, peek through the oven window; you should see the edges beginning to pull away from the pan, a visual cue that they’re ready to release. Resist the urge to open the oven door too often—heat loss can cause uneven rising.
While the donuts bake, prepare the chocolate glaze. Melt 1 cup of chocolate chips (or chopped dark chocolate) with 2 tablespoons of heavy cream in a heat‑proof bowl over a simmering pot of water, stirring until smooth. The glaze should be glossy, thick enough to coat the back of a spoon, and emit a deep cocoa scent that makes your mouth water. If you want a mintier glaze, stir in an extra ¼ teaspoon of peppermint extract; just be careful not to over‑mint.
Once the donuts are done, remove the pan and let them cool in the pan for 5 minutes—this allows the structure to set, preventing them from crumbling when you remove them. Then, gently pop each donut out onto a cooling rack.
While they’re still warm, drizzle the chocolate glaze over each donut, letting it pool and then drip down the sides. The glaze should set within a minute, forming a thin, crackly shell that adds a satisfying snap.Watch Out: If you try to remove the donuts while they’re still hot, they’ll stick and tear; patience is key.Immediately after glazing, sprinkle the crushed peppermint candies over the top while the glaze is still soft. The candies will adhere, creating a festive, crunchy crown. Press them lightly with the back of a spoon to ensure they stick, but don’t press too hard—you’ll crush them into powder, losing that delightful crunch. The contrast between the smooth glaze and the crunchy candy is what makes these donuts unforgettable.
Allow the donuts to sit for another 5 minutes so the glaze fully sets. Then, serve them warm or at room temperature—either way, they’ll retain that melt‑in‑your‑mouth softness inside and a crisp, minty exterior. This is the moment of truth: bite in, and you’ll experience the perfect balance of chocolate richness, peppermint coolness, and a subtle buttery crumb. And now the fun part—watch your guests’ faces light up as they discover the secret behind these holiday miracles.
Insider Tricks for Flawless Results
The Temperature Rule Nobody Follows
Never bake these donuts straight from the fridge; let the batter sit at room temperature for 10‑15 minutes before filling the pan. The batter’s temperature affects how the leavening reacts—cold batter can cause the baking powder to activate too slowly, resulting in a dense texture. I once tried skipping this step and ended up with donuts that felt like rubber bands. Warm batter ensures the gases expand evenly, giving you that airy crumb you crave.
Why Your Nose Knows Best
When the donuts are baking, trust the scent as your ultimate doneness indicator. Around the 12‑minute mark, you’ll notice the chocolate aroma shifting from raw cocoa to a toasted, caramel‑like fragrance. That subtle change tells you the interior has set and the edges are beginning to caramelize. If you rely solely on visual cues, you might pull them out too early, leaving a gummy center. Let your nose guide you, and you’ll consistently pull out perfectly baked donuts.
The 5‑Minute Rest That Changes Everything
After removing the donuts from the pan, give them a brief 5‑minute rest on the rack before glazing. This short pause allows the steam to escape, preventing the glaze from sliding off in a soggy mess. I once glazed donuts immediately, and the glaze turned into a glossy puddle that never set. Patience at this stage creates a clean, glossy finish that holds the crushed peppermint candies in place. It’s a tiny step that makes a massive difference in presentation.
Glaze Consistency Is Key
If your chocolate glaze is too thin, it will run off the donuts, leaving a sticky mess; too thick, and it won’t coat evenly. To test, dip a spoon into the glaze—if it coats the back of the spoon and drips slowly, you’re golden. Adding a splash of milk or cream can thin it, while a few extra minutes of simmering can thicken it. The right consistency gives a snap when you bite through, a hallmark of professional pastry.
Donut Shape Secrets
Even if you’re using a non‑stick pan, lightly dust the donut cavities with a blend of flour and cocoa powder before pouring the batter. This tiny dusting prevents the batter from sticking to the sides, ensuring the donuts release cleanly and retain their perfect ring shape. I once skipped this and ended up with a donut that clung to the pan, tearing the delicate crust. A light dusting is a simple, low‑effort trick that yields flawless rings every time.
Creative Twists and Variations
This recipe is a playground. Here are some of my favorite ways to switch things up:
White Chocolate Peppermint
Swap the dark cocoa for 1 cup of white chocolate chips melted into the batter, and keep the peppermint extract. The result is a snowy‑white donut with a burst of mint—perfect for a winter wonderland theme.
Mocha Madness
Add a tablespoon of finely ground espresso to the dry ingredients and replace half the chocolate glaze with a coffee‑infused glaze. You’ll get a sophisticated mocha flavor that’s ideal for brunch.
Nutty Crunch
Fold in ½ cup of chopped toasted hazelnuts into the batter and sprinkle extra hazelnuts on top of the glaze. The nuts add a buttery crunch that pairs beautifully with the mint.
Spiced Holiday
Introduce a pinch of ground cinnamon, nutmeg, and a dash of clove to the dry mix. This adds warm spice notes that complement the peppermint, creating a festive flavor profile.
Vegan Delight
Replace the egg with a flax‑egg (1 tbsp ground flaxseed + 3 tbsp water) and use plant‑based milk and oil. Use a vegan chocolate glaze, and you’ll have a completely dairy‑free version that still tastes decadent.
Storing and Bringing It Back to Life
Fridge Storage
Place cooled donuts in an airtight container lined with parchment paper. They’ll stay fresh for up to 3 days. To keep the glaze from getting sticky, add a single sheet of wax paper between layers.
Freezer Friendly
Freeze donuts individually on a parchment sheet, then transfer them to a zip‑top bag. They’ll keep for up to 2 months. When you’re ready to enjoy, let them thaw at room temperature for 15 minutes, then give them a quick 30‑second blast in the microwave.
Best Reheating Method
Preheat a skillet over low heat, add a splash of water, and cover with a lid for 1‑2 minutes. The steam revives the interior’s softness while the glaze re‑crispes. Avoid microwaving for too long; it makes the glaze rubbery.