Picture this: I was standing in my kitchen, eyes glued to the screen of a food‑blog video that promised the ultimate chocolate treat. The host, with a mischievous grin, declared, “I dare you to taste this and not go back for seconds.” My heart skipped a beat. I had just finished a marathon of low‑calorie desserts and the craving was real, raw, and impossible to ignore.
The kitchen was a symphony of sizzling sounds. The timer buzzed, the oven door hissed, and the sweet aroma of maple syrup mingled with the earthy scent of cocoa. The countertop was a battlefield: bowls clattered, the blender whirred, and the air was thick with anticipation. I could almost taste the first bite—rich, velvety, yet light enough to feel like a secret indulgence.
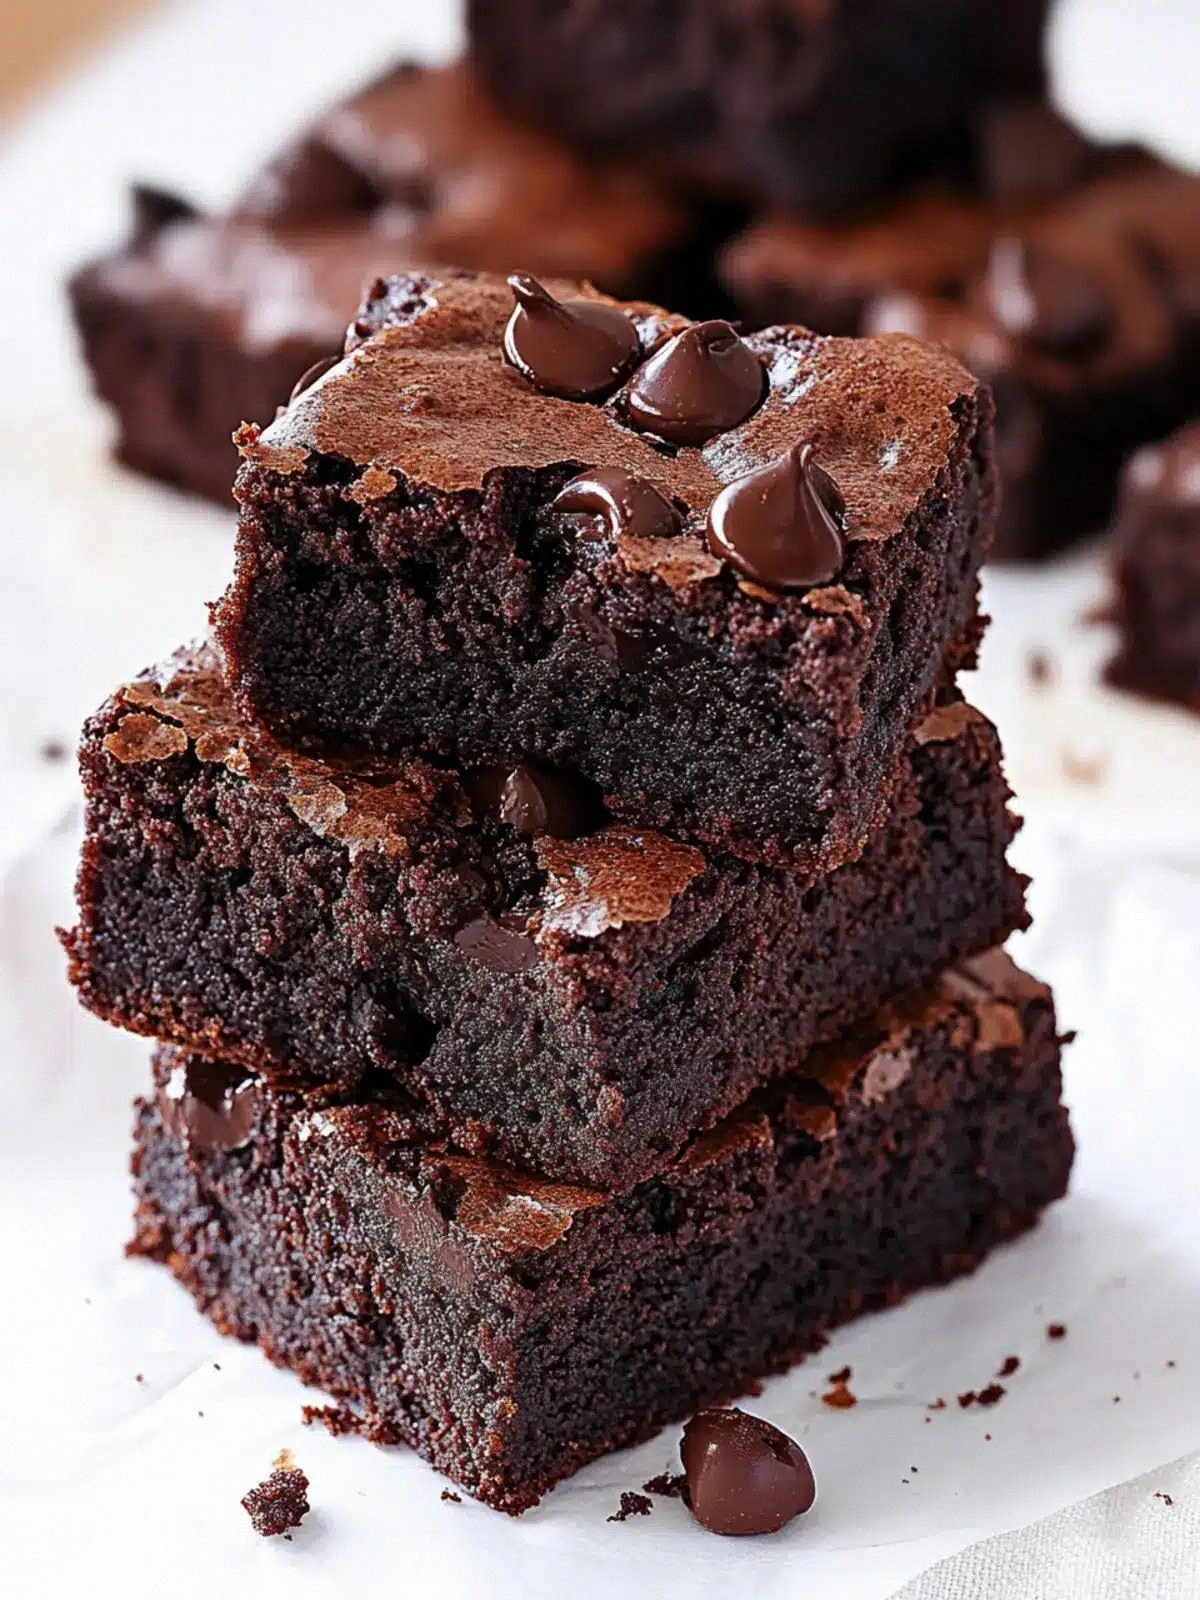
But why should you trust me with this recipe? Because this version is a game‑changer. It’s not just another brownie; it’s a protein‑packed, low‑fat masterpiece that satisfies the sweet tooth while keeping the calories honest. The secret lies in the cottage cheese, the protein powder, and a dash of espresso that awakens the chocolate’s depth. Most recipes get this wrong by over‑sugaring or using heavy butter; I’ve cracked the code to a moist, fudgy texture that doesn’t feel like a guilty pleasure.
Hold onto your spatula, because the next part is pure magic. By the end of this post, you’ll wonder how you ever made brownies the old way. Let me walk you through every single step, from the first whisk to the final dusting of cocoa, and show you why this is hands down the best version you’ll ever make at home.
What Makes This Version Stand Out
- Flavor: The combination of maple syrup and espresso creates a deep, caramelized chocolate experience that feels indulgent without the guilt.
- Texture: The cottage cheese keeps the batter moist and gives the brownies a tender crumb that shatters like thin ice when you bite into them.
- Protein Power: Adding chocolate protein powder boosts the protein content, making these brownies a perfect post‑workout snack.
- Low Fat: By using low‑fat cottage cheese and unsweetened applesauce, you slash the fat content without sacrificing flavor.
- Versatility: The recipe can be tweaked for nut allergies, gluten intolerance, or vegan preferences with simple substitutions.
- Make‑Ahead Friendly: These brownies keep well in the fridge for up to a week and freeze beautifully, so you can enjoy them anytime.
- Time‑Efficient: With a prep time of 15 minutes and a bake time of 30, you get a dessert in under an hour.
- Crowd‑Pleaser: Whether it’s a family dinner or a party, the first bite will have everyone asking for the recipe.
Alright, let's break down exactly what goes into this masterpiece…
Inside the Ingredient List
The Flavor Base
Maple syrup is the sweet heart of this recipe, providing natural sweetness and a subtle caramel undertone that elevates the chocolate. If you’re watching your sugar intake, you can swap maple syrup for a low‑glycemic sweetener like monk fruit syrup, but keep in mind the flavor profile will shift slightly. The key is to use a syrup that has a clean finish, so the chocolate doesn’t feel syrupy.
The Texture Crew
Low‑fat cottage cheese is the unsung hero that delivers moisture and a protein boost without the heaviness of cream. When blended, it turns into a silky base that keeps the brownies tender. If you’re not a fan of cottage cheese’s mild tang, you can blend it with a splash of milk to smooth out the flavor.
Almond flour replaces regular flour, giving the brownies a nutty flavor and a finer crumb. It also keeps the gluten level low, which is essential for a chewy, non‑dense texture. If you’re allergic to nuts, oat flour or coconut flour are good alternatives, but the baking time may need a slight adjustment.
The Unexpected Star
Espresso powder is the secret weapon that unlocks the chocolate’s full potential. It adds depth and a subtle bitterness that balances the sweetness, making the brownies feel more sophisticated. Don’t skip it—if you’re looking for a richer flavor, try a light roast espresso for a smoother finish.
Dark chocolate chips add a burst of richness and a slightly bitter counterpoint to the maple syrup’s sweetness. They also give the brownies a glossy, chocolatey sheen that looks irresistible. If you prefer a sweeter chocolate, use semi‑sweet chips, but be prepared for a less complex flavor.
Chopped walnuts or pecans bring crunch, nutty warmth, and healthy fats, turning each bite into a textural adventure. They also help to anchor the brownie’s structure, preventing it from becoming too soft. Feel free to experiment with almonds, pistachios, or even pumpkin seeds for a different crunch.
The final flourish is vanilla extract, which adds a warm, aromatic note that ties all the flavors together. A teaspoon is enough to lift the entire batter, but if you’re a vanilla lover, a splash more can make the brownies feel more luxurious.
Everything's prepped? Good. Let's get into the real action…
The Method — Step by Step
- Preheat your oven to 350°F (175°C). Line a 9x9‑inch baking pan with parchment paper, leaving a little overhang on the sides for easy removal. This step ensures even heat distribution and a clean lift‑out.
- In a large bowl, combine the low‑fat cottage cheese and eggs. Whisk vigorously until the mixture is smooth and the cottage cheese is fully integrated. The goal is a silky base that will carry the sweet and chocolatey flavors.
- Add the maple syrup, vanilla extract, and espresso powder to the bowl. Stir until the liquids are fully incorporated, and the batter smells faintly of coffee. This is the moment when the aroma starts to tease your senses.
- Sift the cocoa powder, chocolate protein powder, almond flour, salt, and baking powder into a separate bowl. Mixing dry ingredients separately prevents clumping and ensures even distribution of leavening agents.
- Fold the dry mixture into the wet batter gently, using a spatula to preserve the air bubbles. The batter should be thick but pourable; if it’s too thick, add a tablespoon of milk or water.
- Stir in the dark chocolate chips and chopped nuts, distributing them evenly throughout the batter. This step adds pockets of chocolatey goo and crunchy texture.
- Pour the batter into the prepared pan, smoothing the top with a spatula. Tap the pan lightly on the counter to release any trapped air bubbles.
- Bake for 30 minutes, or until the edges pull away from the sides and a toothpick inserted in the center comes out with a few moist crumbs. Avoid overbaking; the brownies should still be slightly soft in the middle to maintain that fudgy bite.
- Let the brownies cool in the pan for 10 minutes, then lift them out using the parchment overhang. Slice into squares and serve immediately, or let them cool completely before storing.
That’s it— you did it. But hold on, I’ve got a few more tricks that will take this to another level.
Insider Tricks for Flawless Results
The Temperature Rule Nobody Follows
Many bakers bake at the highest temperature on the dial, assuming more heat means faster cooking. In reality, a lower, steady temperature (350°F) allows the brownies to rise evenly and develop a moist crumb. I’ve baked at 325°F once, and the result was a slightly thicker, more cake‑like brownie that still tasted amazing.
Why Your Nose Knows Best
Before you pull the brownies out of the oven, give them a sniff. A warm, chocolatey scent that lingers indicates they’re done. If the smell is more like burnt sugar, give them a couple more minutes. Trust your nose—it’s a reliable judge of doneness.
The 5-Minute Rest That Changes Everything
After baking, let the brownies rest in the pan for 5 minutes before lifting them out. This short rest allows the structure to set, preventing the brownies from breaking apart. I’ve seen people slice right out of the oven and end up with a mess; this trick saves the day.
Keep It Cool with Parchment
When removing the brownies, use the parchment overhang to lift them. The parchment protects the edges from sticking and gives a cleaner cut. If you’re using a silicone mat, be sure it’s not too thick, or the brownies might not set properly.
Freeze for Future Cravings
Wrap individual squares in parchment and then in plastic wrap before freezing. When you’re ready to enjoy, let them thaw at room temperature for 10 minutes. The texture remains moist, and the chocolate stays glossy.
Use a Food Thermometer for Precision
If you’re a meticulous baker, a kitchen thermometer can help you hit the perfect internal temperature (around 190°F). This ensures the brownies are fully cooked yet still fudgy. It’s a small tool that makes a big difference.
Creative Twists and Variations
This recipe is a playground. Here are some of my favorite ways to switch things up:
Nutless Delight
Omit the nuts entirely for a cleaner flavor profile. Replace the almond flour with oat flour to keep the texture light and airy. The result is a brownie that’s still fudgy but with a subtle, wholesome grain note.
Spiced Chocolate
Add 1/2 teaspoon of cinnamon and a pinch of cayenne pepper to the dry mix. The cinnamon adds warmth, while the cayenne gives a gentle kick that pairs beautifully with the chocolate. This variation is perfect for a cozy evening.
Berry Burst
Fold in 1/2 cup of fresh blueberries before baking. The berries burst in the center, adding a sweet, tart contrast to the chocolate. Make sure to pat the berries dry to avoid excess moisture.
Almond Joy Twist
Replace dark chocolate chips with milk chocolate chips and add shredded coconut on top before baking. The coconut adds a tropical flavor and a chewy texture that complements the brownie’s softness.
Vegan Version
Swap the cottage cheese for silken tofu, the eggs for flax “eggs,” and use plant‑based protein powder. The tofu keeps the moisture, while the flax eggs bind the batter. The result is a vegan brownie that still satisfies the chocolate craving.
Holiday Edition
Add 1/4 cup of dried cranberries and a pinch of ground ginger. The cranberries add a festive tartness, and the ginger brings a subtle spice that feels like a holiday treat. This version is great for Christmas or Thanksgiving.
Storing and Bringing It Back to Life
Fridge Storage
Store the brownies in an airtight container at room temperature for up to 5 days. Keep them on a cool, dry shelf away from direct sunlight. The brownies will stay moist and flavorful, and the chocolate won’t melt.
Freezer Friendly
Wrap each square in parchment paper, then in a second layer of plastic wrap. Place them in a freezer bag and label with the date. They can stay in the freezer for up to 3 months without losing quality.
Best Reheating Method
To reheat, place a brownie on a microwave‑safe plate and microwave on high for 20–25 seconds. If you prefer a crispier top, finish with a quick broil for 1–2 minutes. A splash of water before reheating steams the brownie back to perfection.