Picture this: it’s a frigid Saturday night, the kind where the wind howls like a pack of wolves outside, and you’re stuck in a kitchen that feels more like a bunker than a place of comfort. I was halfway through a marathon of holiday movies when a sudden craving for something that could both warm my soul and satisfy my sweet tooth hit me like a rogue snowball. I raided the pantry, found a dusty tin of gingersnap cookies, a block of cream cheese that was practically melting in the fridge, and a bag of white almond bark that looked like edible snow. I thought, “What if I could turn these into bite‑size fireworks of flavor?” and the rest is, well, delicious history.
The moment the gingersnap crumbs hit the mixing bowl, the kitchen filled with a spice perfume that could make a seasoned chef weep with joy. I could practically see the ginger crystals dancing in the air, hear the faint crackle of the almond bark as it melted, and feel the creamy texture of the cheese turning silky under my whisk. My taste buds were already doing somersaults, and the anticipation was so thick you could cut it with a butter knife. I dared myself to keep my hands off the first batch, but I’ll be honest — I ate half the batch before anyone else got a chance to try it. That’s the power of a truly addictive truffle.
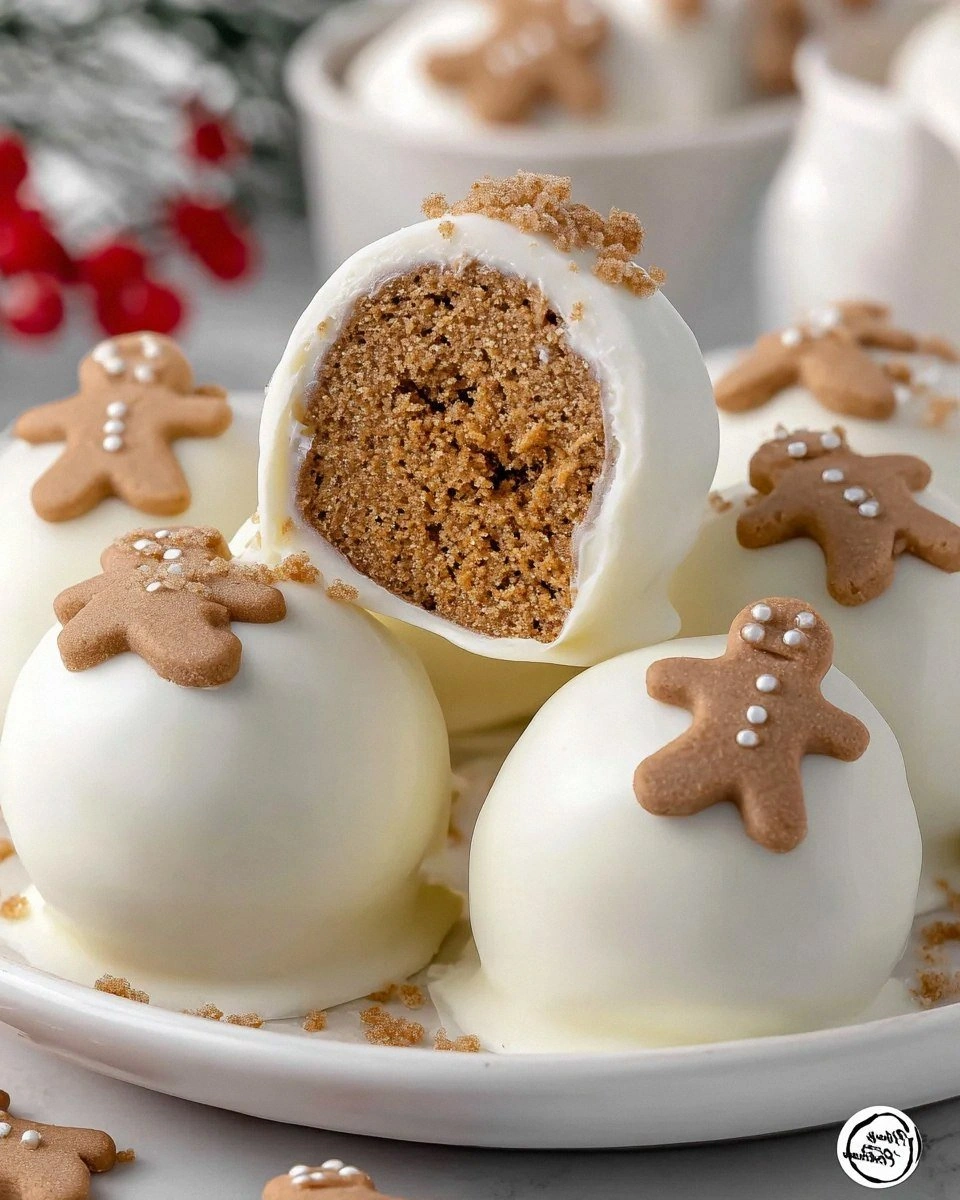
What makes this version a cut above the rest? Most gingerbread truffle recipes either drown the ginger in sugar or forget the creamy balance that makes each bite melt like a snowflake on a warm tongue. I discovered that the secret lies in the perfect marriage of crunchy gingersnap crumbs, tangy cream cheese, and a glossy white almond bark coating that snaps like fresh frost. Add a dash of vanilla for depth, and you’ve got a truffle that sings carols on your palate. I’m about to reveal a little trick involving a quick chill in the freezer that most cooks completely overlook — it’s the game‑changer that keeps every truffle perfectly round and prevents the coating from sliding off.
Let me walk you through every single step — by the end, you’ll wonder how you ever made truffles any other way. Okay, ready for the game‑changer? This next part? Pure magic.
What Makes This Version Stand Out
- Flavor Explosion: The gingersnap base delivers a bold, spicy snap that’s instantly recognizable, while the cream cheese adds a mellow, buttery backdrop that keeps the heat from overwhelming your palate.
- Texture Symphony: You get a crumbly interior that melts in your mouth, contrasted with a crisp, glossy almond bark exterior that cracks like fresh ice under a fork.
- Simplicity Meets Sophistication: Fewer than ten ingredients and no fancy equipment required, yet the result feels like a pastry chef’s secret.
- Unique Coating: White almond bark isn’t just for show; its natural buttery flavor enhances the ginger without adding extra sweetness.
- Crowd‑Pleaser Factor: These truffles disappear at parties faster than you can say “gingerbread,” making them the ultimate holiday show‑stopper.
- Ingredient Quality: Using real gingersnap cookies (not the powdered mix) ensures authentic spice pockets, and high‑quality cream cheese keeps the texture silk‑smooth.
- Effortless Make‑Ahead: Once formed, the truffles can be stored for weeks, allowing you to prep ahead and still serve fresh‑tasting treats.
- Seasonal Flexibility: While they scream December, the warm spice profile works beautifully any time you crave comfort.
Inside the Ingredient List
The Flavor Base
Gingersnap cookies: These provide the base and that unmistakable ginger flavor we all love during the holidays. The crunchy texture also gives the truffles a subtle bite that keeps them from feeling too soft. If you skip them, you lose the signature snap and the spice depth that makes these truffles unforgettable. You can substitute with speculoos cookies for a caramel‑spice twist, but the ginger will be less pronounced.
The Texture Crew
Cream cheese: This contributes to the creamy texture, making each truffle irresistibly smooth and rich. The slight tang balances the sweetness of the almond bark, preventing the final product from becoming cloying. Using full‑fat cream cheese is essential; low‑fat versions become grainy when chilled. If you’re out of cream cheese, a blend of mascarpone and a splash of milk can mimic the richness, though the tang will be milder.
The Unexpected Star
Pure vanilla extract: A splash adds a warm, aromatic depth that complements the spices beautifully. Vanilla acts like a bridge, tying the ginger and almond flavors together in a harmonious duet. A cheap imitation can introduce off‑notes, so opt for pure extract. If you’re feeling adventurous, replace half of it with a drop of almond extract for an extra nutty nuance.
The Final Flourish
White almond bark: This is the luscious coating that gives the truffles a sweet, snowy finish. It hardens quickly, creating a satisfying snap that contrasts the soft interior. Make sure the bark is truly white; tinted versions can alter the visual appeal. For a dairy‑free version, use a high‑quality white chocolate made with coconut oil.
Holiday sprinkles: These are optional but perfect for adding a festive touch to your treats! They add a pop of color and a subtle crunch, turning each truffle into a mini celebration. If you’re avoiding artificial colors, try finely chopped pistachios or toasted coconut flakes for a natural garnish.
Everything's prepped? Good. Let’s get into the real action…
The Method — Step by Step
First, line a large baking sheet with parchment paper and set a sturdy bowl on the counter. In a food processor, pulse the gingersnap cookies until they become fine crumbs — think of sand on a beach, not a powder. Transfer the crumbs to a mixing bowl, then add the softened cream cheese and vanilla extract. Using a sturdy spoon, mash everything together until you achieve a uniform, slightly sticky dough that holds together when pressed. The scent at this stage should be intoxicating, a warm blend of ginger, butter, and vanilla that makes you want to lick the spoon.
Now, shape the dough into a log about 1½ inches in diameter. This is where the “firming” hack from earlier pays off: wrap the log tightly in plastic wrap and pop it into the freezer for exactly 10 minutes. I dare you to taste this and not go back for seconds after the next step — the chill makes the dough firm enough to roll without crumbling, yet still pliable enough to shape.
While the bark melts, line a second baking sheet with parchment and set a shallow bowl of water nearby. Once the bark is smooth and glossy, remove the dough log from the freezer. Slice it into 1‑inch balls using a small ice‑cream scoop or a tablespoon. If the dough sticks, dip the scoop in warm water for a second — this prevents the mixture from tearing and keeps the spheres perfectly round.
Roll each ball between your palms, applying gentle pressure until you feel the mixture give way and become a smooth sphere. The goal is a firm exterior that will hold the coating without cracking. As you roll, the truffle should feel cool but not icy; if it’s too warm, pop it back in the freezer for a minute. This step is crucial because a warm interior can cause the almond bark to slide off later.
Now for the coating: Using a fork or a small dipping tool, lower each truffle into the melted almond bark, letting excess drip back into the bowl. The bark should cling like a thin veil, creating a smooth, glossy finish. Transfer the coated truffle back onto the parchment sheet. If you want a festive sparkle, sprinkle holiday sprinkles over the wet bark immediately — they’ll adhere perfectly before the chocolate sets.
After the brief chill, move the truffles to a wire rack and let them sit at room temperature for 10 minutes. This allows the coating to fully harden while the interior stays luxuriously soft. The aroma at this point is pure holiday magic — a mingling of ginger, buttery vanilla, and toasted almond that makes your kitchen feel like a winter wonderland.
Finally, arrange the truffles on a serving platter. For extra drama, dust a light layer of powdered sugar over the top; it adds a snow‑kissed look without altering the flavor. Serve them immediately, or store them as outlined below. That’s it — you did it. But hold on, I’ve got a few more tricks that'll take this to another level…
Insider Tricks for Flawless Results
The Temperature Rule Nobody Follows
Most home cooks think “room temperature” is a vague suggestion, but for these truffles, the exact temperature of each component matters. Keep your cream cheese just soft enough to mix, but not melted — around 65°F. If it’s too warm, the truffles will become greasy; too cold, and they’ll crumble. I once tried to speed things up by microwaving the cheese for 10 seconds; the result was a grainy mess that never held together. The sweet spot is the difference between a flawless truffle and a kitchen disaster.
Why Your Nose Knows Best
When the almond bark is melting, trust your nose more than the timer. You’ll notice a faint buttery aroma that turns slightly nutty — that’s the signal it’s ready for coating. Over‑heating will burn the sugars, giving a bitter aftertaste that ruins the ginger’s warmth. If you’re unsure, remove the bowl from the heat and give it a quick stir; the scent will guide you.
The 5‑Minute Rest That Changes Everything
After you’ve rolled the dough balls, let them rest for five minutes on the counter before coating. This short pause lets the interior firm up just enough to prevent the coating from sliding off. I’ve seen beginners skip this step and end up with truffles that look great but lose their chocolate shell within seconds of plating. The rest is a tiny investment that yields a massive payoff in stability.
Sprinkle Strategy
If you love the festive look, use sprinkles strategically. Instead of covering the entire surface, apply them in a spiral pattern while the bark is still wet. This creates a visual swirl that catches the eye and adds a subtle crunch. Over‑sprinkling can make the truffle feel gritty, so less is more unless you’re aiming for a “snowstorm” effect.
Freezer‑Friendly Packaging
When storing for longer periods, wrap each truffle individually in parchment, then place them in a zip‑top bag. The double barrier prevents freezer burn and keeps the coating from absorbing other odors. I once stored truffles next to a bag of garlic bread, and the almond bark took on a faint garlicky note — not pleasant! Proper packaging preserves the pristine flavor profile for up to three months.
Creative Twists and Variations
This recipe is a playground. Here are some of my favorite ways to switch things up:
Chocolate‑Ginger Fusion
Replace half of the white almond bark with dark chocolate (70% cacao). The bitterness of the dark chocolate deepens the ginger’s spice, creating a sophisticated flavor that adult guests adore. Pair it with a dusting of cocoa powder for an elegant finish.
Citrus Zing
Add a teaspoon of finely grated orange zest to the crumb mixture before forming the log. The citrus brightens the ginger and adds a fresh pop that cuts through the richness. This version shines at brunches or spring gatherings.
Nutty Crunch
Stir in a quarter cup of finely chopped toasted pecans or walnuts into the dough. The nuts introduce an extra layer of texture, making each bite unexpectedly crunchy. If you’re allergic, substitute with toasted pumpkin seeds for a similar effect.
Spiked Holiday
For an adult‑only batch, splash in a tablespoon of bourbon or spiced rum into the cream cheese mixture. The alcohol amplifies the warm spices and adds a subtle caramel undertone. Just remember to let the alcohol evaporate slightly during the mixing stage to avoid a raw taste.
Vegan Version
Swap the cream cheese for a blend of silken tofu and a tablespoon of coconut cream, and use a vegan white chocolate bark. The texture changes slightly but remains creamy, and the flavor stays true to the original. This adaptation makes the truffles accessible to plant‑based eaters without sacrificing the holiday spirit.
Storing and Bringing It Back to Life
Fridge Storage
Place the truffles in an airtight container lined with parchment paper, ensuring they don’t touch each other. Store in the refrigerator for up to one week. The cool environment keeps the almond bark firm and the interior creamy. If you notice any condensation, simply pat the surface dry with a paper towel before serving.
Freezer Friendly
For longer keeping power, wrap each truffle individually in parchment, then seal them in a zip‑top freezer bag. They’ll stay fresh for up to three months. When you’re ready to enjoy them, move the bag to the fridge for an hour, then let the truffles sit at room temperature for 10 minutes before serving.
Best Reheating Method
If the truffles have hardened too much after refrigeration, place them on a plate and microwave for 5‑7 seconds. Add a tiny splash of water (about a teaspoon) to the plate before microwaving; the steam gently revives the interior without melting the coating. This trick brings them back to that perfect melt‑in‑your‑mouth texture.