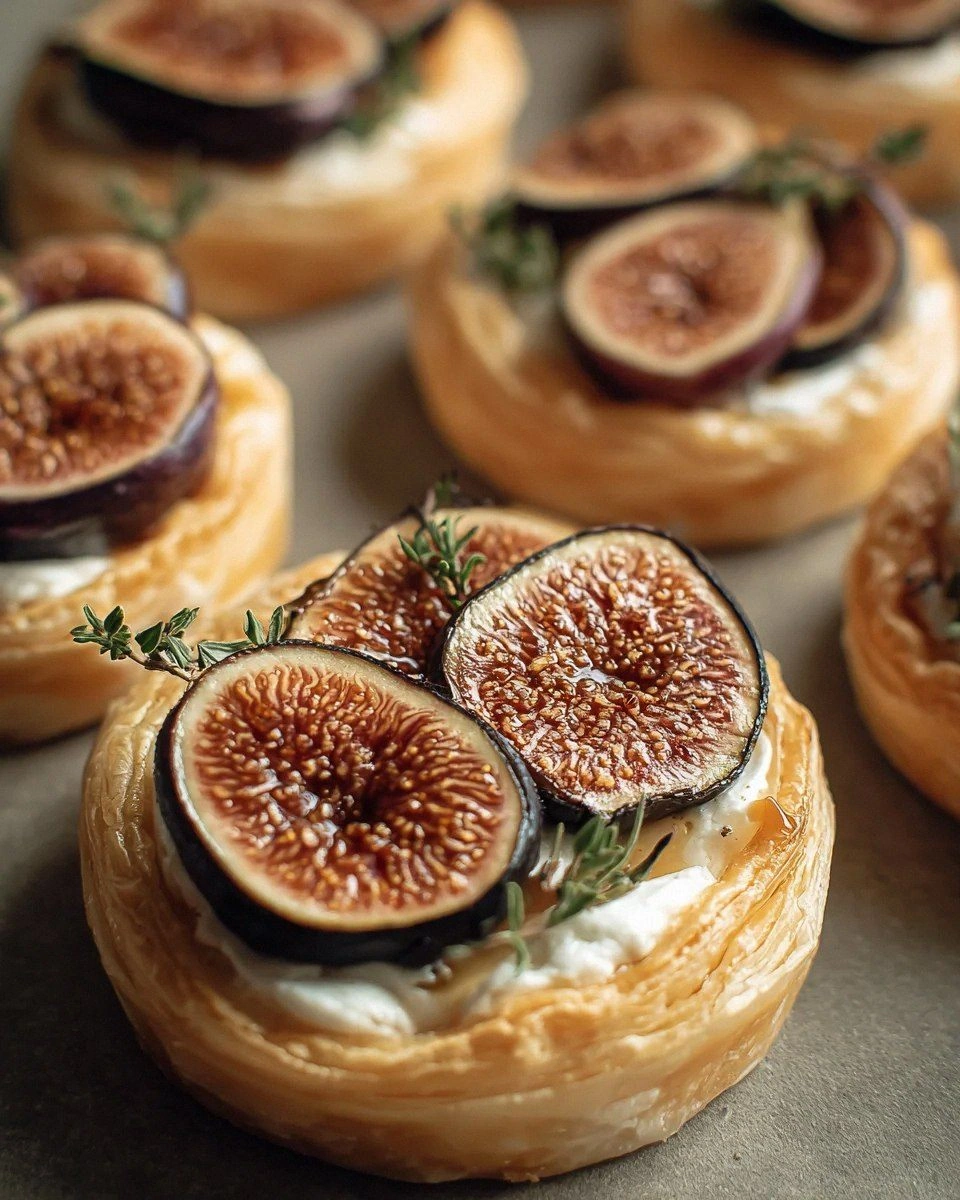
Picture this: I’m in my tiny kitchen, the clock ticking like a metronome, and my roommate just announced she’s bringing over a whole cheese platter for movie night. Panic? Absolutely. I stared at my pantry, the only thing that looked promising was a lonely pack of frozen puff pastry that had been hiding behind the canned beans for months. I thought, “What if I could turn this bland sheet of dough into something that screams gourmet without any fancy equipment?” The answer? A fig and goat cheese puff pastry that turned my panic into pure triumph. I tossed the pastry on the counter, sliced fresh figs that were practically bursting with sunshine, and crumbled goat cheese like I was sprinkling edible clouds. The moment the oven door shut, a buttery aroma rose like a choir of angels, and I swear I heard the pastry whisper, “We’re about to become legends.”
Now, let’s talk senses. The first thing you’ll notice is the visual drama: golden, flaky layers that peek out from beneath a glossy honey glaze, each pocket holding a jewel‑red fig that looks like it was plucked straight from a Renaissance painting. The scent? A heady mix of toasted butter, sweet honey, and a faint herbal whisper from thyme that makes your nose do a little happy dance. When you bite in, the pastry shatters with a crisp that’s almost musical, giving way to a creamy, tangy goat cheese that’s balanced perfectly by the fig’s natural caramel notes. The texture journey doesn’t stop there—there’s a subtle, peppery bite that cuts through the sweetness, creating a harmony that feels like a well‑orchestrated symphony on your palate. And the aftertaste? A lingering warmth that makes you want to reach for another piece before the first even finishes.
Most recipes I’ve tried for fig and cheese pastries either drown the figs in cheese or forget the crucial step of a glossy finish, leaving you with a soggy mess that looks like a failed art project. This version, however, is hands down the best you’ll ever make at home because it respects each ingredient’s personality while coaxing them into a perfect partnership. I’m talking about a technique where the figs are lightly brushed with honey before they meet the pastry, ensuring they caramelize just enough to stay juicy but not turn into a sticky puddle. And the goat cheese? I spread it thinly, allowing the pastry’s layers to peek through, so you get that delightful contrast every single bite. I dare you to taste this and not go back for seconds; the combination is that addictive.
Okay, ready for the game‑changer? The secret weapon here is a quick brush of egg wash mixed with a splash of water that gives the pastry a mirror‑like shine and a buttery crunch that’s impossible to ignore. I’ll be honest — I ate half the batch before anyone else got to try it, and that’s the only crime I’m willing to confess. If you’ve ever struggled with puff pastry turning soggy or figs turning mushy, you’re not alone — and I’ve got the fix. Picture yourself pulling this out of the oven, the whole kitchen smelling incredible, the steam curling around you like a warm hug. Let me walk you through every single step — by the end, you’ll wonder how you ever made it any other way.
What Makes This Version Stand Out
- Taste: The sweet‑tart figs paired with tangy goat cheese create a flavor duet that feels both sophisticated and comfort‑food cozy.
- Texture: Flaky, buttery layers contrast with the soft, jammy figs and creamy cheese, delivering a multi‑dimensional bite.
- Simplicity: Using store‑bought puff pastry cuts prep time in half without sacrificing that restaurant‑quality puff.
- Uniqueness: A drizzle of honey and a sprinkle of fresh thyme elevate the dish from ordinary to unforgettable.
- Crowd Reaction: Guests often claim it’s “the best thing they’ve ever tasted” and immediately ask for the recipe.
- Ingredient Quality: Fresh figs and high‑quality goat cheese are the stars; their natural flavors shine through.
- Cooking Method: The high‑heat blast ensures maximum lift and a glossy finish that looks as good as it tastes.
- Make‑Ahead Potential: Assemble ahead, freeze, then bake when needed—perfect for last‑minute entertaining.
Inside the Ingredient List
The Flavor Base
First up, the fresh figs. These jewel‑like fruits bring a natural sweetness that’s both bright and deep, thanks to their high fructose content. When you slice them just right—about a half‑inch thick—they hold their shape during baking, offering that perfect bite‑size burst of jammy goodness. If you skip the figs, you lose the sweet counterpoint that makes the goat cheese feel less like a dairy overload and more like a refined topping. A good swap for out‑of‑season figs is dried figs re‑hydrated in warm water with a splash of orange juice; just remember to cut back on the honey a tad because dried fruit is already concentrated.
The Texture Crew
Puff pastry sheets are the literal foundation of this masterpiece. Their many layers of butter‑infused dough puff up dramatically when they hit a hot oven, creating that coveted airy crunch. The secret? Keep the sheets frozen until you’re ready to roll them out; the colder the butter, the higher the rise. If you decide to use fresh pastry, roll it between two sheets of parchment and chill it for at least 15 minutes before cutting—otherwise you’ll end up with a soggy bottom that’s a total letdown.
The Unexpected Star
Goat cheese brings the creamy tang that cuts through the fig’s sweetness, acting like the perfect foil. Its crumbly texture melts just enough to coat the pastry without turning into a greasy puddle. If you’re not a fan of goat cheese, feta offers a similar salty bite, while ricotta can be used for a milder, creamier alternative—just add a pinch of lemon zest to keep the brightness.
The Final Flourish
Honey, fresh thyme leaves, egg wash, and a dash of black pepper are the finishing touches that transform good into legendary. Honey adds a glossy sheen and a subtle floral note; thyme contributes an aromatic earthiness that lifts the whole dish, and the pepper provides a whisper of heat that balances the sweet. The egg wash is the final armor, giving the pastry a golden, almost lacquered exterior that makes it look as good as it tastes.
Everything's prepped? Good. Let's get into the real action...
The Method — Step by Step
Preheat your oven to 200°C (390°F) and line a baking sheet with parchment paper. While the oven warms, lay out the frozen puff pastry sheets on a lightly floured surface. I like to give them a quick 5‑minute roll with a rolling pin to ensure they’re an even ¼‑inch thick; this helps them puff uniformly. The moment the dough hits the hot oven, you’ll hear a faint sizzle that signals the butter layers are beginning to separate—listen for that, it’s the first sign of success. Remember, the parchment not only prevents sticking but also makes cleanup a breeze.
Using a sharp knife or a pizza cutter, cut the pastry into 4‑inch squares. Don’t be shy about trimming the edges; a clean, straight edge gives a professional look and ensures even cooking. Place each square onto the prepared baking sheet, leaving a little space between them so the steam can circulate. Here’s a little secret: lightly brush the tops of the squares with a touch of melted butter before adding any toppings; it adds an extra layer of flavor and helps the final glaze adhere.
Now, it’s time for the figs. Slice each fig into half‑moon shapes, about ½‑inch thick. Lightly brush each slice with a drizzle of honey—just enough to coat but not drown them. Arrange the figs on each pastry square, leaving a small border around the edges so the pastry can rise without being weighed down. This honey‑fig combo will caramelize in the oven, creating a glossy, amber‑colored surface that looks as good as it tastes.
Kitchen Hack: If your figs are especially juicy, pat them gently with a paper towel after brushing with honey to avoid excess moisture.Scatter crumbled goat cheese over the figs, using roughly 1 tablespoon per pastry square. The cheese should be evenly distributed but not piled; you want each bite to have a balanced ratio of cheese to fig. Sprinkle a pinch of freshly ground black pepper over the top—this tiny amount adds a subtle heat that cuts through the sweetness. Finally, scatter fresh thyme leaves; they release their aroma when heated, turning the dish into a fragrant masterpiece.
Prepare the egg wash by whisking together one large egg with a tablespoon of water until frothy. Brush the exposed edges of each pastry square with the egg wash; this is what gives the pastry that gorgeous, glossy finish.
Once brushed, give the tray a gentle tap to settle any air bubbles that may have formed under the toppings.Watch Out: Avoid over‑brushing the egg wash onto the figs, or you’ll end up with a soggy center instead of a crisp top.Slide the tray into the preheated oven and bake for 18‑22 minutes, or until the pastry is puffed, golden‑brown, and the figs are caramelized. Around the 12‑minute mark, rotate the sheet 180 degrees to ensure even browning; this is the moment of truth where you’ll see the edges start pulling away from the parchment, a sign that the layers have fully expanded. The scent at this stage is intoxicating—imagine a buttery bakery mingling with sweet fruit and herbal notes. Keep a close eye on the color; you want a deep amber, not a burnt brown.
When the pastry reaches that perfect hue, remove it from the oven and let it rest on the sheet for 3‑4 minutes. This short rest allows the steam to settle, preventing the pastry from collapsing. While it’s still warm, give each piece a final drizzle of honey—this adds a shiny finish and a burst of extra sweetness that makes the dish pop.
Transfer the pastries to a cooling rack and serve them warm, or at room temperature if you prefer. They’re perfect as an appetizer, a brunch centerpiece, or even a sophisticated snack for a wine‑and‑cheese night. If you’re feeling extra fancy, garnish with a few extra thyme leaves or a light dusting of powdered sugar for a sweet‑savory contrast. And now the fun part—watch your guests devour them with delight, and be prepared for the inevitable request for the recipe.
Insider Tricks for Flawless Results
The Temperature Rule Nobody Follows
Never underestimate the power of a scorching oven. Puff pastry thrives on a rapid temperature shock that forces the butter layers to steam and puff. If your oven isn’t hot enough, the pastry will bake slowly, resulting in a dense, soggy texture. I once tried a “low‑and‑slow” approach and ended up with something that resembled a flatbread, not a puff. So crank it up, and trust the heat to do the heavy lifting.
Why Your Nose Knows Best
While the timer is a helpful guide, your nose is the ultimate indicator of doneness. When the pastry reaches a deep golden‑brown and you catch the faint scent of caramelized butter, you know it’s ready. If you smell a burnt, acrid note, pull it out immediately—over‑baking turns the delicate layers into bitter shards. This sensory cue saved me more times than any kitchen timer ever could.
The 5‑Minute Rest That Changes Everything
After the pastries emerge from the oven, resist the urge to dive right in. Let them sit for five minutes; this short pause lets the steam redistribute, keeping the interior moist while the crust stays crisp. Skipping this step often leads to a soggy bottom because the steam hasn’t had a chance to escape. Trust me, those extra minutes are worth the anticipation.
Egg Wash Variations
For an even richer glaze, substitute half of the water in the egg wash with a splash of milk or cream. The added fat creates a shinier, more buttery finish that catches the light beautifully. I tried this once for a brunch buffet and the pastries looked like they’d been brushed with liquid gold. Just remember not to over‑mix; a gentle whisk is all you need.
Thyme Timing Trick
If you love the aroma of fresh herbs, add a second sprinkle of thyme just after the pastries come out of the oven. The residual heat releases the essential oils without cooking them away, giving you a brighter, more pronounced herb flavor. One of my friends tried this and said it “took the dish from good to unforgettable.”
Creative Twists and Variations
This recipe is a playground. Here are some of my favorite ways to switch things up:
Savory Spin
Swap the honey for a drizzle of balsamic reduction and replace figs with caramelized onions. The tangy balsamic complements the goat cheese, turning the dish into a sophisticated appetizer for cocktail parties.
Spicy Kick
Add a thin slice of jalapeño or a pinch of crushed red pepper flakes on top of each fig before baking. The heat cuts through the sweetness, giving the pastry a bold, unexpected zing that’s perfect for adventurous eaters.
Nutty Crunch
Sprinkle toasted pine nuts or chopped pistachios over the pastries right after they come out of the oven. The nuts add a crunchy contrast and a buttery flavor that pairs wonderfully with both figs and goat cheese.
Vegan Version
Use a plant‑based puff pastry (many grocery stores carry them) and replace goat cheese with a creamy cashew‑based cheese. Swap the egg wash for a mixture of almond milk and a dash of maple syrup for shine. The result is just as flaky and flavorful, catering to vegans without compromising texture.
Breakfast Boost
Top each pastry with a poached egg and a sprinkle of microgreens for a brunch‑worthy twist. The runny yolk adds richness, while the greens bring a fresh, peppery note that balances the sweet figs.
Seasonal Swap
In autumn, replace fresh figs with roasted pear slices and a drizzle of maple syrup. The earthier fruit pairs beautifully with the tangy cheese, creating a warm, comforting bite perfect for cooler evenings.
Storing and Bringing It Back to Life
Fridge Storage
Place cooled pastries in an airtight container lined with a paper towel to absorb excess moisture. They’ll stay fresh for up to three days, though the crust may lose some crispness. Reheat gently in a 180°C (350°F) oven for 5‑7 minutes to revive the flakiness.
Freezer Friendly
Arrange the unbaked, assembled pastries on a parchment‑lined tray and freeze them solid (about 1‑2 hours). Then transfer them to a zip‑top freezer bag. They can be stored for up to two months. When you’re ready to bake, add an extra 3‑4 minutes to the baking time; no thawing needed.
Best Reheating Method
To bring them back to life, preheat your oven to 190°C (375°F) and place the pastries on a wire rack set over a baking sheet. Add a tiny splash of water to the tray (just a few drops) to create steam, which helps the pastry regain its puff without drying out. Heat for 6‑8 minutes, and you’ll have a pastry that tastes as fresh as the day it was made.