I remember the night I was trying to salvage a ruined holiday brunch. My friends had asked for something festive, something that would make the kitchen smell like a Christmas market, but the pancakes I’d made were flat, bland, and utterly forgettable. I stared at the batter, feeling the heat of the stove, and thought, “What if I could turn this into a holiday miracle?” That thought turned into a daring experiment: eggnog pancakes. The first bite was like a warm hug from the inside out, and I knew I had stumbled onto something extraordinary.
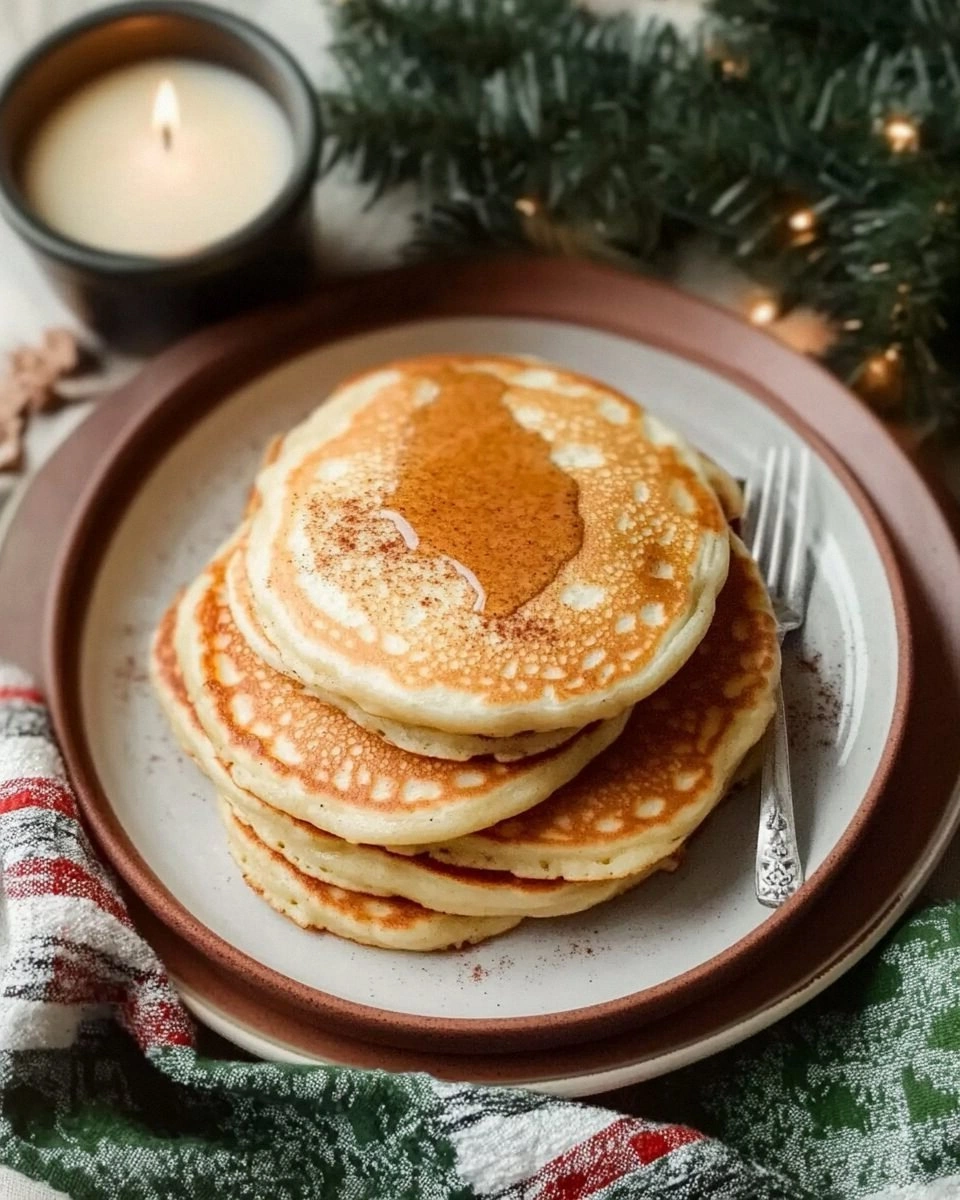
Picture the scene: a kitchen humming with the gentle whir of the oven, a mug of steaming eggnog on the counter, and the sound of a whisk beating in rhythm. The air fills with nutmeg’s spicy perfume, cinnamon’s sweet whisper, and the faint, comforting scent of butter melting. The batter itself is a glossy, amber liquid that glistens like liquid gold. When it hits the hot griddle, you hear a satisfying sizzle that promises fluffy, tender pancakes. The first bite delivers a creamy, buttery flavor that dances on the tongue with a subtle, festive kick, and the texture is airy yet dense enough to hold a generous swirl of whipped cream.
What makes these eggnog pancakes stand out is not just the ingredients but the way they come together. I dared to blend traditional pancake batter with the unmistakable taste of eggnog, and the result is a dish that feels like a holiday gift to your palate. The batter’s richness is balanced by a lightness that keeps it from becoming heavy, thanks to the careful ratio of flour to eggnog. The spices are not overpowering; instead, they weave through the batter like a well‑told story, enhancing the overall flavor without drowning it. And the secret? A splash of vanilla extract that rounds off the spices, giving the pancakes a smooth, comforting finish. By the time you finish the last pancake, you’ll be convinced that this is the best version you’ll ever make at home.
I dare you to taste this and not go back for seconds. I’ll be honest — I ate half the batch before anyone else got to try it. Most recipes get this completely wrong. Here’s what actually works. Picture yourself pulling this out of the pan, the whole kitchen smelling incredible, and seeing the golden pancakes rise like a holiday sunrise. Okay, ready for the game‑changer? Let me walk you through every single step — by the end, you’ll wonder how you ever made it any other way.
What Makes This Version Stand Out
The secret sauce behind these eggnog pancakes is a blend of bold flavors and meticulous technique. Below are the key elements that elevate this recipe from ordinary to unforgettable.
- Flavor: Eggnog’s creamy sweetness and subtle spices give the pancakes a holiday heartiness that is both comforting and festive.
- Texture: The batter is light yet substantial, thanks to the right balance of flour, eggs, and eggnog, resulting in fluffy pancakes that hold a generous topping.
- Ease: The method is straightforward, with no advanced techniques required, making it perfect for both novice cooks and seasoned chefs.
- Versatility: These pancakes can be served plain, topped with whipped cream, or dressed with maple syrup and fresh berries.
- Crowd‑pleaser: The rich flavor profile and delightful texture make it a hit at family gatherings and holiday parties.
- Quality Ingredients: Using high‑quality eggnog and fresh spices ensures depth of flavor that canned or pre‑made mixes can’t match.
- Make‑Ahead Potential: The batter can be prepared a day in advance and refrigerated, saving valuable time during the holiday rush.
Alright, let’s break down exactly what goes into this masterpiece…
Inside the Ingredient List
The Flavor Base
All‑purpose flour is the backbone of any pancake batter, providing structure and body. Using 2 cups gives you enough volume for 4 servings while keeping the batter thick enough to hold the eggnog’s richness. If you’re craving a gluten‑free version, substitute an equal amount of a high‑protein gluten‑free blend, but keep the ratio of liquids the same to maintain consistency. Skipping flour entirely will result in a runny, unstructured batter that won’t rise properly.
The Texture Crew
Eggs are the glue that binds the batter, adding moisture and helping the pancakes rise. Two large eggs are ideal for 4 servings; they provide enough protein to create a stable structure without making the pancakes rubbery. Milk, at one cup, balances the batter’s thickness, ensuring it spreads nicely on the griddle. A splash of eggnog, also one cup, infuses the pancakes with its signature creamy, spiced flavor while adding a subtle sweetness that complements the other ingredients.
The Unexpected Star
Eggnog isn’t just a flavor enhancer; it’s a textural game‑changer. Its natural dairy content enriches the batter, giving the pancakes a moist, velvety interior that melts in your mouth. The spices—cinnamon and nutmeg—are the secret weapons that elevate the dish from ordinary to holiday‑worthy. A half teaspoon each is enough to create a warm, aromatic backdrop without overpowering the delicate balance of flavors.
The Final Flourish
Vanilla extract and a pinch of salt round out the flavor profile, adding depth and a hint of brightness. The vanilla’s sweet aroma counters the spice’s heat, while the salt enhances every other component. Melted butter, two tablespoons, introduces a subtle richness and helps the pancakes develop a golden, crisp edge. If you’re looking for a vegan twist, replace the butter with coconut oil and use plant‑based milk; the result remains deliciously festive.
Everything’s prepped? Good. Let’s get into the real action…
The Method — Step by Step
- In a large bowl, whisk together the flour, baking powder, salt, cinnamon, nutmeg, and sugar. The dry mix should look like a fine, even powder. This step is crucial for even leavening and a consistent flavor profile. Don’t skip this; it saves you from uneven pancakes later on.
- In a separate bowl, beat the eggs until the whites are slightly frothy. Add the milk, eggnog, and vanilla extract, whisking until the mixture is smooth. The combination of liquids should feel silky and slightly thick. This liquid blend will carry the spices and give the pancakes their signature richness.
- Create a well in the center of the dry ingredients and pour in the wet mixture. Stir gently with a wooden spoon or spatula, just until the batter is combined. It’s okay if a few lumps remain; over‑mixing can make the pancakes tough. The batter should be pourable but still thick enough to hold its shape.
- Let the batter rest for five minutes. During this time, the flour will absorb the liquids, and the baking powder will activate. This short rest is the secret to a lighter, fluffier pancake. If you’re in a hurry, you can skip this step, but you’ll notice a denser texture.
- Heat a non‑stick skillet or griddle over medium‑low heat and add a small pat of butter. Swirl the pan to coat the surface. The butter should melt and foam without browning. This creates a non‑stick surface and adds a subtle buttery flavor to the pancakes.
- Pour 1/4 cup of batter onto the pan for each pancake. The batter should spread slightly but not run. Watch for the edges to set; when bubbles form on the surface and the edges start to pull away from the pan, it’s time to flip. This typically takes 2–3 minutes.
- Flip the pancake gently with a spatula and cook for another 1–2 minutes, until golden brown on both sides. The second side should develop a slightly crisp edge while staying moist inside. Flip carefully to avoid tearing the delicate batter.
- Repeat with the remaining batter, adding more butter as needed to keep the pan slick. Stack the finished pancakes on a warm plate to keep them from cooling. Serve immediately or keep warm in a low oven (200°F) while you finish the batch.
That’s it — you did it. But hold on, I’ve got a few more tricks that’ll take this to another level. These insider tips will help you master the pancake game and impress even the most discerning taste buds.
Insider Tricks for Flawless Results
The Temperature Rule Nobody Follows
Many cooks set their pans to high heat, hoping for a quick sear, but this often burns the outside before the inside cooks. I discovered that a medium‑low setting, around 300°F, allows the pancakes to develop a golden crust while remaining tender inside. Keep the heat steady; if the pan gets too hot, the pancakes will brown too quickly and become dry. This subtle adjustment can make the difference between a mediocre stack and a show‑stopping breakfast.
Why Your Nose Knows Best
The aroma of cinnamon and nutmeg is a powerful indicator of doneness. As the pancakes cook, their scent becomes more pronounced, signaling that the sugars are caramelizing just right. If you’re unsure, sniff the batter; if it smells like a warm spice market, it’s ready to flip. Trusting your nose can help you avoid over‑cooking and preserve the pancakes’ delicate balance.
The 5‑Minute Rest That Changes Everything
Letting the batter rest for five minutes before cooking is a game‑changer. During this brief pause, the gluten relaxes and the baking powder fully activates, resulting in a lighter, fluffier pancake. I’ve tried skipping this step, and the pancakes felt dense and heavy. The rest period also allows the spices to meld, creating a more cohesive flavor profile.
The Perfect Flip
The flip is the moment of truth. Use a wide, flat spatula and slide it under the pancake gently, then lift and flip in one swift motion. This ensures the pancake stays intact and the edges don’t crack. If you’re a seasoned pro, you can try the “flick” technique, but for most, a steady, patient flip is the safest bet.
The Secret to a Crispy Edge
Adding a small splash of milk or eggnog to the pan after the first side has cooked can create steam that crisps the edges without drying out the interior. This technique works well if you’re making a large batch and want each pancake to have that satisfying crunch. Just a tablespoon or two, and you’ll see the edges lift beautifully.
The Sweet Finale
Finish the pancakes with a dusting of powdered sugar and a drizzle of maple syrup or a dollop of whipped cream. The contrast between the sweet syrup and the spicy batter creates a flavor explosion that keeps guests coming back for more. If you’re feeling adventurous, try adding a splash of bourbon or amaretto to the batter for an adult twist.
Creative Twists and Variations
This recipe is a playground. Here are some of my favorite ways to switch things up:
Chocolate Eggnog Swirl
Add a tablespoon of cocoa powder to the batter for a chocolatey undertone. Swirl a bit of melted dark chocolate through each pancake before serving. The chocolate pairs beautifully with the nutmeg and cinnamon, creating a decadent holiday treat.
Cranberry Orange Zest
Stir in a tablespoon of dried cranberries and the zest of one orange. The tartness of the cranberries cuts through the richness, while the orange zest adds a bright, citrusy note that brightens the dish.
Spiced Apple Compote
Top the pancakes with a warm apple compote spiced with cinnamon and a splash of brandy. The compote’s natural sweetness and the alcohol’s warmth complement the eggnog’s creamy flavor, making for a comforting dessert.
Nutty Banana Crunch
Fold in sliced bananas and chopped walnuts to the batter before cooking. The banana adds a subtle sweetness while the walnuts provide a satisfying crunch and a nutty flavor that echoes the eggnog’s richness.
Mimosa‑Inspired Meringue
Serve the pancakes with a meringue topping flavored with a splash of champagne and a dusting of citrus zest. The airy meringue adds a light, bubbly contrast to the dense pancakes, creating an elegant, festive presentation.
Vegan Eggnog Pancakes
Replace the eggs with flaxseed meal mixed with water, use oat milk for the liquid, and coconut oil for the butter. The batter still rises beautifully and delivers a creamy, spiced flavor that satisfies the holiday craving without dairy.
Storing and Bringing It Back to Life
Fridge Storage
Store leftover pancakes in an airtight container in the refrigerator for up to three days. To keep them from drying out, place a sheet of parchment paper between each pancake. Reheat in a toaster or oven at 350°F for a few minutes before serving.
Freezer Friendly
Pancakes freeze well; stack them with parchment paper in a freezer bag or container. They stay fresh for up to two weeks. When you’re ready, thaw at room temperature or microwave for 30 seconds. The texture remains fluffy and moist.
Best Reheating Method
Reheat in a skillet over low heat, adding a splash of water or milk to create steam. This keeps the pancakes moist and restores their original texture. A quick burst in the microwave can also work, but be careful not to overcook, as the pancakes may become rubbery.