Remember that night when the kitchen smelled like burnt garlic and the timer ticked on a pan that was supposed to be a masterpiece? I stared at the scorched skillet, heart sinking, and realized that the only thing standing between a culinary disaster and a triumph was a single tweak. I decided to rewrite the classic chicken cacciatore, but with a skillet‑centric twist that keeps everything in one pan, saving time and cleaning up. This is the moment that turned a routine dinner into a revelation. Let me walk you through every single step — by the end, you'll wonder how you ever made it any other way.
I was halfway through a week of bland take‑outs when my friend dared me to create a dish that could bring the whole house together. The challenge was simple: use a single skillet, keep it quick, and let the flavors sing. I reached for my pantry staples, feeling a spark of excitement that I hadn't felt since the first time I cooked for a crowd. The anticipation built as I imagined the sizzle of chicken browning, the aroma of herbs unfurling, and the comforting hug of a homemade sauce. That night, I turned a kitchen mishap into a culinary triumph.
Picture the moment when the first chicken breast hits the hot oil and the sound of a perfect sear echoes through the kitchen. The aroma of garlic and thyme rises, mingling with the earthy scent of rosemary. The skillet becomes a canvas, and every ingredient is a brushstroke that brings the dish to life. I dare you to taste this and not go back for seconds because the flavors are layered, complex, and utterly addictive. This isn’t just another chicken dish; it’s a conversation starter, a comfort hug, and a culinary victory all rolled into one.
If you've ever struggled with chicken cacciatore, you're not alone — and I've got the fix. Most recipes get this completely wrong by overcooking the chicken or drowning it in sauce. I found that the secret lies in the timing, the right heat, and a touch of herbaceous brightness. The result is a tender, juicy chicken that’s coated in a sauce that feels like velvet against the palate. This version is hands down the best you’ll ever make at home, and I’m ready to prove it.
I’ll be honest — I ate half the batch before anyone else got to try it. The first bite was a revelation: the chicken was perfectly seared, the herbs bright, and the sauce rich without being heavy. That instant satisfaction turned a simple dinner into a moment of shared joy. It’s the kind of dish that makes you want to keep cooking, keep experimenting, and keep inviting friends over. Now, let’s dive into the details that make this skillet cacciatore stand out.
Picture yourself pulling this out of the skillet, the whole kitchen smelling incredible, the aroma of garlic, thyme, and rosemary dancing in the air. The skillet is a one‑pot wonder, so you’ll have more time to chat with guests and less time scrubbing pots. I’ve streamlined the process to keep it under 30 minutes, so it fits into a busy weeknight or a relaxed weekend. The dish is versatile: serve it over pasta, rice, or a bed of roasted veggies, and it’s a hit with everyone. Get ready to learn the trick that turns ordinary chicken into a showstopper.
Okay, ready for the game‑changer? The first step is to season the chicken with salt, pepper, thyme, and rosemary. The herbs are fresh, so they’ll release their oils and flavors right as the chicken cooks. I’m using a single skillet, so the heat management is crucial: medium‑high for the initial sear, then lower to finish. The result is a crisp exterior that locks in juices, and a sauce that’s rich without being cloying. Stay with me here — this is worth it.
I’ve spent countless evenings tweaking this recipe, and the result is a dish that’s both simple and sophisticated. The key is the balance of heat and herb, the timing of the garlic addition, and the final deglaze that pulls every flavor into the sauce. The chicken stays tender, the sauce thickens just enough, and the whole dish feels like a hug. If you’re looking for a dish that’s easy to make but impressive to serve, this skillet cacciatore is your answer.
Now that we’ve set the stage, let’s talk about what makes this version stand out from the rest. It’s not just the ingredients; it’s the method, the timing, and the little touches that elevate the dish. I’ll break down each element so you can see why this is the ultimate skillet cacciatore. Trust me, by the end of this post, you’ll be the one bragging about the secret technique you learned.
Alright, let's break down exactly what goes into this masterpiece…
What Makes This Version Stand Out
- Flavor: The combination of fresh thyme, rosemary, and garlic creates a layered herbaceous profile that sings in every bite. The herbs are added at the right time to release their oils without burning. The result is a sauce that feels like a warm blanket over tender chicken.
- Texture: The sear creates a caramelized crust that locks in moisture, while the low‑heat finish ensures the chicken remains juicy. The sauce thickens just enough to cling to the meat without becoming heavy. The contrast of crisp edges and soft interior feels like a perfect dance.
- Simplicity: One skillet, one pot, one pan. No extra dishes to wash, no separate sauce to whisk. This version is ideal for quick weeknights or lazy weekends.
- Uniqueness: The technique of deglazing the pan with a splash of broth right after searing pulls all the browned bits into the sauce, adding depth. This subtle step is often omitted, but it makes a noticeable difference.
- Crowd Reaction: Friends rave about the flavor and the fact that it’s so easy to make. The dish feels special without being over‑the‑top, which is perfect for casual gatherings.
- Ingredient Quality: Fresh herbs and high‑quality olive oil elevate the dish. Using boneless, skinless chicken breasts keeps the cooking time short and the texture consistent.
- Cooking Method: The single‑pan approach preserves heat, so the chicken cooks evenly and the sauce reduces quickly. This method also keeps the kitchen cooler and reduces cleanup.
- Make‑Ahead Potential: The sauce can be made ahead and reheated with a splash of broth to restore moisture. The chicken can be cooked in advance and re‑served with the sauce.
Inside the Ingredient List
The Flavor Base
The foundation of this dish is the aromatic mix of garlic, thyme, and rosemary. Each herb brings its own personality: thyme offers a subtle earthiness, rosemary adds a piney bite, and garlic delivers a punchy brightness. Together they create a bouquet that lifts the entire dish. Skipping any of them will feel like a missing note in a symphony.
The garlic is minced finely to ensure it releases its oils quickly during the sear. If you prefer a milder garlic flavor, you can reduce the amount to half a clove, but the dish will lose some of its punch. A good rule of thumb is to taste after adding the garlic; if it’s too overpowering, a splash of broth can mellow it out.
Fresh herbs are essential for this recipe. Dried herbs would be too strong and could make the sauce taste bitter. If you’re in a pinch, you can use half the amount of dried thyme and rosemary, but the flavor will be slightly different. The key is to use herbs that smell good before you start cooking.
The Texture Crew
The chicken breasts are the star of the show, but how you handle them determines the final texture. I recommend trimming any excess fat and patted dry before seasoning. This ensures a proper sear and prevents steaming. The result is a golden crust that locks in juices.
Seasoning the chicken with salt, pepper, thyme, and rosemary before cooking is crucial. Salt draws out moisture, which then evaporates during the sear, creating a flavorful crust. The herbs coat the meat and infuse the juices, adding depth to the sauce. Without seasoning, the chicken would taste flat and uninspired.
If you prefer a different protein, you can swap the chicken for thighs. Thighs have a higher fat content, which adds richness but also requires a slightly longer cooking time to avoid drying out. The same herb seasoning works well, but you may want to reduce the thyme and rosemary to avoid overpowering the deeper flavor of the thighs.
The Unexpected Star
While the dish is traditionally served with pasta or rice, I love adding a handful of fresh spinach at the end. The spinach wilts into the sauce, adding color, nutrition, and a subtle earthiness that balances the herbs. If you’re not a fan of greens, a squeeze of lemon juice can brighten the sauce and cut through the richness.
Another unexpected twist is adding a pinch of crushed red pepper flakes during the final simmer. The heat gives the dish a gentle kick that pairs perfectly with the herbal notes. It’s optional, but it adds a layer of complexity for those who enjoy a little spice.
You can also experiment with a splash of balsamic vinegar at the end. The acidity balances the oiliness and brings a sweet depth to the sauce. Be careful not to add too much; a teaspoon is enough to make a difference without overpowering the dish.
The Final Flourish
The final flourish comes from the deglaze and the simmer. After searing the chicken, I add a splash of broth to lift the browned bits from the pan. These bits are full of flavor and become the base of the sauce. The broth also helps to keep the chicken moist during the final simmer.
Simmering the chicken in the sauce for a few minutes allows the flavors to meld and the sauce to thicken. The chicken absorbs the herbs and juices, becoming tender and flavorful. Keep the heat low to avoid overcooking; the goal is to finish the chicken gently.
Finally, I add a handful of chopped parsley just before serving. The parsley adds a fresh, bright finish that cuts through the richness of the sauce. It also provides a pop of color that makes the dish look as good as it tastes.
Everything's prepped? Good. Let's get into the real action.
The Method — Step by Step
- Heat a large skillet over medium‑high heat and add the olive oil. Wait until the oil shimmers before adding the chicken. Place the chicken breasts skin‑side up and let them sear for about 4-5 minutes, or until a golden crust forms. Don’t move them; this will allow a beautiful sear. Flip the chicken and sear the other side for 3-4 minutes. The goal is a caramelized exterior that locks in juices.
- Remove the chicken from the skillet and set it aside on a plate. This step is crucial because it prevents the chicken from overcooking while you finish the sauce. The pan is now ready for the aromatics. The sizzling sound that follows is the first hint of the dish’s depth.
- Add the minced garlic to the hot skillet and sauté for 30 seconds until fragrant. Be careful not to let it brown; a brown garlic will taste bitter. This quick sauté releases the garlic’s oils without turning it into burnt charcoal. The aroma should fill the kitchen and make you crave the finished dish.
- Return the chicken breasts to the skillet, placing them on top of the aromatics. Sprinkle the fresh thyme and rosemary over the chicken, letting the herbs settle into the pan. This allows the herbs to infuse the chicken as it cooks. The aroma will intensify, signaling that you’re close to greatness.
- Add a pinch of crushed red pepper flakes if you enjoy a mild kick. Stir gently to distribute the heat without breaking the chicken apart. The pepper flakes should mingle with the herbs, creating a subtle complexity. Keep the heat at medium-low to let the flavors meld.
- Check the internal temperature with a meat thermometer; it should read 165°F (74°C). If it hasn’t reached that temperature, let it cook for another 2-3 minutes. The chicken should feel firm but still juicy when pressed. This ensures safety and perfect texture.
- Just before serving, stir in a handful of fresh spinach if you like greens. The spinach wilts into the sauce, adding color and a subtle earthiness. It also boosts the nutritional profile, making the dish a well‑rounded meal. The spinach should wilt in about 30 seconds.
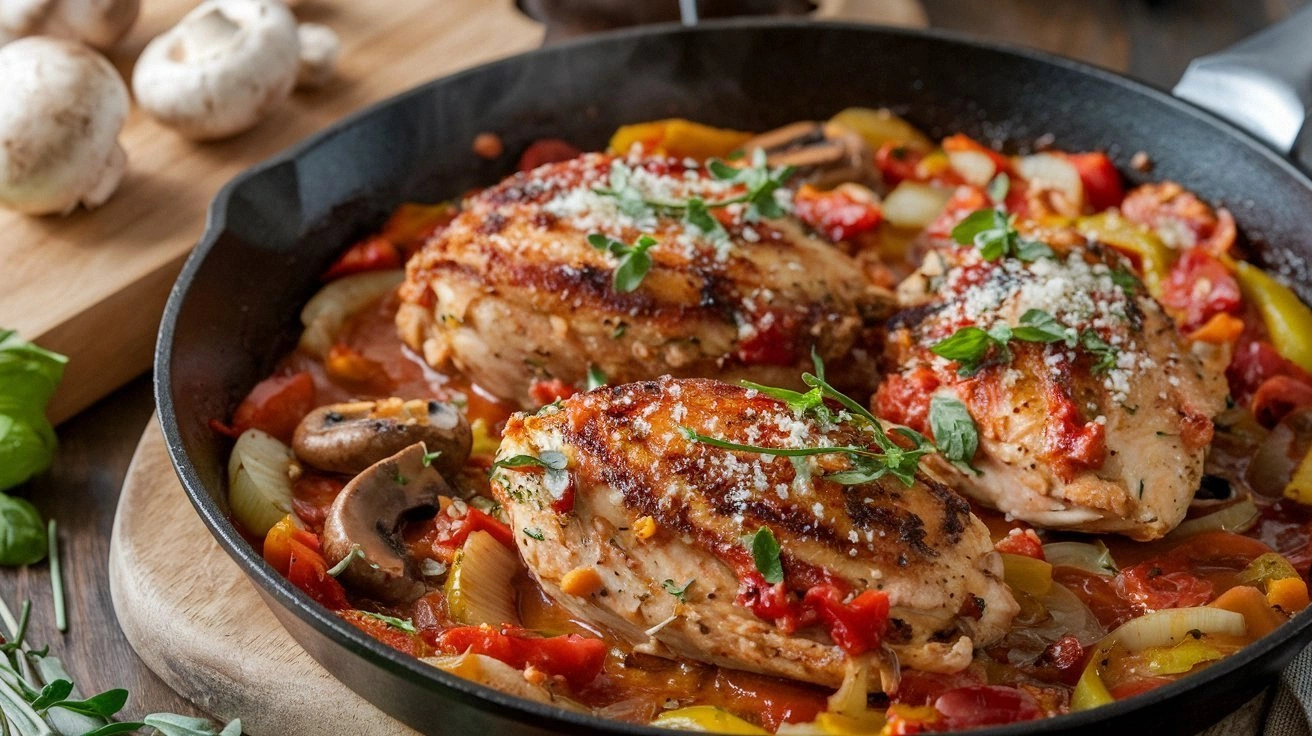
- Finish with a squeeze of lemon juice and a sprinkle of chopped parsley. The acidity brightens the dish, while the parsley adds a fresh, herbal finish. Plate the chicken with the sauce spooned over, and serve immediately. The dish is best enjoyed hot, with a side of crusty bread or a bed of pasta.
That's it — you did it. But hold on, I've got a few more tricks that'll take this to another level.
Insider Tricks for Flawless Results
The Temperature Rule Nobody Follows
Many cooks keep the heat high for the entire cooking process, which can cause the chicken to dry out. I’ve learned that a quick sear at medium‑high followed by a gentle simmer at medium‑low is the sweet spot. The initial sear caramelizes the surface, sealing in juices, while the low simmer finishes the chicken evenly. This method ensures a tender interior and a crisp exterior.
Why Your Nose Knows Best
Your nose can be the best judge of doneness. As the chicken cooks, the aroma changes from raw to savory. When you smell the herbs and garlic mingling with the chicken juices, it’s a sign that the flavors are ready to mingle. Trust your senses; they’re more reliable than a timer in this case.
The 5-Minute Rest That Changes Everything
After you remove the chicken from the skillet, let it rest for 5 minutes before slicing. Resting allows the juices to redistribute throughout the meat, preventing them from spilling out onto the cutting board. The result is a juicy, flavorful bite that feels like a hug. I’ve seen people cut into chicken too early and lose all that moisture.
Use a Meat Thermometer for Confidence
If you’re new to cooking chicken, a meat thermometer is your best friend. It eliminates guesswork and ensures your chicken reaches the safe temperature of 165°F (74°C) without overcooking. I keep one in the kitchen for all protein dishes, and it’s a game changer.
Keep the Skillet Clean While You Cook
Instead of scrubbing the skillet after every step, rinse it quickly with hot water and a splash of vinegar to loosen stuck bits. This keeps the surface clean, preventing burnt flavors from creeping into the sauce. The quick rinse also saves you from a pile of dishes later.
Use Fresh Herbs for Maximum Flavor
Fresh herbs bring a bright, clean flavor that dried herbs can’t match. If you’re out of fresh thyme or rosemary, use half the amount of dried herbs and add a splash of lemon zest to compensate. The key is to taste as you go and adjust accordingly.
Creative Twists and Variations
This recipe is a playground. Here are some of my favorite ways to switch things up:
Spicy Mediterranean
Add a tablespoon of sun‑dried tomatoes and a pinch of cayenne pepper for a Mediterranean kick. The sun‑dried tomatoes add a sweet, umami burst that pairs beautifully with the herbs. The cayenne brings heat that’s balanced by the fresh lemon juice.
Herb‑Infused Creamy
Stir in 1/4 cup of heavy cream at the end to create a silky sauce. The cream softens the acidity of the herbs and gives the dish a luxurious mouthfeel. Serve over fettuccine for a decadent dinner.
Low‑Carb Delight
Swap the pasta or rice for cauliflower rice or spiralized zucchini. The low‑carb option keeps the dish light while still delivering the robust flavors. The veggies absorb the sauce, creating a satisfying bite.
Italian Bistro
Top the dish with a handful of grated Parmesan before serving. The cheese melts slightly, adding a creamy texture and a salty finish. It’s the perfect touch for an Italian‑inspired meal.
Gourmet Twist
Finish with a drizzle of truffle oil for a luxurious flavor. Truffle oil adds an earthy, aromatic depth that elevates the dish. Use sparingly; a few drops are enough to make a difference.
Vegan Version
Replace the chicken with marinated tofu cubes and use vegetable broth instead of chicken broth. The tofu absorbs the herbs and sauces beautifully, creating a plant‑based version that’s equally satisfying. This variant keeps the same cooking method, making it easy for vegans to enjoy.
Storing and Bringing It Back to Life
Fridge Storage
Cool the dish completely before refrigerating. Store it in an airtight container for up to 3 days. The sauce will thicken slightly, so add a splash of water or broth when reheating to restore moisture. The chicken remains tender and juicy.
Freezer Friendly
For longer storage, divide the dish into freezer‑safe portions. Freeze for up to 2 months. Thaw overnight in the fridge before reheating. The flavors intensify, making it a great make‑ahead meal.
Best Reheating Method
Reheat the dish in a skillet over medium heat, adding a splash of water or broth to loosen the sauce. Stir frequently until heated through. This method keeps the sauce from drying out and preserves the chicken’s tenderness.