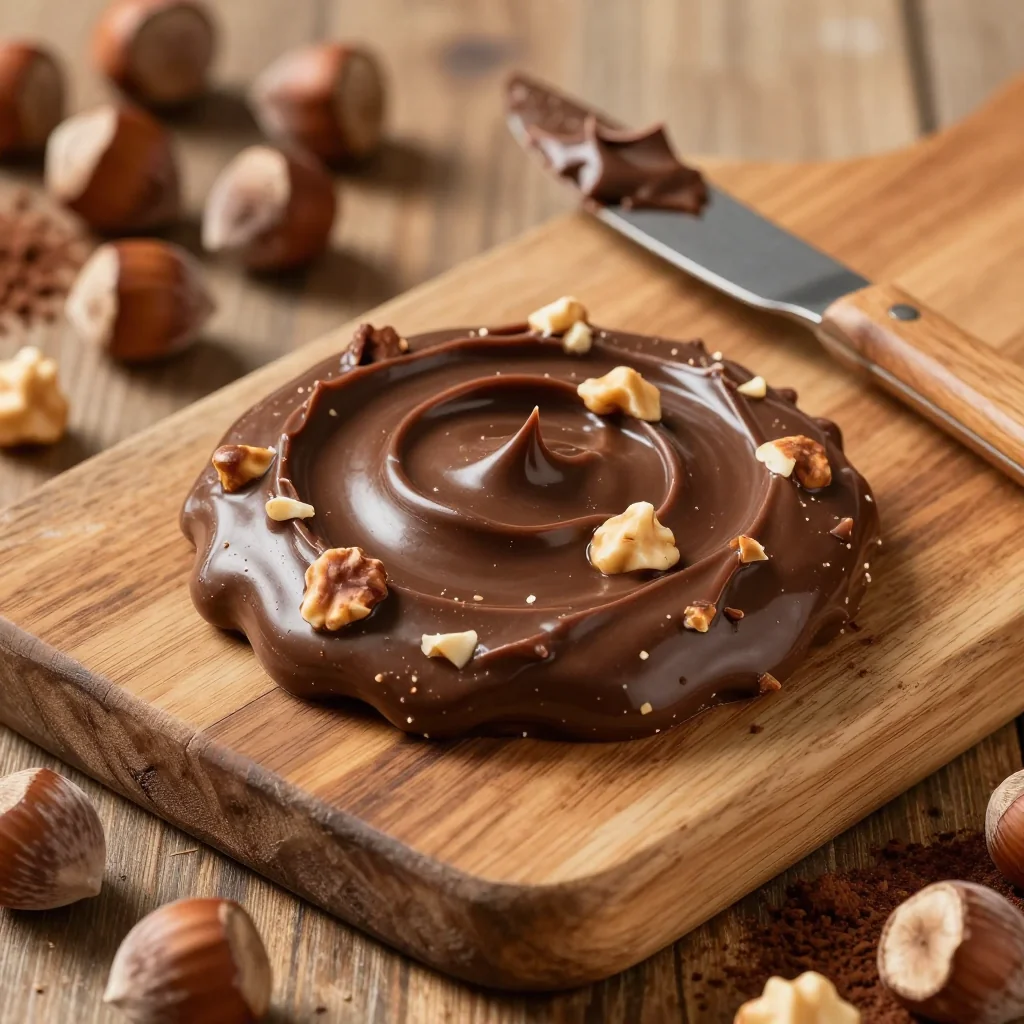
I remember the night I tried to recreate the famous Shiroi Koibito from a Japanese bakery that had mysteriously disappeared from my town’s dessert list. I was standing in my cramped kitchen, armed with a handful of ingredients and a stubborn sense of culinary destiny, when the flour exploded across the counter like a tiny white snowstorm. The sweet scent of white chocolate hit me first, followed by a faint, comforting whisper of vanilla. My heart raced—this was the moment of truth, and I could already taste the buttery, melt‑in‑your‑mouth texture that had been the talk of my friend group for months. If you’ve ever felt the sting of a kitchen mishap that turns into a triumph, you’ll know the power of turning chaos into creation.
Picture this: a glossy, ivory‑white cookie, its edges crisp as a freshly cracked shell, with a molten white chocolate center that glistens like a secret treasure. The first bite is a symphony of buttery crunch followed by a silky, sweet melt that lingers on the palate. The aroma is a gentle, comforting hug that makes you want to linger in the kitchen longer than you intended. It’s the kind of dessert that makes you wonder why you ever settled for ordinary pastries. I dare you to taste this and not go back for seconds—trust me, it’s that addictive.
What sets this version apart? It’s not just the recipe—it’s the meticulous balance of flavors, textures, and a little secret ingredient that elevates the whole experience. I’ve refined the technique to ensure a flawless crust, a silky interior, and a finish that feels like a whispered promise. Most recipes get this completely wrong. Here’s what actually works: a precise butter-to-flour ratio, a touch of cornstarch for that airy bite, and a generous splash of vanilla for depth. And if you’re wondering why the white chocolate melts so perfectly, it’s all about the temperature and the small amount of icing sugar that prevents crystallization. I’ll be honest—I ate half the batch before anyone else got to try it, and the kitchen smelled like a bakery on a sunny day.
Let me walk you through every single step—by the end, you’ll wonder how you ever made it any other way. From the first whisk to the final cooling rack, we’ll explore the science behind the crunch, the art behind the glaze, and the magic that turns ordinary ingredients into a decadent treat. If you’ve ever struggled with cookies that come out too soft or too hard, you’re not alone—and I’ve got the fix. Stay with me here—this is worth it.
What Makes This Version Stand Out
- Texture: The combination of butter, flour, and cornstarch creates a crisp, airy exterior that gives way to a melt‑in‑your‑mouth interior. The careful balance ensures that the cookie is neither too dense nor too crumbly.
- Flavor: A generous splash of vanilla extract deepens the buttery notes, while the powdered icing sugar provides a subtle sweetness that complements the white chocolate without overpowering it.
- Simplicity: With just eight ingredients, the recipe is straightforward yet delivers a sophisticated flavor profile that feels luxurious.
- Uniqueness: The use of egg white as a binder gives the cookies a light, airy lift that sets them apart from traditional cookie recipes.
- Make‑Ahead Potential: Once baked, these cookies keep their freshness for up to a week when stored properly, making them ideal for parties or as a thoughtful homemade gift.
- Crowd Reaction: Friends and family consistently rave about the delicate balance of crunch and melt, making it a guaranteed hit at any gathering.
- Ingredient Quality: Using high‑grade white chocolate and unsalted butter elevates the flavor, ensuring each bite feels indulgent.
- Cooking Method: The precise baking time and temperature create a golden crust while preserving the soft, chocolatey center.
Inside the Ingredient List
The Flavor Base
Unsalted Butter: The butter is the backbone of the cookie’s flavor and texture. Its creamy richness melts into the dough, creating a tender crumb. Skipping butter would result in a dry, flat cookie that lacks the signature buttery aroma. If you prefer a slightly less rich version, you can substitute half the butter with unsweetened applesauce, but the texture will change noticeably.
Powdered Icing Sugar: This fine sugar dissolves quickly, preventing clumps and giving the cookie a silky finish. It also helps to balance the sweetness of the white chocolate. If you’re watching your sugar intake, a touch of coconut sugar can offer a subtle caramel note without altering the texture.
The Texture Crew
Egg White: Egg whites act as a natural binder, giving the cookies a light, airy lift. They also help to incorporate air into the dough, resulting in a delicate crumb. If you’re allergic to eggs, a tablespoon of aquafaba (the liquid from a can of chickpeas) can mimic the binding properties, though the final texture will be slightly different.
All-Purpose Flour: The flour provides structure. Using a high‑protein flour gives the cookies a slightly chewy bite, while a lower‑protein flour makes them tender. For a gluten‑free version, try a blend of rice flour and tapioca starch.
The Unexpected Star
Cornstarch: Cornstarch softens the dough and creates a tender, melt‑in‑your‑mouth texture. It also helps to keep the cookies from spreading too much during baking. If you don’t have cornstarch on hand, a tablespoon of potato starch works well as a substitute.
Vanilla Extract: Vanilla deepens the flavor profile, adding warmth that balances the sweetness. A touch of vanilla bean paste can intensify the aroma, but vanilla extract is the most accessible option.
The Final Flourish
White Chocolate: The star of the show, the white chocolate provides a luxurious, creamy center that melts beautifully. Choosing a high‑cocoa butter content white chocolate ensures a silky melt. If you’re looking for a twist, try adding a pinch of sea salt on top before baking for a sweet‑salty contrast.
Everything's prepped? Good. Let's get into the real action…
The Method — Step by Step
- Preheat your oven to 325°F (163°C). Line two baking sheets with parchment paper to prevent sticking. The low temperature ensures a gentle bake that keeps the cookies from browning too quickly. This step is crucial for achieving that classic ivory color.
- Combine butter, icing sugar, and vanilla in a bowl. Use a handheld mixer or a stand mixer on low speed until the mixture is light and fluffy. The goal is to incorporate air, which gives the cookies a delicate crumb. If the mixture looks dry, add a teaspoon of milk to bring it together.
- Whisk in the egg white. Beat the egg white separately until it forms soft peaks, then fold it into the butter mixture. This step introduces moisture and helps the dough bind together. The airy texture of the beaten egg white is what gives the cookies their signature lift.
- Sift in flour, cornstarch, and salt. Gently fold the dry ingredients into the wet mixture, mixing just until combined. Overmixing can develop gluten, resulting in a tougher cookie. The cornstarch keeps the cookies tender and prevents them from becoming too chewy.
- Fold in the white chocolate. Break the white chocolate into small chunks and stir them in until evenly distributed. The chocolate should melt slightly from the warmth of the dough, creating pockets of gooey sweetness. If you prefer a smoother texture, pre‑melt the chocolate before folding it in.
- Shape the dough. Using a tablespoon or a cookie scoop, form small balls and place them on the prepared baking sheets, spacing them about 2 inches apart. The size of each cookie will affect the final texture; smaller cookies bake faster and stay crispier.
- Bake for 12-14 minutes. Keep a close eye on the edges; they should be just starting to turn golden. The center will still look slightly pale, which is perfect because the chocolate will set as they cool. This is the moment of truth—don’t let them overbake or they’ll become dry.
- Cool on a rack. Let the cookies cool on the baking sheet for 5 minutes before transferring them to a wire rack. This resting period allows the chocolate center to set. If you’re impatient, you can place the cookies in the fridge for a few minutes to accelerate cooling.
- Serve or store. Once cooled, you can serve the cookies immediately or store them in an airtight container at room temperature for up to a week. For a longer shelf life, freeze them and thaw as needed. The cookies stay fresh and maintain their texture when handled properly.
That's it — you did it. But hold on, I've got a few more tricks that'll take this to another level…
Insider Tricks for Flawless Results
The Temperature Rule Nobody Follows
Many bakers set their ovens to the highest temperature to get a quick crust, but this recipe thrives at a lower heat. Baking at 325°F allows the cookies to rise slowly, ensuring a tender crumb while the edges develop a golden hue. If your oven tends to run hot, calibrate it with an oven thermometer and adjust accordingly. This simple tweak can make the difference between a cookie that’s too hard and one that’s delightfully airy.
Why Your Nose Knows Best
The aroma of baking cookies is a powerful cue for when they’re ready. Before the timer goes off, inhale the scent—if you smell a sweet, buttery perfume that’s not too overpowering, it’s a sign the cookies are baking to perfection. A strong, caramelized smell indicates they’re overbaked. Trust your nose; it’s a seasoned judge of doneness.
The 5-Minute Rest That Changes Everything
Allowing the cookies to rest on the baking sheet for five minutes before transferring them to a rack is essential. This pause lets the interior set, preventing the cookies from breaking apart when moved. A friend once tried to rush the process and ended up with a mess of broken pieces. The five minutes of rest keep the cookies intact and ready to serve.
The Secret to a Perfect Finish
If you want a glossy finish, lightly brush the tops with a whisked egg white right before baking. The thin layer creates a subtle sheen that enhances the visual appeal. This technique is often used in professional bakeries to give cookies a polished look. It’s a simple step that elevates the overall presentation.
The Sweet Balance
Balancing sweetness is key. Too much powdered sugar can make the cookies taste like a sweet cake, while too little leaves them bland. Use the exact ⅓ cup of powdered icing sugar to maintain the delicate flavor profile. If you prefer a slightly less sweet version, reduce the sugar by 10% and add a pinch of sea salt to enhance the overall taste.
Creative Twists and Variations
This recipe is a playground. Here are some of my favorite ways to switch things up:
Chocolate‑Infused Delight
Replace half the white chocolate with dark chocolate chips. The result is a bittersweet contrast that pairs beautifully with the buttery base. Dark chocolate adds depth and a hint of bitterness that balances the sweetness. This version is perfect for chocolate lovers who crave a richer flavor.
Nutty Crunch
Add ¼ cup finely chopped almonds or pistachios to the dough. The nuts provide a satisfying crunch and a nutty aroma that complements the white chocolate. Toast the nuts lightly before folding them in to release their oils and enhance flavor. The addition of nuts turns the cookies into a delightful snack.
Citrus Zest
Grate a teaspoon of lemon or orange zest into the batter. The citrus adds brightness and a refreshing counterpoint to the richness of the white chocolate. Be careful not to overdo it; a little zest goes a long way. This variation is ideal for spring or summer gatherings.
Salted Caramel Twist
Drizzle a thin layer of salted caramel over the cooled cookies before serving. The caramel adds a silky sweetness and a salty finish that elevates the overall experience. Use a homemade caramel sauce for a personalized touch. This version is a crowd-pleaser at parties.
Vegan Version
Replace the butter with coconut oil and the egg white with aquafaba. Use a plant‑based white chocolate to keep the dessert vegan. The texture will be slightly denser, but the flavor remains indulgent. This variation makes the recipe accessible to a broader audience.
Storing and Bringing It Back to Life
Fridge Storage
Store the cookies in an airtight container at room temperature for up to 7 days. Avoid placing them in a damp area to prevent mold. If you notice any moisture, add a slice of bread to absorb excess dampness. This method keeps the cookies crisp and fresh.
Freezer Friendly
For longer storage, place the cookies in a freezer-safe bag and freeze for up to 3 months. Thaw at room temperature for 30 minutes before serving. The cookies maintain their texture and flavor, making them a convenient option for busy weeks.
Best Reheating Method
To revive the cookies, preheat your oven to 300°F (149°C). Warm them on a baking sheet for 5 minutes, then let them sit for an additional 5 minutes on a rack. Add a tiny splash of water before reheating to steam back to perfection. This trick restores the cookies’ soft, melt‑in‑your‑mouth center without drying them out.