I was standing in my kitchen, the clock ticking like a metronome, when a sudden craving for something crunchy, cheesy, and utterly comforting hit me like a bolt of lightning. I had a tub of cold mashed potatoes from last night’s dinner, a block of sharp cheddar begging to be shredded, and a pantry full of breadcrumbs that were screaming for a purpose. The idea sparked: what if I could transform those humble leftovers into a snack that crackles with golden edges and melts in your mouth like a buttery cloud? I tossed the ingredients together, and the first bite was a revelation – a perfect marriage of fluffy interior and a crisp, cheesy shell that made me shout, “I dare you to taste this and not go back for seconds!”
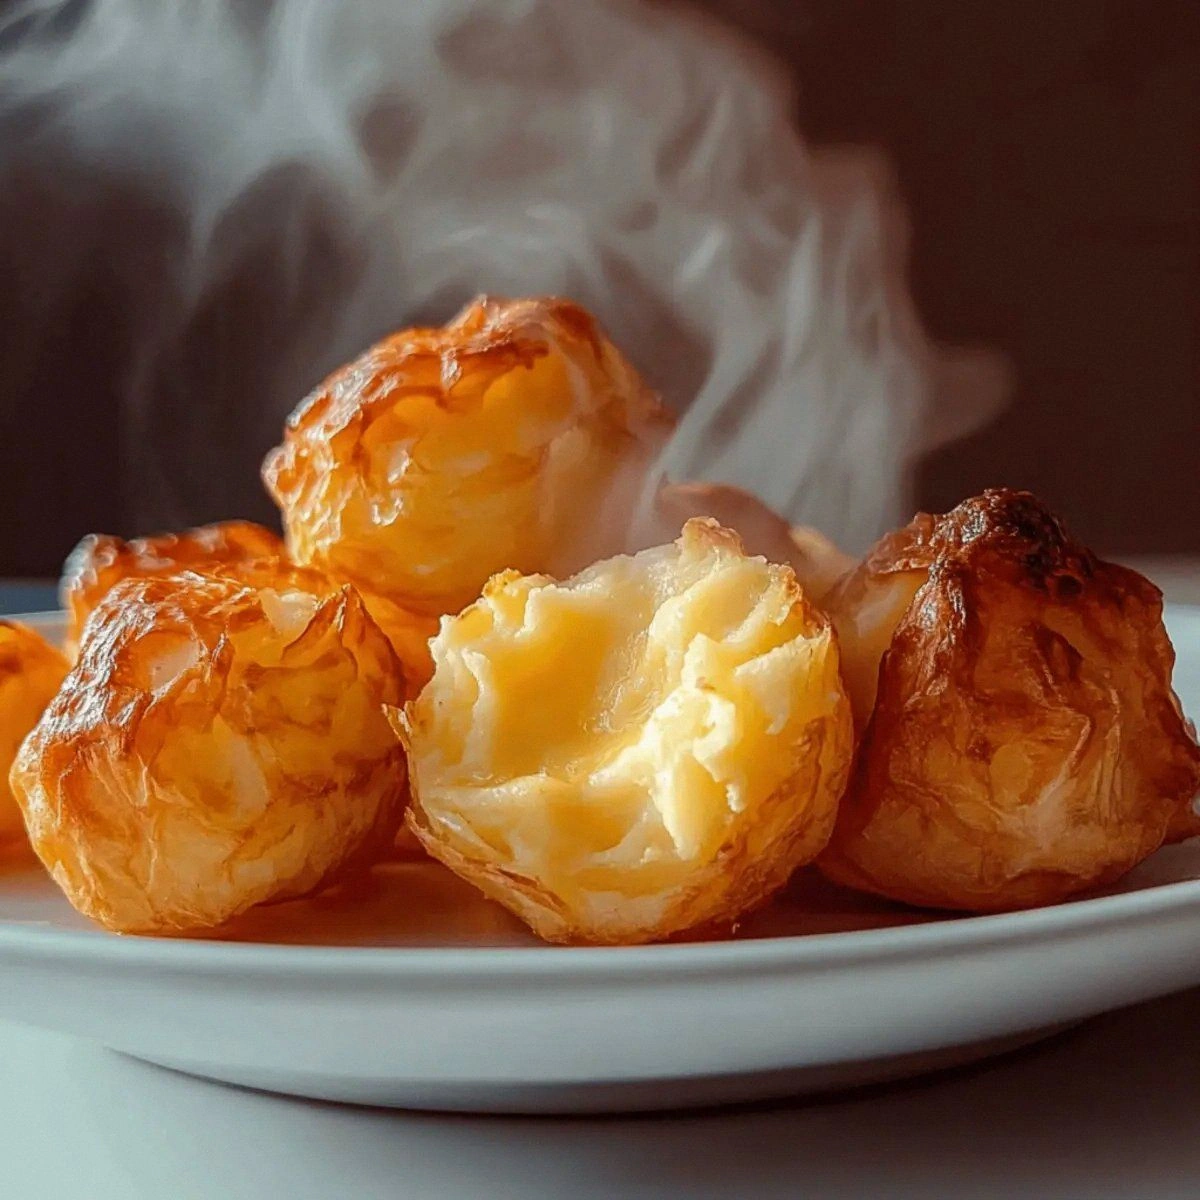
Picture the scene: the oven humming, the kitchen filling with the scent of toasted butter and garlic, the sound of the pusher of the tray sliding in, and the anticipation building like a drumroll. When those puffs finally emerged, their golden crowns glistened with a buttery sheen, and the steam rose in silky ribbons, promising a melt‑in‑your‑mouth experience. I took a bite, and the crunch sang a crisp, almost musical note, while the interior whispered of buttery potatoes and gooey cheddar. I’ll be honest — I ate half the batch before anyone else got a chance to try them, and that’s saying something because these are addictive.
Most recipes for potato bites either turn out soggy, bland, or overly dense, but this version hits every note on the flavor symphony. The secret? A precise balance of flour and breadcrumbs that creates a protective armor, an extra egg wash for that glossy finish, and a dash of garlic powder that lifts the whole thing into a new dimension. I’m not just talking about a snack; I’m talking about a handheld masterpiece that will make you the hero of any gathering, from game night to a casual brunch. This is hands down the best version you’ll ever make at home, and I’m about to spill every detail so you can recreate the magic.
Let me walk you through every single step — by the end, you’ll wonder how you ever made it any other way. Okay, ready for the game‑changer? This next part? Pure magic. Stay with me here — this is worth it.
What Makes This Version Stand Out
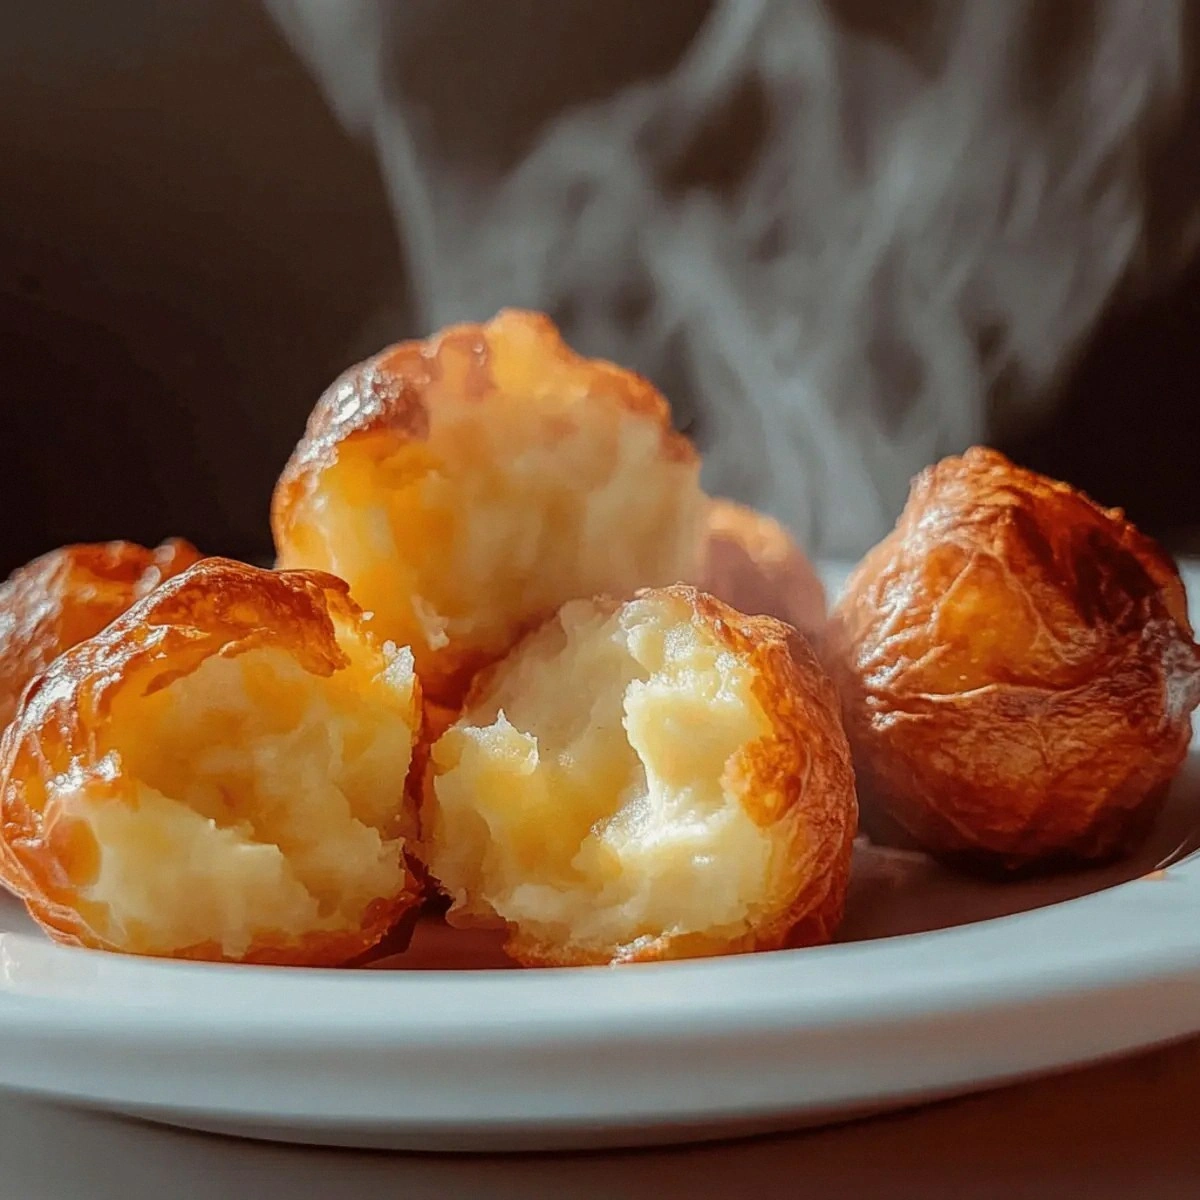
- Flavor Explosion: The cheddar melts into the potato base, creating a buttery, cheesy core that bursts with every bite, while the garlic powder adds a subtle kick that lingers.
- Texture Contrast: A crisp, golden crust that shatters like thin ice gives way to a pillowy interior, delivering that satisfying crunch‑to‑soft sensation.
- Simplicity: All ingredients are pantry staples, and the method uses just one bowl and a baking sheet, making clean‑up a breeze.
- Uniqueness: Cold mashed potatoes are rarely used in snacks; this recipe flips the script, turning leftovers into a star‑studded appetizer.
- Crowd Reaction: Guests can’t stop reaching for more; it’s the kind of snack that sparks conversation and endless “what’s the secret?” questions.
- Ingredient Quality: Using sharp cheddar and fresh garlic powder elevates the flavor profile from ordinary to unforgettable.
- Cooking Method: Baking instead of frying keeps the dish lighter while still achieving that coveted crunch.
- Make‑Ahead Potential: You can prep the puffs ahead of time, freeze them, and pop them in the oven for a quick snack anytime.
Inside the Ingredient List
The Flavor Base
Cold mashed potatoes are the heart of this snack. Their creamy texture binds the cheese and eggs, creating a cohesive mixture that stays together during baking. If you skip the cold step and use warm potatoes, the dough becomes too soft, and the puffs may spread out on the tray. For the best flavor, use potatoes that have been seasoned with a pinch of butter and a touch of milk; this adds richness without extra effort.
The Texture Crew
Shredded cheddar cheese is the star that melts into the potato matrix, delivering that gooey, indulgent center. Choose a sharp cheddar for a pronounced flavor; a mild cheese will make the snack taste flat. The all‑purpose flour and breadcrumbs form a protective crust that crisps up beautifully. If you prefer a gluten‑free version, substitute the flour with rice flour and the breadcrumbs with panko made from gluten‑free bread.
The Unexpected Star
Eggs act as both binder and glaze. The yolks give the puffs a golden sheen, while the whites hold everything together during baking. Be sure to beat the eggs lightly before adding them; over‑whisked eggs can make the mixture too airy, leading to a spongy texture instead of a dense bite. If you’re avoiding eggs, a mixture of milk and a teaspoon of mustard can mimic the binding effect, though the color won’t be as vibrant.
The Final Flourish
Seasonings—salt, black pepper, and garlic powder—are the silent heroes that bring everything together. Salt enhances the natural flavors of the potato and cheese, while black pepper adds a subtle heat that balances the richness. Garlic powder is the secret weapon; it infuses the entire bite with a warm, aromatic depth that you’ll notice after the first chew. If you love a little heat, a pinch of cayenne can be added without overwhelming the delicate balance.
Everything's prepped? Good. Let's get into the real action...
The Method — Step by Step
Preheat your oven to 425°F (220°C). While the oven warms up, line a baking sheet with parchment paper and set a wire rack on top; this allows air to circulate, ensuring the puffs stay crisp on every side. The heat should feel like a gentle roar, promising a quick transformation. This is the moment of truth—if the oven isn’t hot enough, you’ll end up with soggy puffs, and nobody wants that.
Watch Out: Do not open the oven door during the first 10 minutes; temperature loss will prevent the crust from forming properly.In a large mixing bowl, combine the cold mashed potatoes, shredded cheddar, and the beaten eggs. Use a sturdy wooden spoon to fold everything together until the mixture is uniform and slightly sticky. You’ll notice the cheese starting to melt into the warm potatoes, creating a glossy, cohesive dough. This step is where the magic begins, and the aroma will already start to tease your senses.
Kitchen Hack: If the mixture feels too loose, sprinkle in an extra tablespoon of flour; this will tighten the dough without making it tough.Add the all‑purpose flour, salt, black pepper, and garlic powder to the bowl. Stir gently until the flour is fully incorporated; you should have a thick, pliable dough that holds together when pinched. The seasoning should be evenly distributed, giving the dough a faint golden hue. Feel the dough between your fingers; it should be firm enough to roll but still soft enough to shape.
Transfer the dough onto a lightly floured surface. Using a cookie scoop or a tablespoon, portion out the dough into uniform balls, about the size of a golf ball. Roll each ball gently between your palms to smooth the surface. This uniformity ensures even cooking and a professional look, even if you’re the only one in the kitchen.
Set up a shallow dish with breadcrumbs. Gently roll each dough ball in the breadcrumbs, pressing lightly so the crumbs adhere well. The breadcrumb coating is what gives the final product its signature crunch. Make sure each puff is fully covered; any gaps will result in uneven browning.
Arrange the coated puffs on the wire rack, leaving a small gap between each. This spacing allows hot air to circulate, creating that coveted crispy exterior. Lightly spray the tops with cooking spray or brush with a little melted butter for extra golden color. The sizzle when they hit the rack? Absolute perfection.
Slide the tray into the preheated oven and bake for 15‑18 minutes, or until the puffs are deep golden brown and the edges start pulling away from the tray. Around the 10‑minute mark, you’ll hear a faint crackle as the crust solidifies—listen for it, it’s a good sign.
Remove the puffs from the oven and let them rest on the rack for 2‑3 minutes. This brief rest lets the interior set, preventing a soggy center when you bite in. Serve them warm, perhaps with a side of sour cream or a tangy mustard dip. That first bite? The crunch should echo like a tiny fireworks display, followed by a melt‑in‑your‑mouth cheese‑potato core.
That's it — you did it. But hold on, I've got a few more tricks that'll take this to another level. Okay, ready for the game‑changer? This next part? Pure magic.
Insider Tricks for Flawless Results
The Temperature Rule Nobody Follows
Never bake these puffs at a low temperature. A hot oven (425°F) creates a rapid steam burst inside the dough, which inflates the interior while the exterior crisps instantly. I once tried 375°F because I thought “lower is safer,” and the result was a soggy, pale mess that never achieved that signature snap. Trust the heat, and you’ll get that perfect contrast every time.
Why Your Nose Knows Best
When the puffs are about 12 minutes into the bake, start sniffing the kitchen. A buttery, nutty aroma signals that the crust is forming; if you smell a faint burnt scent, they’re on the brink of over‑cooking. Your nose is a more reliable timer than any digital readout, especially when you’re juggling multiple dishes.
The 5‑Minute Rest That Changes Everything
After you pull the puffs from the oven, let them sit for exactly five minutes before serving. This short rest lets the steam redistribute, firming up the interior and preventing a gummy bite. I once skipped this step in a rush and the first puff felt oddly soft, ruining the whole experience. Patience is a small price for that perfect bite.
Egg Wash Secrets
For an extra glossy finish, whisk the eggs with a teaspoon of water before brushing. The added moisture creates a thin film that catches the light, giving each puff a restaurant‑quality sheen. If you want a deeper color, add a pinch of paprika to the wash; it won’t alter the flavor but will give a beautiful rust‑red hue.
Freezer‑Friendly Prep
If you want to make a big batch, shape and freeze the unbaked puffs on a tray. Once frozen solid, transfer them to a zip‑top bag. When you’re ready, bake them straight from the freezer, adding an extra 3‑4 minutes to the cooking time. This method keeps the texture intact and lets you have a snack on demand.
Creative Twists and Variations
This recipe is a playground. Here are some of my favorite ways to switch things up:
Spicy Jalapeño Kick
Finely dice a jalapeño and fold it into the potato‑cheese mixture. The heat pairs beautifully with the cheddar, creating a bite that tingles without overwhelming. Perfect for those who love a little fire.
Herb‑Infused Delight
Add a tablespoon of fresh chopped chives or parsley to the dough. The herbaceous notes brighten the flavor, making the puffs feel lighter and more spring‑like.
Smoky Bacon Bits
Crumble cooked bacon into the mixture for a smoky, salty crunch. The bacon’s fat adds extra richness, turning the snack into a indulgent treat.
Cheese Fusion
Swap half of the cheddar for Gruyère or smoked mozzarella. The different melt points and flavor profiles create a more complex, layered taste.
Vegan Version
Replace the cheddar with a firm vegan cheese, use flax‑egg (1 tbsp ground flaxseed + 3 tbsp water) instead of eggs, and choose a gluten‑free breadcrumb. The texture remains, and the flavor stays bold.
Storing and Bringing It Back to Life
Fridge Storage
Place cooled puffs in an airtight container lined with a paper towel to absorb excess moisture. They’ll stay crisp for up to three days. Reheat in a preheated 350°F oven for 5‑7 minutes; the crust will revive its crunch.
Freezer Friendly
Freeze unbaked puffs on a tray, then transfer to a zip‑top bag. They can be stored for up to two months. Bake directly from frozen at 425°F for 20‑22 minutes, adding a splash of water to the pan to create steam that revitalizes the interior.
Best Reheating Method
For ultimate crispness, reheat on a wire rack in a hot oven (425°F) for 4‑5 minutes. If you’re in a hurry, a quick blast in a toaster oven works too, but avoid the microwave—it will make the crust soggy.