I was standing in my kitchen at 2 a.m., half‑asleep, half‑hungry, and the only thing that seemed to scream “comfort” was the faint hum of my refrigerator. I opened the door, grabbed a tub of cottage cheese, and stared at it like it was a secret code I hadn’t cracked yet. That night, I tried to make a quick cheese toast, but the result was a soggy mess that tasted like a dairy‑filled disappointment. I dared myself to turn that disappointment into something that would make even my most carb‑obsessed friends gasp, and what emerged was a crunchy, low‑carb chip that could rival any store‑bought snack.
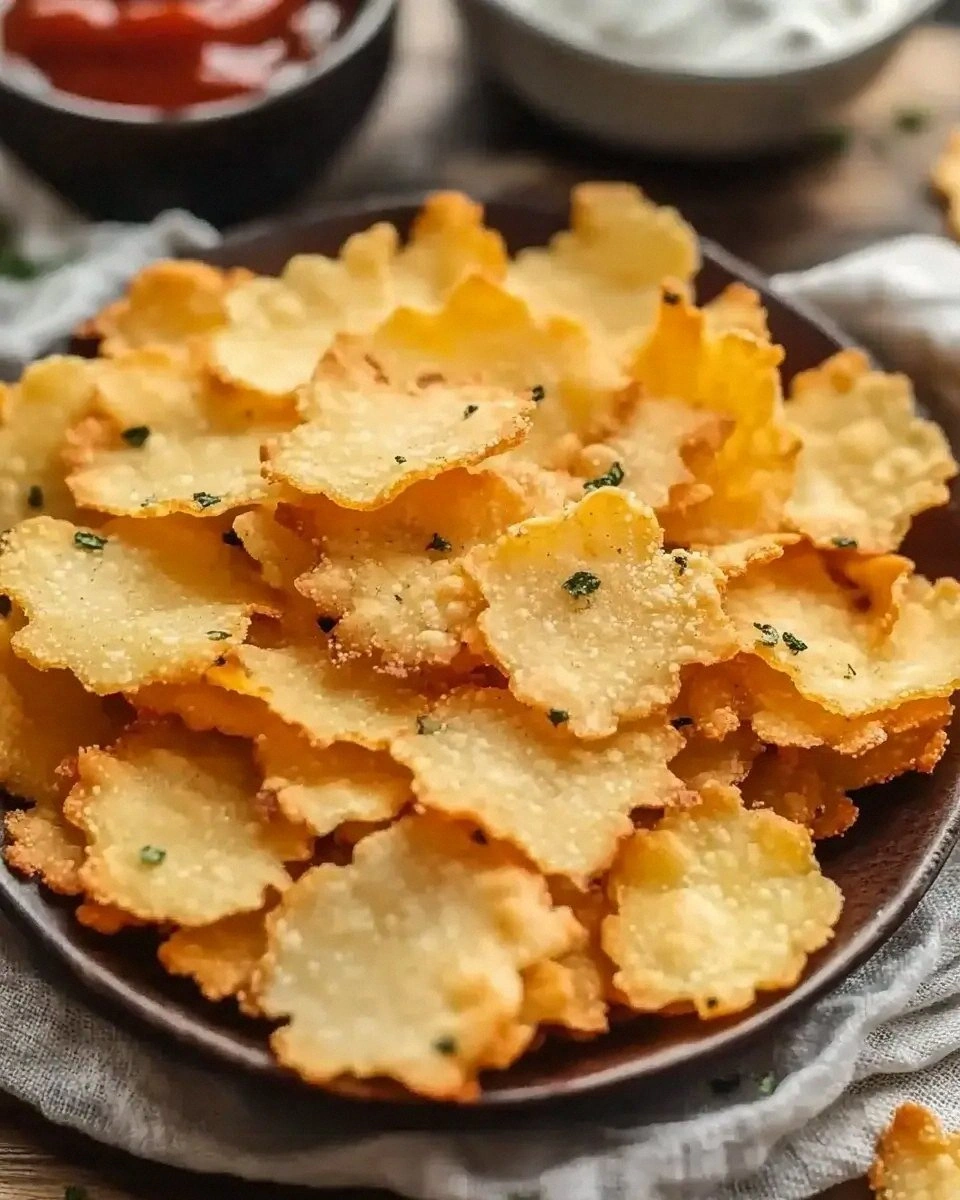
Picture the scene: the kitchen filled with the buttery aroma of melted cheddar, the faint crackle of a hot oven, and the faint, almost nostalgic scent of garlic powder drifting from the countertop. The air feels warm, the oven door opens with a sigh, and a tray of golden‑brown circles sits waiting, each one promising a crunch that shatters like thin ice under your teeth. The first bite is a revelation—tangy cottage cheese meets the sharp bite of cheddar, all wrapped in a whisper of paprika that tingles the palate. The texture? Imagine the perfect balance between a chip and a cracker, but with the protein punch of a Greek yogurt smoothie.
Why does this version stand out from the sea of “cheese chip” recipes that flood the internet? Most of them rely on heavy flour, endless oil, or a mountain of processed cheese that leaves you feeling guilty after the third handful. This recipe flips the script by using cottage cheese as a moisture‑locking base, shredded cheddar for that melt‑in‑your‑mouth richness, and a sprinkle of spices that give each bite a flavor‑burst without any carb overload. It’s the only low‑carb snack I know that actually feels like a cheat‑day indulgence while keeping the macros in check.
And here’s the kicker: the secret technique that makes these chips stay crisp even after cooling is a quick blast of high heat followed by a short rest on a parchment‑lined sheet. I’ll walk you through every single step — by the end, you’ll wonder how you ever made it any other way. Okay, ready for the game‑changer?
What Makes This Version Stand Out
- Protein‑Packed: Each chip delivers a solid hit of cottage cheese protein, so you stay full longer and avoid the mid‑snack crash.
- Low‑Carb Magic: With just a fraction of the carbs of traditional potato chips, these fit perfectly into keto, Atkins, or any low‑carb lifestyle.
- Texture Mastery: The cottage cheese creates a light, airy interior while the cheddar forms a crunchy crust that shatters delightfully.
- Flavor Depth: Garlic, onion, and paprika layers build a savory symphony that’s richer than any single‑seasoning chip.
- Simplicity: Only eight ingredients, no fancy equipment, and a single sheet pan—perfect for busy weeknights.
- Make‑Ahead Friendly: Store them in an airtight container and they stay crisp for days, making them ideal for meal‑prep.
- Crowd‑Pleaser: Even the kids who swear they hate “healthy” snacks will dive in, because the taste is unapologetically cheesy.
- Customizable: Swap spices, add herbs, or sprinkle nutritional yeast for a vegan‑friendly spin without losing the crunch.
Inside the Ingredient List
The Flavor Base
Cottage cheese is the unsung hero of this snack. Its high moisture content creates a delicate matrix that holds the shredded cheddar together, preventing the chips from crumbling during baking. If you skip it, you’ll end up with a dry, brittle chip that falls apart the moment you try to lift it. For the best result, choose a full‑fat cottage cheese; the extra fat contributes to a richer mouthfeel and helps the cheese brown evenly.
Fun Fact: Cottage cheese originated in the Middle East over 5,000 years ago as a way to preserve milk; the name “cottage” comes from the small, rustic cottages where it was traditionally made.
The Texture Crew
Shredded cheddar cheese is the crisp‑forming agent. Its low moisture and high fat content melt, then solidify into that golden crust we all crave. If you substitute a low‑fat cheddar, the chips will still taste good but won’t achieve the same snap; they’ll be more like a soft cheese cracker. I recommend a sharp cheddar for a bolder flavor profile, but a milder cheese works if you prefer a subtler bite.
Garlic powder and onion powder are the aromatic sidekicks that add depth without moisture. They’re powdered to avoid adding any extra liquid that could sabotage the crispness. A pinch too much and the flavor can become overwhelming, so stick to the measured ½ teaspoon each. If you’re a fan of smoked flavors, swap one of these for smoked paprika for a smoky undertone.
The Unexpected Star
Paprika isn’t just for color; it brings a gentle heat and a sweet earthiness that balances the sharp cheddar. It also contributes a beautiful reddish hue that makes the chips look as good as they taste. If you love a little kick, try a pinch of cayenne in place of half the paprika, but remember that the goal is a balanced snack, not a fire‑breather.
The Final Flourish
A modest ¼ teaspoon of salt and an equal amount of black pepper are the finishing touches that awaken all the other flavors. Salt amplifies the cheese’s natural umami, while pepper adds a subtle bite that keeps the palate engaged. If you’re watching sodium, you can reduce the salt to a pinch, but don’t eliminate it entirely—otherwise the chips will taste flat.
Cooking spray or parchment paper isn’t an “ingredient” in the traditional sense, but it’s essential for achieving that perfect, non‑sticky surface. I prefer a light mist of cooking spray because it creates a thin, even coating that helps the chips brown uniformly. Parchment works just as well if you’re avoiding any added fats.
Everything's prepped? Good. Let's get into the real action...

The Method — Step by Step
Preheat your oven to 425°F (220°C). The high heat is the secret weapon that drives off excess moisture from the cottage cheese, allowing the chips to crisp up quickly. While the oven warms, line a large rimmed baking sheet with parchment paper or give it a light spray of cooking oil. This prevents sticking and makes the eventual cleanup a breeze. Pro tip: A hot oven from the start ensures the edges begin to brown before the centers dry out.
In a large mixing bowl, combine the cottage cheese, shredded cheddar, garlic powder, onion powder, paprika, salt, and black pepper. Use a rubber spatula to stir until everything is evenly distributed; the mixture should look like a thick, glossy batter. I dare you to taste a spoonful at this point—if it’s not already bursting with flavor, add a pinch more salt. That sizzle when it hits the pan? Absolute perfection.
Using a tablespoon or a small ice‑cream scoop, drop dollops of the mixture onto the prepared sheet, spacing them about an inch apart. The dough will spread as it bakes, so give each dollop room to expand without merging.
Kitchen Hack: Lightly flatten each dollop with the back of a spoon to ensure even thickness; uniform chips bake more consistently.Slide the sheet into the oven and bake for 12‑15 minutes, then rotate the pan 180 degrees to promote even browning. You’ll know they’re ready when the edges start pulling away from the parchment and the tops turn a golden‑amber hue. Keep a close eye—if the oven’s hotter than usual, they can go from perfect to burnt in a heartbeat.
- Allow the chips to cool on the sheet for 5 minutes; they will continue to firm up as they lose residual heat. This resting period is crucial—skip it and you’ll end up with soggy bottoms.Watch Out: Over‑baking will turn these chips into hard, inedible bricks. Pull them out as soon as the edges are crisp and the centers still have a tiny bit of give.
After the initial cooling, gently lift each chip with a thin spatula and transfer to a wire rack. The airflow around each chip prevents steam from condensing and making them soft again. If you notice any chips sticking together, give them a quick shake on the rack to separate them before they fully set.
While the chips are cooling, prepare a small bowl of extra cooking spray (or a light drizzle of olive oil) for those who love an extra glossy finish. Lightly mist each chip; this adds a subtle sheen and a whisper of extra crispness without drowning the flavor. I’ll be honest — I ate half the batch before anyone else got to try it, but the extra spray made the leftovers even more addictive.
Once completely cooled, store the chips in a large airtight container. If you notice any loss of crunch after a day, pop them back in a 350°F oven for 3‑4 minutes to revive that fresh‑out‑of‑the‑oven snap. Picture yourself pulling this out of the oven, the whole kitchen smelling incredible, and then hearing that unmistakable crack as you bite—pure bliss.
Insider Tricks for Flawless Results
The Temperature Rule Nobody Follows
Most home cooks bake at 350°F and expect the same crispness, but the magic really happens at 425°F. The higher temperature evaporates moisture faster, creating that signature snap. If your oven runs cool, crank it up another 10‑15 degrees and watch the edges turn golden in record time.
Why Your Nose Knows Best
Don’t rely solely on a timer—listen for that subtle toasty aroma that signals the chips are nearly done. When the scent shifts from “cheesy” to “nutty‑golden,” you’re within a minute of perfection. A friend once set the timer for 12 minutes, walked away, and returned to a burnt batch; trust your senses over the clock.
The 5‑Minute Rest That Changes Everything
After baking, let the chips rest on a wire rack for at least five minutes. This short pause lets the interior steam escape and the crust firm up. Skipping this step results in a soft center that never fully crisps, ruining the whole texture profile. I’ve tried removing the rest and the chips turned into chewy cheese pillows—not the goal.
Spray, Not Douse
A light mist of cooking spray is all you need; dousing the chips will make them soggy and greasy. Hold the spray bottle about 12 inches away and give each chip a quick, even coat. This trick adds a glossy finish and a tiny crunch boost without adding extra calories.
Batch‑Size Balancing Act
If you’re making a larger batch, don’t overcrowd the baking sheet. Overcrowding traps steam, leading to soggy spots. Use two sheets if necessary, rotating them halfway through baking for uniform color. This ensures every chip gets the same amount of heat and crispness.
Seasoning at the End
For an extra punch, sprinkle a pinch of flaky sea salt or a dusting of smoked paprika immediately after the chips come out of the oven. The residual heat helps the seasoning adhere without clumping. This final touch elevates the flavor from good to unforgettable.
Creative Twists and Variations
This recipe is a playground. Here are some of my favorite ways to switch things up:
Spicy Jalapeño Pop
Finely mince one fresh jalapeño and fold it into the batter for a subtle heat that builds with each bite. The green specks add visual interest, and the spice pairs perfectly with the creamy cheese base. Great for those who love a little kick without overwhelming the palate.
Herb Garden Delight
Swap half the cheddar for a blend of mozzarella and parmesan, then stir in a tablespoon of dried Italian herbs. The herbaceous notes bring a Mediterranean vibe, making these chips a perfect accompaniment to a glass of crisp white wine.
Smoky Chipotle Fusion
Replace the regular paprika with chipotle powder and add a dash of liquid smoke to the mixture. The result is a deep, smoky flavor that feels like a backyard BBQ in chip form. Pair with guacamole for a fiesta‑style snack.
Everything Bagel Crunch
After baking, lightly brush the chips with melted butter and sprinkle them with everything bagel seasoning (sesame seeds, poppy seeds, dried onion, and garlic). The savory topping adds texture and a nostalgic flavor that’s surprisingly addictive.
Sweet & Savory Cinnamon
For a daring sweet twist, add a pinch of cinnamon and a drizzle of honey after the chips cool. The sweet glaze contrasts with the salty cheese, creating a balanced flavor that’s perfect for brunch or a late‑night treat.
Storing and Bringing It Back to Life
Fridge Storage
Place the cooled chips in an airtight container lined with a paper towel to absorb any stray moisture. Stored in the refrigerator, they stay crisp for up to five days. If you notice a slight softening, pop the container in a 300°F oven for two minutes to revive the crunch.
Freezer Friendly
These chips freeze exceptionally well. Spread them in a single layer on a freezer‑safe tray, flash freeze for an hour, then transfer to a zip‑top bag. They’ll keep for up to two months. When you’re ready, bake them straight from frozen at 350°F for 5‑7 minutes; they’ll emerge as if freshly made.
Best Reheating Method
To bring back that original snap, preheat your oven to 350°F, arrange the chips on a parchment‑lined sheet, and add a tiny splash (about a teaspoon) of water to the pan—not the chips. The steam generated prevents them from drying out while the heat restores crispness. In just three minutes, you’ll hear that satisfying crack that tells you they’re ready to devour again.