Picture this: I’m in my tiny city‑apartment kitchen, the oven humming like a lazy cat, when my roommate bursts in demanding something sweet, something that screams “luxury” but without the pretentious price tag. I stare at my pantry, see a lonely pack of kataifi pastry, a bar of dark chocolate, and a half‑cup of butter that’s been melting into a buttery puddle on the counter. I thought, “What if I could turn these humble ingredients into a dessert that makes even the most seasoned pastry chef gasp?” That’s when the idea hit me like a splash of orange zest – a crispy, chocolate‑laden kataifi that’s as crunchy as a fresh spring leaf and as silky as a midnight silk scarf.
The moment I pulled the first strand of kataifi from the box, I could hear it whisper, “We’re about to get crazy.” I tossed it into a bowl, drizzled melted butter, and watched it glisten like a field of golden wheat under a desert sun. The kitchen filled with a buttery aroma that reminded me of a Dubai souk at sunrise, warm and inviting. As the chocolate melted, it released that deep, earthy scent that makes your mouth water before you even taste it. I added a handful of pistachios, orange zest, and a sprinkle of cinnamon – a combination that hits all the right notes: sweet, nutty, citrusy, and spiced.
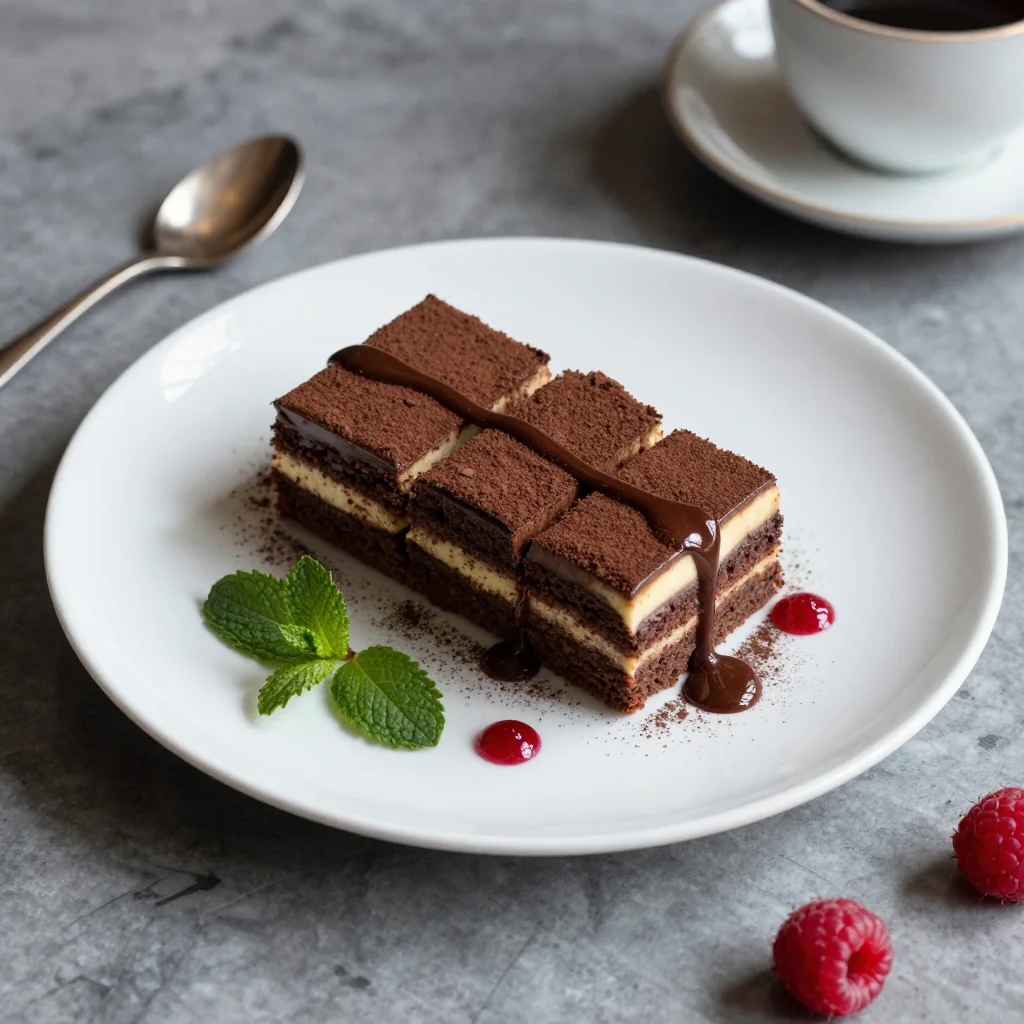
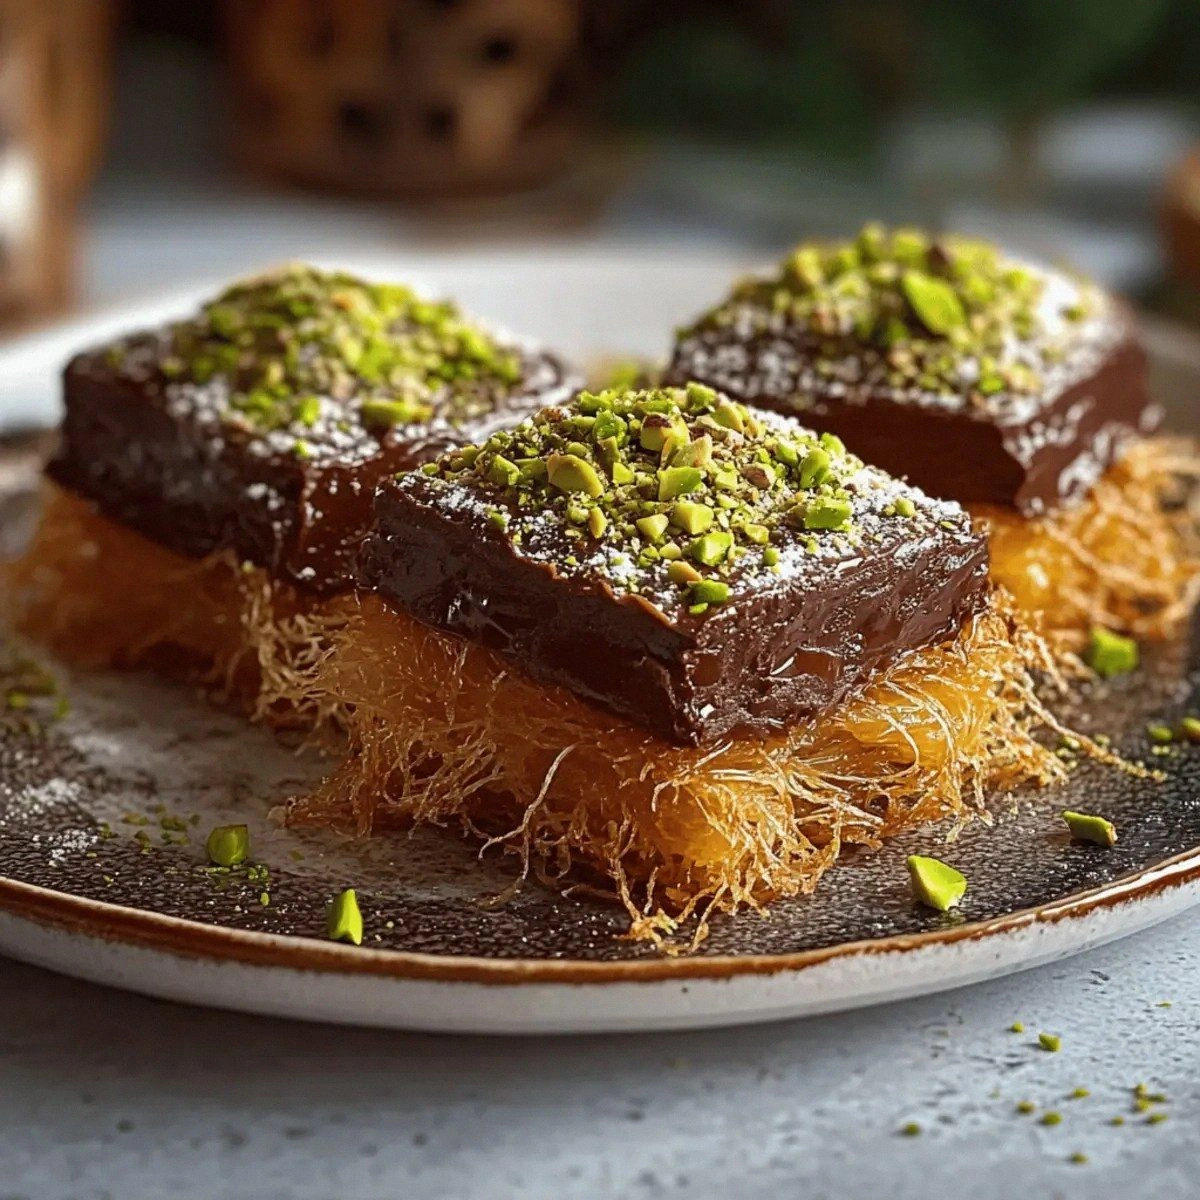
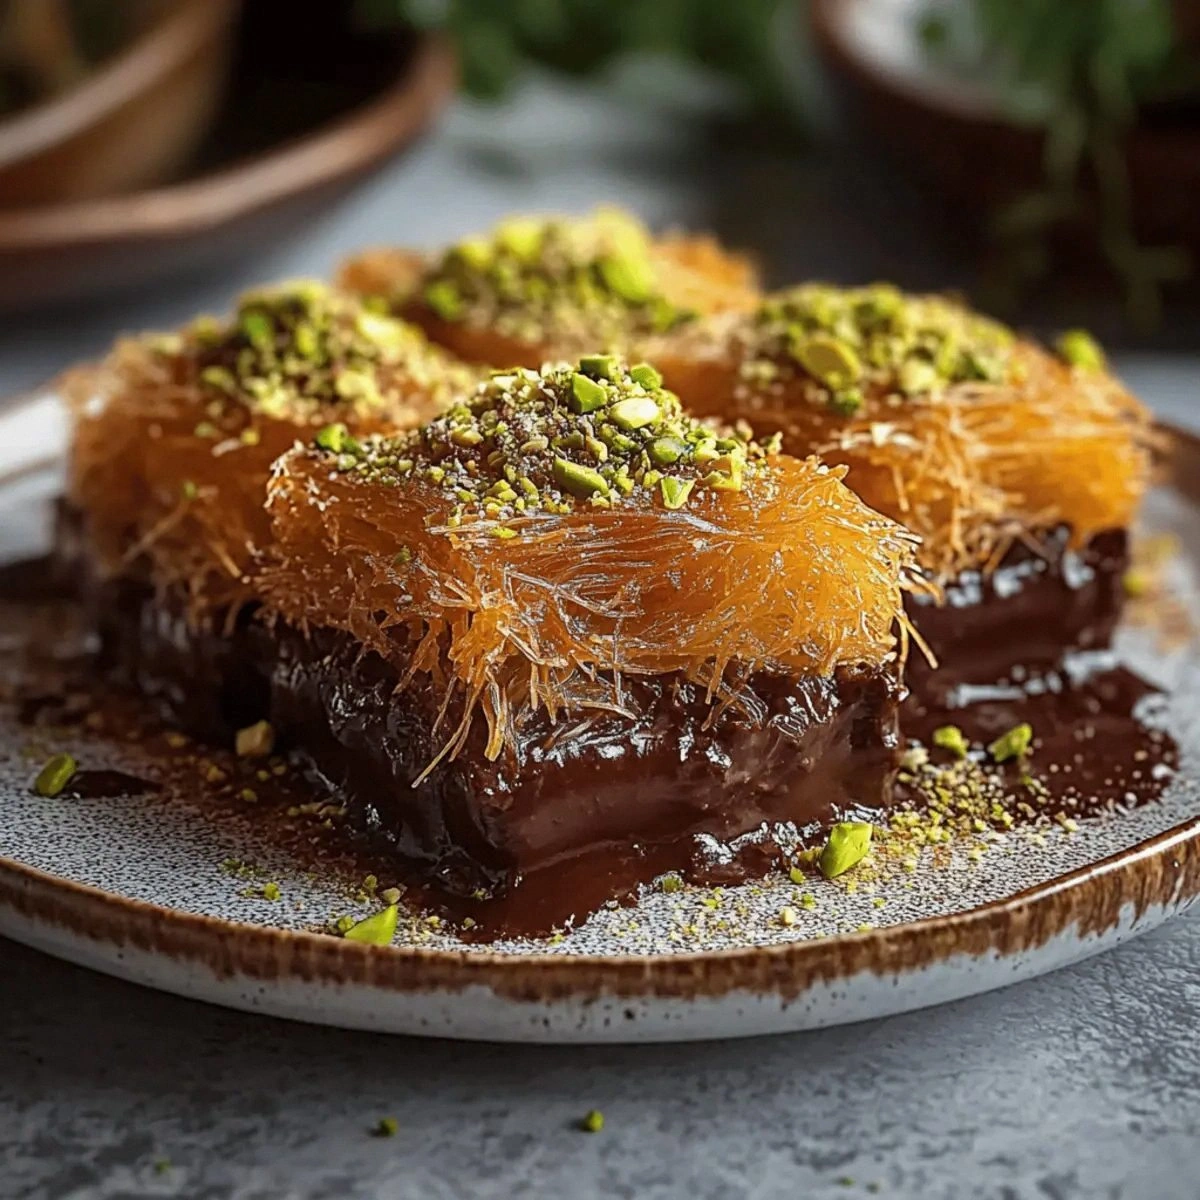
Most kataifi desserts I’ve tried were either soggy, overly sweet, or just plain boring. This version, however, flips the script. I’m talking about a texture that crackles under your fork like thin ice on a mountain lake, a chocolate coating that clings to each strand like velvet, and a honey‑glazed finish that adds a glossy, caramel‑kissed sheen. The coconut flakes on top give it a tropical whisper, while the orange zest adds a bright pop that cuts through the richness. If you’ve ever struggled with a soggy, limp pastry, you’ll know this is the antidote.
And here’s the kicker: I’m going to share a secret technique that most recipes completely miss – a quick butter‑flash that locks in crispness before the chocolate even touches the kataifi. It’s the difference between a pastry that crumbles like dry sand and one that shatters like delicate glass. I dare you to taste this and not go back for seconds. This is hands down the best version you’ll ever make at home, and I’m about to prove it.
Let me walk you through every single step — by the end, you’ll wonder how you ever made it any other way.
What Makes This Version Stand Out
- Texture: The kataifi strands stay crisp thanks to a butter‑flash technique that seals the layers before they soak up any moisture. The result is a satisfying crunch that shatters like thin ice.
- Flavor Depth: Dark chocolate, orange zest, and a hint of cinnamon create a layered flavor profile that evolves with every bite, from bitter to bright to warm.
- Simplicity: Only eight ingredients, all pantry‑friendly, yet the outcome feels like a five‑star restaurant dessert.
- Uniqueness: The addition of coconut flakes and honey glaze gives a Middle‑Eastern twist that you won’t find in standard kataifi recipes.
- Crowd Reaction: Expect gasps, “What’s in this?” questions, and immediate requests for seconds – it’s a show‑stopper at parties.
- Ingredient Quality: Using high‑quality dark chocolate and fresh orange zest makes the difference between “good” and “legendary.”
- Cooking Method: The two‑stage bake (low‑temp butter flash, then high‑temp chocolate finish) guarantees perfect crispness without burning.
- Make‑Ahead Potential: You can prep the kataifi base a day ahead, store it airtight, and finish the chocolate glaze just before serving.
Inside the Ingredient List
The Flavor Base
Kataifi Pastry: This shredded phyllo is the backbone of the dish. Its fine, thread‑like strands create a massive surface area, perfect for absorbing butter and later, the chocolate glaze. If you skip it, you lose the signature crunch that defines this dessert. Look for fresh, un‑frozen packs; frozen kataifi can become brittle and break apart when you try to work with it.
Swap suggestion: If you can’t find kataifi, use shredded phyllo dough or even puff pastry strips, but expect a slightly different texture – less airy, more buttery.
The Texture Crew
Unsalted Butter: Butter is the secret weapon that locks in crispness. It coats each strand, creating a barrier that prevents sogginess once the chocolate is added. Using unsalted gives you control over the final salt level; a pinch of sea salt at the end can elevate the chocolate flavor.
Tip: Use European‑style butter (higher butterfat) for an even richer mouthfeel. If you’re dairy‑free, try clarified ghee – it behaves similarly in the crisping step.
The Unexpected Star
Orange Zest: This bright, citrusy spark cuts through the chocolate’s richness and adds a fragrant aroma that makes the whole kitchen feel like a boutique patisserie. The zest’s essential oils cling to the butter‑coated kataifi, delivering a burst of freshness with each bite.
Fun alternative: Swap orange zest for lemon or yuzu for a different zing. Just remember, the zest should be finely grated to distribute evenly.
The Final Flourish
Chocolate: Dark chocolate (70% cocoa or higher) provides a deep, slightly bitter backbone that balances the honey’s sweetness. Melt it gently over a double boiler to keep it silky; overheating will cause it to seize and become grainy.
If you prefer a sweeter profile, use milk chocolate, but remember you’ll need to reduce the honey or syrup to avoid cloying sweetness.
Nuts (Pistachios or Walnuts): These add crunch and a buttery richness. Pistachios bring a vibrant green pop, while walnuts offer earthier notes. Toast them lightly before mixing in to unlock deeper flavors.
Honey or Simple Syrup: This glaze adds a glossy finish and a subtle floral sweetness that pairs beautifully with the chocolate. Use honey for a more complex flavor; simple syrup if you want a neutral sweetness.
Coconut Flakes: They introduce a tropical whisper and a slight chewiness that contrasts the crisp kataifi. Lightly toast the flakes for extra aroma.
Cinnamon or Cardamom: A pinch of spice adds warmth. Cardamom gives an exotic, floral note, while cinnamon feels more familiar and comforting. Choose based on your mood.
Everything's prepped? Good. Let's get into the real action...
The Method — Step by Step
Preheat your oven to 350°F (175°C). While it heats, spread the kataifi pastry on a large, clean kitchen towel and gently pull it apart with your fingers, teasing the strands so they’re loose and airy. This step is crucial – the more you separate the threads, the crispier the final product will be. I like to play some upbeat music; the rhythm helps you keep the strands moving.
In a small saucepan, melt the unsalted butter over low heat until it’s just bubbling – no browning. Pour the melted butter over the kataifi, using a spatula to toss and coat every single strand. You’ll hear a faint sizzle as the butter meets the dry pastry – that’s the sound of crispness forming. Watch out: If the butter starts to brown, remove it immediately; burnt butter will give a bitter aftertaste.
Watch Out: Do not over‑mix the buttered kataifi; you’ll crush the delicate strands, turning them into a mushy clump.Transfer the butter‑coated kataifi onto a parchment‑lined baking sheet, spreading it into an even layer about ½ inch thick. Press gently with the back of a spoon to create a compact but not overly dense base. This is the moment of truth – the edges should start pulling away from the parchment, signaling that the butter has begun to set.
Slide the sheet into the oven for a “butter flash” bake – just 8‑10 minutes. You’ll notice the pastry puffing slightly and turning a light golden hue. The aroma at this stage is buttery heaven, and the surface should feel firm to the touch but not browned.
While the kataifi is in the oven, prepare the chocolate glaze. Chop the chocolate into uniform pieces, place them in a heat‑proof bowl, and set the bowl over a pot of simmering water (double boiler). Stir gently until the chocolate is completely melted and glossy. Add a tablespoon of honey or simple syrup for shine, and a pinch of sea salt to enhance the chocolate’s depth.
When the butter flash is done, remove the tray and immediately drizzle the molten chocolate over the hot kataifi, using a spatula to spread it evenly. The chocolate should cascade like lava, coating each strand. This is where the magic happens – the hot kataifi absorbs just enough chocolate to stay crisp yet luxuriously coated.
Scatter the toasted nuts, orange zest, and cinnamon (or cardamom) over the chocolate‑covered kataifi. Gently press them in so they adhere. Then, sprinkle the toasted coconut flakes on top for that final tropical whisper.
Return the tray to the oven, now set to 375°F (190°C), for a final 12‑15 minute bake. This higher heat sets the chocolate, giving it a snap when you bite. Keep an eye on it – you want a glossy, firm crust, not a burnt shell.
Once baked, remove from the oven and let it cool on the rack for at least 10 minutes. The cooling period allows the chocolate to fully set, creating that satisfying “crack” sound when you break a piece. If you’re impatient (like me), a quick blast of cold air from a fan can speed up the process without compromising texture.
Finally, cut the kataifi into generous squares or diamond shapes using a sharp knife. Drizzle any remaining chocolate glaze over the top for extra shine, and dust with a final pinch of orange zest for aroma. Serve warm, or at room temperature – either way, you’ve got a dessert that looks as impressive as it tastes.
That's it — you did it. But hold on, I've got a few more tricks that'll take this to another level...
Insider Tricks for Flawless Results
The Temperature Rule Nobody Follows
Never bake kataifi at a temperature lower than 350°F for the final chocolate set. The higher heat creates a crisp outer shell while keeping the interior airy. I once tried a 325°F bake to “be gentle,” and the result was a soggy, gummy mess that clung to the fork. Trust the heat – it’s the secret to that perfect snap.
Why Your Nose Knows Best
When the butter flash is done, you’ll smell a nutty, toasted aroma. That scent is your cue that the pastry has reached the ideal crispness. If you don’t smell it, give it another minute. Your nose is a better timer than any kitchen gadget for this step.
The 5‑Minute Rest That Changes Everything
After the final bake, let the kataifi rest uncovered for exactly five minutes before cutting. This short pause lets the chocolate firm up fully, preventing it from cracking unevenly. Skipping this rest is the fastest way to end up with a crumbly, uneven dessert.
Friend’s Fail: Skipping the Nut Toast
A friend once thought to save time and tossed raw pistachios straight onto the hot chocolate. The nuts turned mushy, losing their crunch and releasing a bitter oil. The lesson? Toast nuts separately until golden, then add them at the end for that essential crunch.
Humidity Hack
If you live in a humid climate, place the baked kataifi on a cooling rack set over a sheet pan with a few ice cubes underneath. The cold air draws moisture away, preserving the crispness for longer.
Creative Twists and Variations
This recipe is a playground. Here are some of my favorite ways to switch things up:
Spiced Chai Kataifi
Swap cinnamon for a blend of chai spices (cardamom, clove, ginger). Add a splash of brewed chai to the honey glaze for an aromatic, warm twist that feels like a cozy winter treat.
White Chocolate & Raspberry
Use white chocolate instead of dark, and fold in fresh raspberry purée into the glaze. The tartness of raspberry cuts through the sweetness, creating a vibrant pink‑gold dessert.
Nut‑Free Coconut Dream
Omit the pistachios or walnuts, double the coconut flakes, and add a drizzle of toasted sesame oil to the glaze. This version stays crunchy and introduces an exotic, nut‑free profile.
Matcha Green Tea Infusion
Mix a teaspoon of matcha powder into the melted butter before coating the kataifi. The subtle earthiness pairs beautifully with dark chocolate and adds a stunning green hue.
Caramelized Banana Layers
Slice bananas thinly, caramelize them in a pan with a touch of butter and brown sugar, then layer them between two sheets of kataifi before the final bake. The result is a dessert that feels like a deconstructed banana split.
Alcohol‑Boosted Glaze
Stir a tablespoon of Grand Marnier or dark rum into the honey glaze before drizzling. The alcohol evaporates during baking, leaving behind a nuanced, adult‑only flavor.
Storing and Bringing It Back to Life
Fridge Storage
Place the cooled kataifi in an airtight container, separating layers with parchment paper to avoid sticking. It will stay crisp for up to three days. Before serving, let it sit at room temperature for 15 minutes to let the chocolate soften just a touch.
Freezer Friendly
Wrap the entire baked sheet tightly in foil, then place it in a freezer‑safe bag. It freezes beautifully for up to one month. To reheat, thaw overnight in the fridge, then pop it in a 300°F oven for 5‑7 minutes. The quick blast revives the crunch.
Best Reheating Method
When you’re ready to serve, preheat your oven to 350°F, place the kataifi on a baking sheet, and add a tiny splash (about a teaspoon) of water to the pan. Cover loosely with foil and heat for 8 minutes; the steam restores moisture without sogging, while the foil protects the chocolate from over‑browning.