
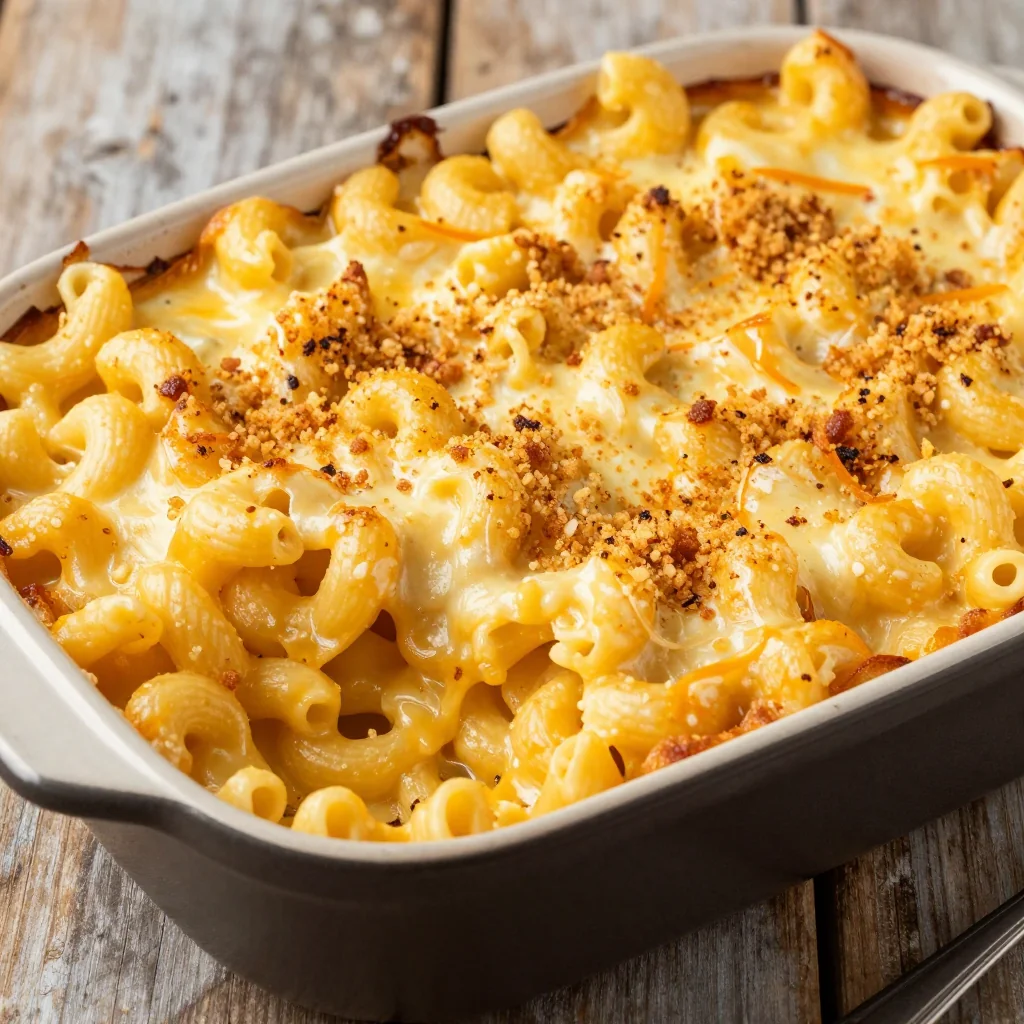
A comforting, cheesy bake that celebrates sweet corn and vibrant peppers in every bite.

When I was a child, the scent of sweet corn roasting on a summer grill always pulled me toward the kitchen, where my grandmother would whisk together butter, cream, and a handful of fresh herbs into a silky sauce. One rainy afternoon, I discovered that same nostalgic sweetness could be transformed into a hearty casserole, perfect for chilly evenings or bustling family gatherings. The first time I layered golden corn kernels with melty cheddar, bright bell peppers, and a buttery breadcrumb topping, the whole house filled with a warm, inviting aroma that felt like a hug.
This dish hails from the rustic traditions of American comfort food, where corn—America’s golden grain—takes center stage. While it’s not tied to a specific region, its roots lie in the farm‑to‑table ethos of the Midwest, where corn, cheese, and simple pantry staples are celebrated in every home-cooked meal. The addition of colorful peppers adds a modern twist, lending both visual appeal and a subtle sweetness that balances the richness of the cheese and cream.
In this article, you’ll learn how to achieve the perfect creamy texture without ending up soggy, how to select the freshest corn and peppers, and why a quick breadcrumb finish makes all the difference. I’ll walk you through each step, share the science behind the emulsification of milk and eggs, and reveal my secret for a golden crust that stays crisp even after reheating.
Let’s dive in, gather our ingredients, and create a casserole that will become a beloved staple in your kitchen for years to come.
🌟 Why This Recipe Will Win Your Heart
From family gatherings to quick weeknight dinners, this casserole blends comfort, flavor, and convenience in a single dish.
- ✨ Creamy Yet Light Texture: The combination of whole milk, heavy cream, and eggs creates a custard‑like base that feels indulgent without being heavy, thanks to the natural moisture of fresh corn.
- ✨ Vibrant Color Palette: Red and green bell peppers add bursts of color that make the casserole visually striking, perfect for plating on any table.
- ✨ Easy Customization: Swap cheeses, add herbs, or adjust the spice level—this recipe is a flexible canvas for creativity.
- ✨ One‑Dish Wonder: All components bake together, minimizing cleanup and delivering a balanced meal with protein, carbs, and vegetables.
- ✨ Crowd‑Pleaser: The familiar flavors of cheese and corn appeal to both kids and adults, making it ideal for parties, potlucks, or family dinners.
- ✨ Freezer Friendly: Prepare ahead, freeze, and reheat later without sacrificing the buttery crust or creamy interior.
🥗 Ingredients
📝 Complete Ingredient List
For the Base:
- 4 cups fresh corn kernels
- 1 cup whole milk
- ½ cup heavy cream
- 2 large eggs
- 1 tsp salt
- ½ tsp black pepper
For the Cheese & Peppers:
- 1 cup shredded sharp cheddar cheese
- ½ cup shredded mozzarella cheese
- ½ cup diced red bell pepper
- ½ cup diced green bell pepper
- ¼ cup chopped fresh parsley
For the Topping:
- ½ cup panko breadcrumbs
- 2 tbsp melted butter
- 1 pinch paprika (optional)

🔍 Focus on Key Ingredients
Fresh Corn Kernels
Corn provides natural sweetness and a pleasant crunch when cooked just right. When selecting fresh corn, look for ears with bright green husks and milky sap at the tip. If you’re using frozen corn, choose a brand without added sauces or salt to preserve the pure flavor.
Sharp Cheddar Cheese
Sharp cheddar offers a robust, tangy flavor that cuts through the richness of the cream. It melts smoothly, creating those glorious golden streaks throughout the casserole. For a deeper flavor, age the cheese for at least six months.
Bell Peppers
Red and green bell peppers contribute both color and a subtle sweetness. Their crisp texture remains after baking, adding a pleasant bite. Choose peppers that are firm, glossy, and free from blemishes.
🔄 Quick Substitutions
| If you don’t have... | Use instead... |
|---|---|
| Fresh corn | Frozen corn, thawed |
| Sharp cheddar | Gruyère or aged gouda |
| Panko breadcrumbs | Regular breadcrumbs or crushed cornflakes |
👨🍳 Step‑by‑Step Instructions
Follow these detailed steps to create a perfectly creamy, golden‑topped casserole that’s sure to impress.
📋 Phase 1: Preparation & Mise en Place
Gather, measure, and prep all ingredients before you start cooking.
Preheat the Oven
Set your oven to 190°C (375°F) and let it fully preheat while you prepare the casserole. A properly preheated oven ensures an even rise and a golden crust.
Prepare the Corn
If using fresh corn, shuck the ears and slice the kernels off with a sharp knife. For frozen corn, spread it on a kitchen towel and pat dry to remove excess moisture, which could make the casserole watery.
Dice the Bell Peppers
Remove the stems, seeds, and white membranes from the red and green peppers. Dice them into uniform ½‑inch cubes so they cook evenly and distribute color throughout the dish.
🔥 Phase 2: Mixing & Baking
Combine the creamy base, incorporate cheese and peppers, then bake.
Make the Custard Base
In a large mixing bowl, whisk together the milk, heavy cream, eggs, salt, and black pepper until fully blended. The eggs act as a natural thickener, creating a custard that will set gently during baking.
Combine Corn, Peppers, and Cheeses
Add the corn kernels, diced red and green peppers, shredded cheddar, and mozzarella to the custard. Fold gently to coat every kernel and pepper piece with the creamy mixture. The cheese will melt into ribbons, giving the casserole its signature gooeyness.
Prepare the Breadcrumb Topping
In a small bowl, mix the panko breadcrumbs with melted butter until each crumb is lightly coated. Sprinkle a pinch of paprika over the mixture for a subtle smoky note and a pop of color.
Assemble the Casserole
Grease a 9‑inch (23 cm) square baking dish with a little butter or oil. Pour the custard‑corn‑cheese mixture into the dish, spreading it evenly. Top with the buttered panko breadcrumbs and scatter the chopped parsley for freshness.
Bake Until Golden
Place the dish in the preheated oven and bake for 30‑35 minutes, or until the top is golden brown and a knife inserted into the center comes out clean. The custard should be set but still slightly wobbling—this indicates a silky interior.
✨ Phase 3: Finishing & Serving
Let the casserole rest, then plate it beautifully.
Check for Doneness
After the timer goes off, gently shake the pan; the edges should be firm while the center may still have a slight jiggle. This is the hallmark of a perfectly set custard.
Rest and Garnish
Allow the casserole to rest for 5‑10 minutes. This resting period lets the custard finish setting and makes it easier to cut clean squares. Sprinkle a little extra fresh parsley for a bright finishing touch.
Serve
Cut the casserole into six generous portions. Serve hot, accompanied by a simple green salad or crusty bread to soak up any remaining sauce.
💡 Expert Tips & Tricks
🛒 Choosing the Right Ingredients
Look for corn that is bright yellow and plump; the kernels should snap easily when bitten. For cheese, a balance of sharp cheddar (for flavor) and mozzarella (for melt) works best. When selecting bell peppers, choose ones that feel heavy for their size and have smooth skins—this indicates freshness and a sweeter flavor profile.
🔪 Preparation Techniques
When whisking the custard, use a balloon whisk and incorporate the eggs gradually to avoid curdling. A gentle folding motion when adding the corn and peppers preserves the corn’s texture and prevents the mixture from becoming too dense.
🌡️ Mastering the Bake
Start the bake at 190°C (375°F) for a consistent rise. If your oven runs hot, rotate the pan halfway through baking. The breadcrumb topping should turn a deep golden brown; if it darkens too quickly, loosely cover the dish with foil.
🍽️ Presentation & Service
Serve the casserole directly from the baking dish for a rustic look, or transfer squares onto a warm platter. A drizzle of melted butter infused with fresh herbs adds a glossy finish and extra aroma.
🏆 Pro Tips
Professional chefs focus on texture, flavor balance, and visual appeal to elevate a simple casserole into a standout dish.
- 🎯 Use a Double Boiler for the Custard: Gently heating the milk and cream over a double boiler before whisking in the eggs prevents curdling and creates a silkier base.
- 🎯 Toast the Breadcrumbs First: Lightly toast the panko with butter in a skillet for 2‑3 minutes; this adds a deeper, nutty flavor to the topping.
- 🎯 Incorporate a Touch of Sweetness: A teaspoon of honey or maple syrup balances the pepper’s slight bitterness and enhances the corn’s natural sweetness.
- 🎯 Finish with a Sprinkle of Smoked Paprika: The smoky note adds complexity without overpowering the delicate custard.
- 🎯 Use a Silicone Baking Mat: It promotes even browning and makes cleanup effortless.
- 🎯 Rest Before Cutting: Allowing the casserole to sit for 10 minutes after baking ensures clean slices and prevents the custard from spilling.
"A great casserole is all about balance—sweet, savory, creamy, and crunchy all in one bite." — Chef Thomas Keller
🔄 Variations & Adaptations
This versatile recipe can be tweaked to suit dietary preferences, flavor cravings, and seasonal produce.
🥬 Vegetarian / Vegan Version
Replace the dairy components with plant‑based alternatives: use almond milk, coconut cream, and a vegan cheese blend (such as a cheddar‑style cashew cheese). Substitute the eggs with a mixture of ¼ cup silken tofu blended with 1 tablespoon nutritional yeast per egg.
- Almond milk (1 cup) – provides creaminess without dairy.
- Vegan cheddar (1 cup) – adds the familiar tang.
🌶️ Flavor Variations
Play with global spices and additional vegetables to create new taste experiences.
Spicy Version
Stir in 1 finely chopped jalapeño and a pinch of cayenne pepper into the custard for a gentle heat that complements the sweetness of the corn.
Mediterranean Version
Add ¼ cup crumbled feta, 2 tablespoons chopped Kalamata olives, and a sprinkle of dried oregano. Finish with a drizzle of extra‑virgin olive oil before baking.
Asian‑Inspired Version
Mix in 1 tablespoon soy sauce, 1 teaspoon grated ginger, and replace cheddar with a blend of mozzarella and shredded aged gouda. Garnish with toasted sesame seeds after baking.
⚠️ Dietary Adaptations
Gluten‑Free
Swap the panko breadcrumbs for gluten‑free breadcrumbs or crushed rice crackers. Ensure the cheese you use is certified gluten‑free.
Lactose‑Free
Use lactose‑free milk and a lactose‑free cheese alternative. Coconut cream can replace heavy cream for a richer mouthfeel.
Low‑Calorie
Reduce the heavy cream to ¼ cup and replace half of the cheddar with low‑fat mozzarella. Use a light spray of cooking oil for the breadcrumb topping instead of butter.
👶 Kid‑Friendly Version
Omit the paprika and use milder cheeses like mild cheddar and mozzarella. Add a handful of sweet corn kernels mixed with a small amount of finely diced carrots for added color and nutrition that kids love.
📦 Storage & Reheating
🧊 Conservation
In the Refrigerator:
- Duration: 3–4 days
- Recommended container: Airtight glass or plastic storage dish
- Tip: Cover with foil to keep the topping crisp.
In the Freezer:
- Duration: Up to 2 months
- Method: Cool completely, then wrap tightly in foil and place in a freezer‑safe bag.
- Defrosting: Transfer to the fridge overnight before reheating.
💡 For best texture, reheat from frozen using the oven method; microwaving may soften the breadcrumb topping.
♨️ Reheating
🔥 Oven (Recommended):
- Preheat to 180°C (350°F).
- Cover the casserole loosely with aluminum foil.
- Heat for 15‑20 minutes if refrigerated, or 30‑35 minutes if frozen.
- Remove foil and bake an additional 5 minutes to re‑crisp the topping.
⚡ Microwave (Quick):
- Place a slice on a microwave‑safe plate.
- Cover with a microwave‑safe lid or paper towel.
- Heat on medium power for 1‑2 minutes, then stir gently.
🍳 Skillet:
For a single serving, melt a tablespoon of butter in a skillet over medium heat, add a slice, cover, and cook 4‑5 minutes, flipping once, until heated through and the bottom is crispy.
🍷 Perfect Pairings
🥗 Side Dishes
- Mixed Green Salad with Lemon Vinaigrette: The acidity cuts through the richness, refreshing the palate.
- Garlic‑Roasted Asparagus: Adds a crisp, earthy contrast to the creamy casserole.
- Crusty Sourdough Bread: Perfect for soaking up any lingering sauce.
🍷 Wine & Beverage Pairings
- Chardonnay (oaked): Its buttery notes echo the creaminess while its acidity balances the cheese.
- Riesling (off‑dry): Offers a hint of sweetness that mirrors the corn.
- Non‑Alcoholic: Sparkling apple cider provides a crisp, fruity counterpoint.
🍰 To Complete the Meal
Start with a light cucumber‑mint soup, follow with the casserole, and finish with a citrus‑infused panna cotta topped with fresh berries. This progression keeps the meal balanced, from refreshing to comforting to sweet.
❓ Frequently Asked Questions
Q: Can I use canned corn instead of fresh or frozen?
Yes, but drain and rinse the canned corn thoroughly to remove excess salt and liquid. Pat it dry with a clean kitchen towel before adding it to the custard to avoid a watery casserole.
Q: How do I prevent the custard from curdling?
Temper the eggs by slowly whisking in a small amount of the warm milk‑cream mixture before adding the full custard back to the bowl. This gradual temperature increase stabilizes the proteins, preventing curdling.
Q: What if I don’t have panko breadcrumbs?
You can substitute regular breadcrumbs, crushed cornflakes, or even finely ground almonds for a gluten‑free option. Toast them lightly with butter for extra crunch.
Q: My casserole turned out watery—what went wrong?
Excess moisture from the corn or using too much milk can cause a runny texture. Ensure frozen corn is well‑drained, and consider reducing the milk by ¼ cup if you prefer a firmer custard.
Q: Can I make this recipe ahead of time?
Absolutely. Assemble the casserole up to the point of baking, cover tightly, and refrigerate for up to 24 hours. Bake directly from the fridge, adding a few extra minutes to the cooking time.
Q: How do I scale the recipe for more or fewer servings?
Use the portion adjuster below the recipe card. The built‑in JavaScript will automatically recalculate ingredient quantities based on the number of servings you select.
🎉 Let’s Get Cooking!
This Creamy Corn Casserole with Cheese and Peppers combines the sweet crunch of corn, the melt‑in‑your‑mouth richness of cheddar, and the vibrant snap of bell peppers—all wrapped in a buttery, golden crust. Whether you’re feeding a family, hosting a potluck, or simply craving comfort food, this dish delivers flavor, texture, and visual appeal in one easy bake. Remember the key steps: gentle custard preparation, even distribution of cheese and peppers, and a crisp breadcrumb topping.
Give it a try, experiment with the variations, and share your results in the comments below. Your feedback helps the community grow, and we love seeing your beautiful plates on social media.
Have you tried this recipe?
Leave a comment and rating below! Share your photos on Instagram with #CornCasseroleDelight to be featured.
Creamy Corn Casserole with Cheese and Peppers
A cheesy, buttery bake that celebrates sweet corn and colorful peppers.
📝 Ingredients
Base
Cheese & Peppers
Topping
👨🍳 Instructions
- 1 Preheat oven to 190°C (375°F). Place a rack in the middle.
- 2 Prepare corn and dice bell peppers as described in Phase 1.
- 3 Whisk milk, cream, eggs, salt, and pepper together until smooth.
- 4 Fold corn, peppers, and both cheeses into the custard.
- 5 Mix panko with melted butter and paprika; set aside.
- 6 Grease a 9‑inch square dish, pour the mixture, and top with breadcrumbs.
- 7 Bake 30‑35 min until golden and set.
- 8 Rest 5 min, garnish with parsley, then slice.
- 9 Serve hot with your favorite side.
- 10 Enjoy and share your photos!
🥗 Nutritional Information (per serving)
*Values are estimates based on standard ingredient data.
📚 You Might Also Like
Cheesy Broccoli Gratin
Spicy Chicken Enchiladas
Lemon Garlic Salmon


💬 Comments & Reviews
Leave a Comment
[Comments will appear here after visitors post their feedback]