Love this? Pin it for later! 📌
When life gets hectic, these clean eating protein balls have become my secret weapon. I first started making them during my marathon training days, when I needed something portable, nutritious, and indulgent enough to feel like a treat after those brutal 20-mile runs. What began as a post-workout snack has evolved into my go-to solution for everything from afternoon energy slumps to healthy dessert cravings.
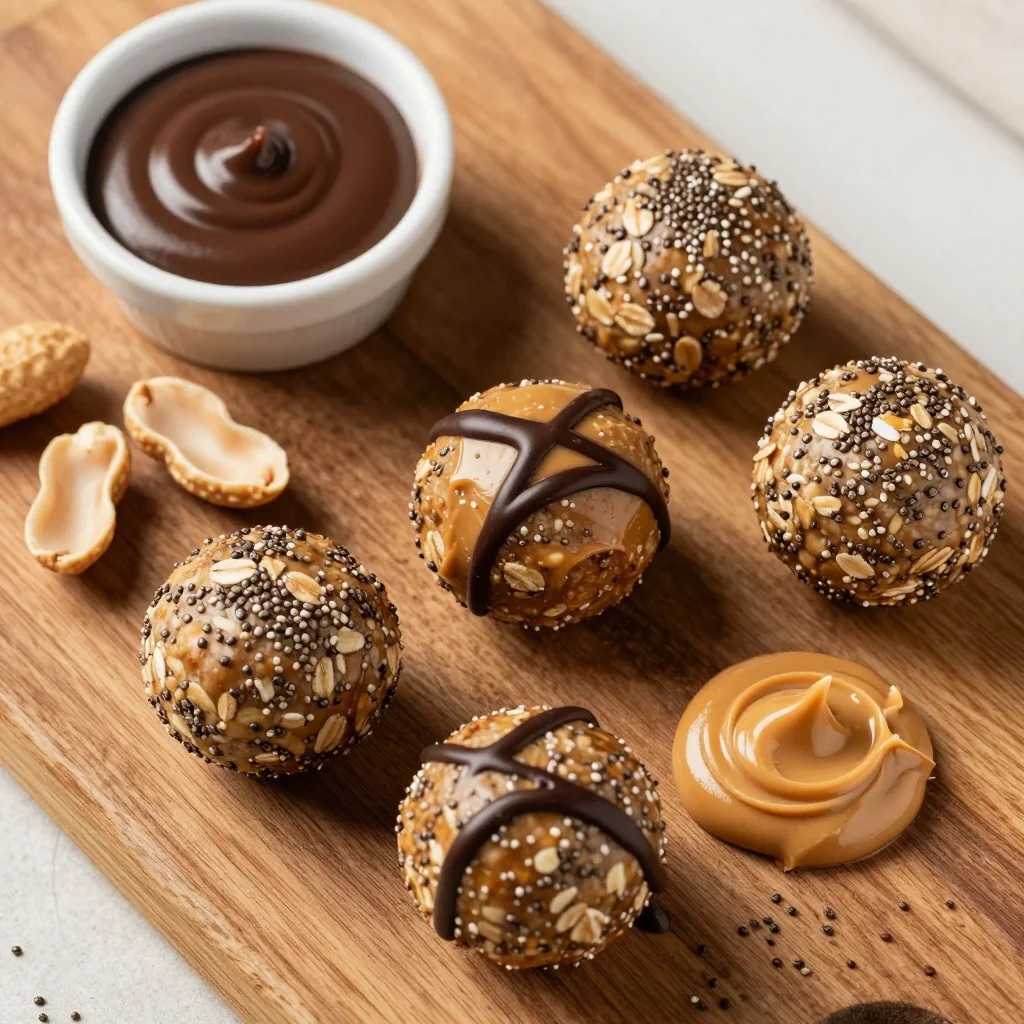
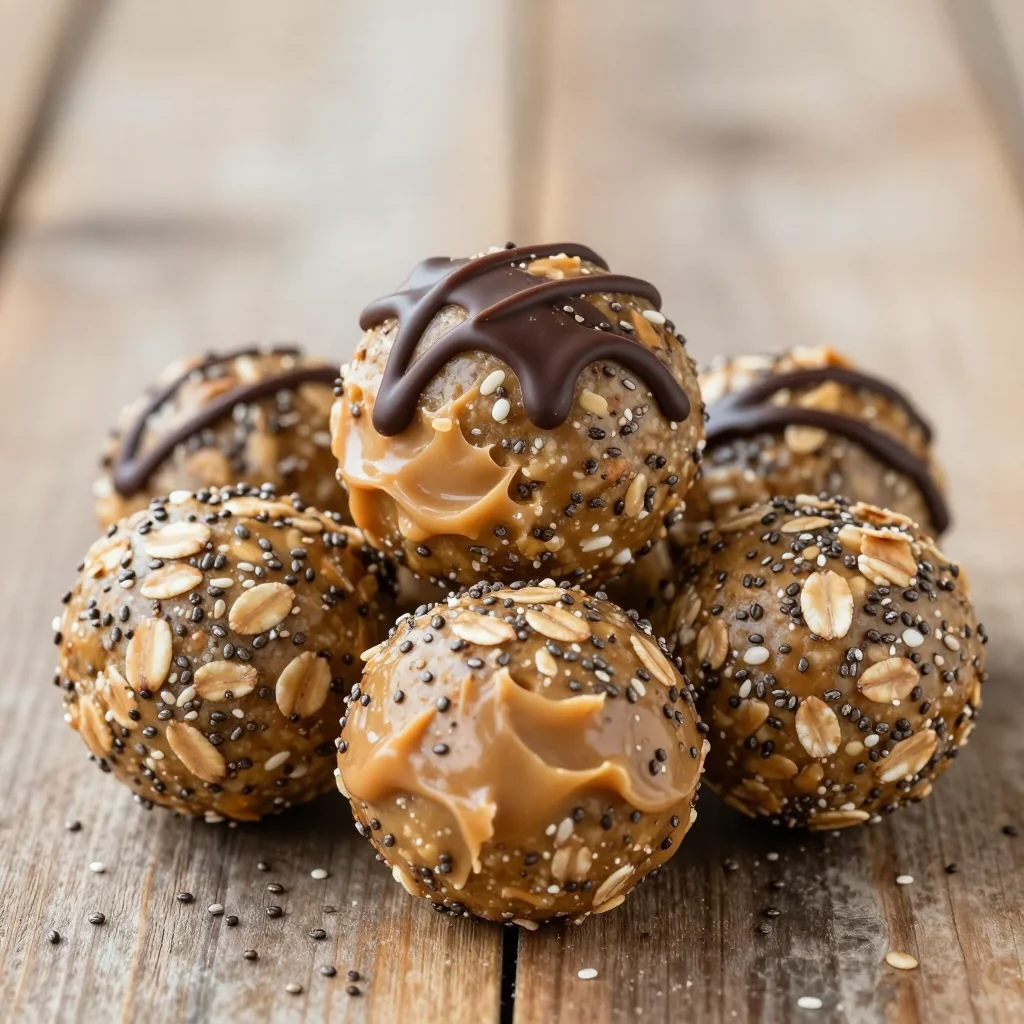
There's something magical about the combination of creamy peanut butter and rich chocolate that makes these protein balls feel like dessert, even though they're packed with wholesome ingredients. My kids think they're getting candy when I pull these out of the fridge, and honestly, I'm not going to correct them. The best part? They take less than 15 minutes to make and require zero baking skills – if you can stir ingredients in a bowl, you can master this recipe.
Over the years, I've perfected this recipe through countless iterations, testing different protein powders, natural sweeteners, and add-ins. The result is a protein ball that's not only nutritionally balanced but also incredibly satisfying. Whether you're meal prepping for the week ahead, packing school lunches, or looking for a post-workout recovery snack that actually tastes good, these protein balls deliver on every level.
Why This Recipe Works
- Perfect Texture: The combination of oats and protein powder creates a satisfyingly chewy texture that doesn't crumble or fall apart.
- Balanced Nutrition: Each ball delivers 8g of protein, healthy fats, and complex carbs for sustained energy without the sugar crash.
- Meal Prep Friendly: These balls stay fresh for up to 2 weeks refrigerated or 3 months frozen, making them perfect for batch cooking.
- Kid-Approved: Even picky eaters love these – they're like healthy candy that satisfies sweet cravings without refined sugar.
- Customizable: Easy to adapt for dietary needs – make them vegan, gluten-free, or nut-free with simple substitutions.
- No Equipment Needed: One bowl, one spoon, and ten minutes is all you need – no food processor or special equipment required.
- Budget-Friendly: Made with pantry staples, these cost about 25 cents per ball compared to $2-3 for store-bought versions.
Ingredients You'll Need
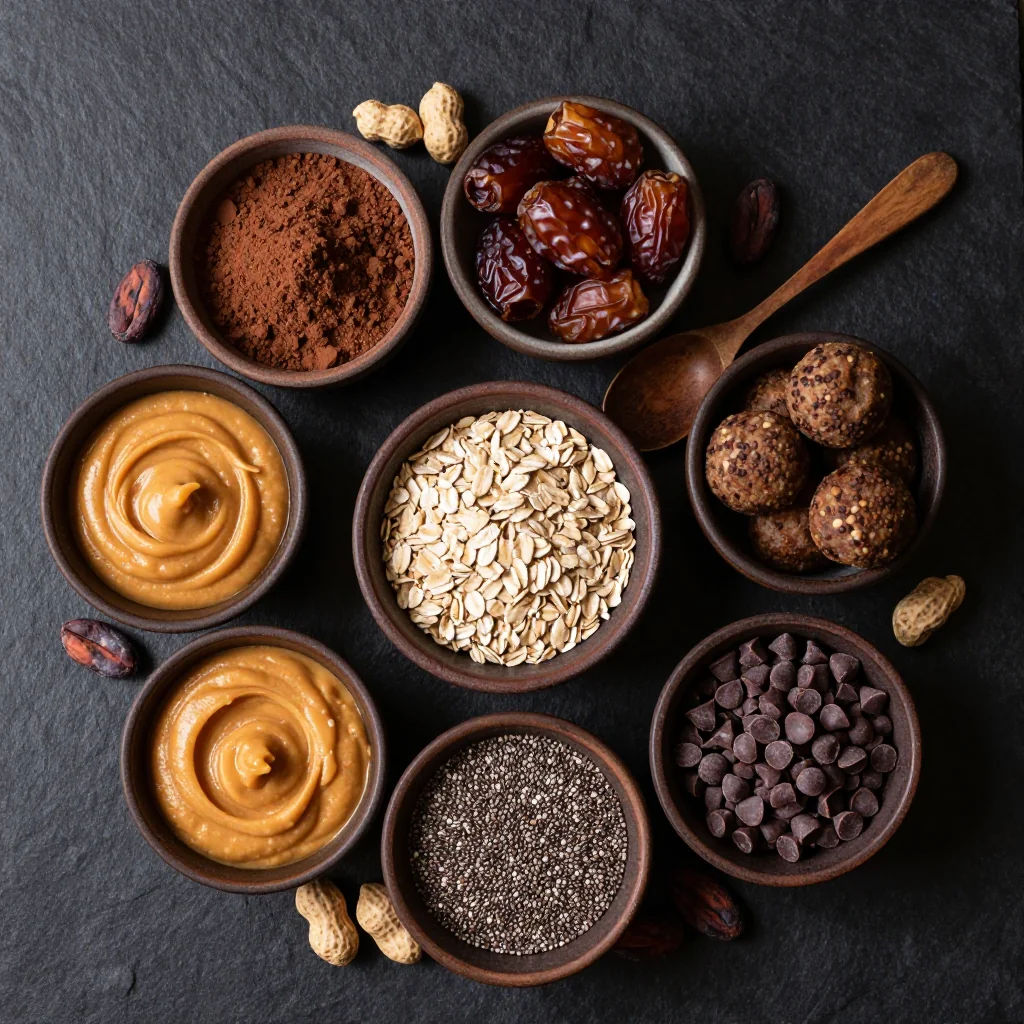
Let's talk about each ingredient and why it matters. The beauty of this recipe lies in its simplicity – every component serves a purpose, whether it's providing structure, flavor, or nutritional benefits.
Natural Peanut Butter (1 cup)
Choose a natural peanut butter with just peanuts and salt – no added oils or sugars. The natural oils help bind everything together while providing healthy monounsaturated fats. If your peanut butter is too stiff from the fridge, microwave it for 20-30 seconds to loosen it up. Not a peanut butter fan? Almond butter or cashew butter work beautifully too.
Old-Fashioned Rolled Oats (1½ cups)
Rolled oats provide the perfect texture – not too chewy, not too powdery. They absorb excess moisture and give structure to the balls. Make sure to use old-fashioned oats, not quick-cooking or steel-cut. For gluten-free protein balls, simply use certified gluten-free oats.
Protein Powder (½ cup)
This is where you can really customize. I prefer vanilla or chocolate whey protein isolate for the smoothest texture, but plant-based proteins work too. If using plant-based protein, you might need an extra tablespoon of liquid since they tend to be more absorbent. Avoid protein powders with artificial sweeteners – they can leave an aftertaste.
Dark Chocolate Chips (⅓ cup)
Look for chocolate chips that are at least 60% cacao for the health benefits and less sugar. Mini chips distribute more evenly throughout the balls, but regular chips work fine too. For a cleaner option, chop up a high-quality dark chocolate bar – it melts less and tastes more luxurious.
Honey or Maple Syrup (¼ cup)
Both work well as natural binding agents and sweeteners. Honey creates a slightly firmer texture, while maple syrup makes them more tender. For strict vegans, maple syrup is the way to go. Start with less and add more to taste – some protein powders are sweeter than others.
Ground Flaxseed (2 tablespoons)
Flaxseed adds omega-3 fatty acids and helps with binding. Make sure to use ground flaxseed, not whole – your body can't digest whole flaxseeds properly. If you don't have flaxseed, chia seeds make an excellent substitute.
Vanilla Extract (1 teaspoon)
Vanilla enhances all the other flavors and makes these taste like a real treat. Use pure vanilla extract, not imitation. For a fun twist, try almond extract instead – it pairs beautifully with the peanut butter.
How to Make Clean Eating Protein Balls with Peanut Butter and Chocolate
Prepare Your Workspace
Start by clearing a clean surface and grabbing a large mixing bowl. Line a baking sheet or large plate with parchment paper – this prevents sticking and makes cleanup easier. If your peanut butter is cold and stiff, microwave it for 20-30 seconds until it's easily stirrable but not hot.
Combine Wet Ingredients
In your large mixing bowl, add the peanut butter, honey (or maple syrup), and vanilla extract. Stir these together until smooth and well combined. The mixture should be glossy and easily stirrable. If it's too thick, add a teaspoon of warm water at a time until you reach a consistency similar to thick cake batter.
Add Dry Ingredients
Now add the oats, protein powder, ground flaxseed, and a pinch of sea salt. Use a sturdy spoon or spatula to combine everything. At first, it might seem like there's not enough liquid, but keep stirring – the oats will absorb moisture and the protein powder will hydrate. If after 2-3 minutes of stirring the mixture seems too dry and crumbly, add water a teaspoon at a time. If it's too wet and sticky, add more oats a tablespoon at a time.
Fold in Chocolate
Once your base mixture is ready, gently fold in the chocolate chips. Don't overmix – just stir until they're evenly distributed. If you mix too vigorously, the chocolate can melt from the warmth of your hands and create chocolate streaks throughout the mixture.
Test the Texture
Before rolling all your balls, test one: scoop up about 2 tablespoons of mixture and squeeze it in your palm. It should hold together without crumbling. If it falls apart, your mixture needs more binding – add a teaspoon of honey or water. If it's too sticky to roll, add more oats.
Roll Your Balls
Using a small cookie scoop or tablespoon, portion out the mixture. Roll between your palms to form 1-inch balls. If the mixture sticks to your hands, lightly dampen your palms with water – this prevents sticking without adding extra oil. Place each ball on your prepared parchment-lined surface.
Chill and Set
Once all your balls are rolled, refrigerate them for at least 30 minutes. This chilling time allows the oats to fully hydrate and the flavors to meld together. The balls will firm up and become the perfect texture – soft enough to bite through easily but firm enough to hold their shape.
Store and Enjoy
Transfer the chilled protein balls to an airtight container. They'll keep in the refrigerator for up to 2 weeks, though they rarely last that long in my house. For longer storage, freeze them on a baking sheet first, then transfer to a freezer bag – they'll keep for up to 3 months frozen.
Expert Tips
Temperature Matters
Room temperature ingredients blend more easily. If your peanut butter is cold from the fridge, let it sit at room temperature for 30 minutes or microwave briefly. Cold ingredients can make the mixture seize up and become difficult to roll.
Moisture Control
Different protein powders absorb liquid differently. Start with less liquid and add more as needed. Whey protein typically needs less liquid than plant-based proteins. Add water a teaspoon at a time until you reach the right consistency.
Size Consistency
Use a small cookie scoop or tablespoon for uniform sizes. This ensures even chilling and makes portion control easier. If you're tracking macros, consistent sizing helps you know exactly what you're getting in each ball.
Flavor Boosters
Add a pinch of cinnamon for warmth, a dash of espresso powder to enhance chocolate flavor, or a drop of mint extract for a fun twist. Start with small amounts – you can always add more, but you can't take it out.
Make-Ahead Magic
Double the batch and freeze half. They thaw in about 10 minutes at room temperature, making them perfect for grab-and-go snacking. Frozen protein balls also make a great topping for yogurt or smoothie bowls.
Sticky Situation
If the mixture is too sticky to roll, chill it for 15 minutes first. You can also lightly oil your hands with coconut oil, or keep a bowl of water nearby to dampen your hands as needed.
Protein Powder Swap
Different brands vary in sweetness and absorption. If switching brands, start with 2 tablespoons less than the recipe calls for and adjust as needed. Unflavored protein powder works too – just add an extra tablespoon of honey for flavor.
Gift Presentation
These make wonderful gifts! Layer them in a mason jar with parchment paper between layers, or package them in cute treat bags tied with ribbon. Include the recipe card – everyone will ask for it anyway!
Variations to Try
Almond Joy Protein Balls
Replace peanut butter with almond butter, use coconut flakes instead of oats for ¼ cup of the dry ingredients, and add 2 tablespoons of chopped almonds. Use dark chocolate chips and add ½ teaspoon coconut extract for that classic Almond Joy flavor profile.
White Chocolate Raspberry
Use vanilla protein powder, replace chocolate chips with white chocolate chips, and add ¼ cup freeze-dried raspberries crushed into powder. The tart raspberries balance the sweetness of white chocolate beautifully.
Mocha Energy Balls
Add 1 tablespoon espresso powder and 2 tablespoons cocoa powder to the dry ingredients. Use chocolate protein powder and add ¼ cup chopped espresso beans for crunch. These are perfect for that afternoon energy slump.
Tropical Paradise
Replace 2 tablespoons of oats with unsweetened shredded coconut, add ¼ cup chopped dried mango or pineapple, and use coconut extract instead of vanilla. These taste like a tropical vacation in protein ball form.
Snickerdoodle
Add 1 teaspoon cinnamon and ¼ teaspoon cream of tartar to the dry ingredients. Use vanilla protein powder and white chocolate chips. Roll the finished balls in a mixture of cinnamon and coconut sugar for that classic snickerdoodle coating.
Peanut Butter and Jelly
Replace 2 tablespoons of honey with your favorite jam or jelly. Add ¼ cup chopped dried strawberries or raspberries. Use peanut butter as the base and consider adding a few chopped peanuts for extra texture.
Storage Tips
Proper storage is key to maintaining the perfect texture and maximizing the shelf life of your protein balls. Here's everything you need to know about keeping them fresh and delicious:
Refrigerator Storage (Up to 2 weeks)
Store protein balls in an airtight container in the refrigerator. I like to layer them with parchment paper between layers to prevent them from sticking together. The cold temperature helps them maintain their shape and prevents the chocolate from melting. They'll actually get better after a day or two as the flavors meld together.
Freezer Storage (Up to 3 months)
For longer storage, freeze your protein balls. First, arrange them in a single layer on a baking sheet and freeze until solid (about 2 hours). This prevents them from sticking together. Then transfer to a freezer-safe bag or container. Label with the date so you know when you made them. They thaw in about 10-15 minutes at room temperature.
Room Temperature (2-3 days)
These can be kept at room temperature for a few days, making them perfect for lunch boxes or hiking snacks. Just be aware that the chocolate might get a little soft in warm weather. If taking them on the go, consider using an insulated lunch bag with an ice pack during hot weather.
Make-Ahead Tips
These are perfect for meal prep! Make a double batch on Sunday and you're set for snacks all week. They actually taste better after the first day as the oats soften and the flavors meld. You can also prep the dry ingredients in mason jars ahead of time – just add the wet ingredients when you're ready to make them.
Frequently Asked Questions
Absolutely! Replace the peanut butter with sunflower seed butter or pumpkin seed butter (also called pepita butter). These have a similar texture and nutritional profile. You might need to adjust the sweetness slightly since seed butters can be a bit more bitter than nut butters. Start with 2 tablespoons less honey and add more to taste.
This usually happens when your protein powder is very absorbent or your peanut butter is too dry. Don't panic! Add liquid a teaspoon at a time – water, milk, or even brewed coffee for mocha-flavored balls. Start with 2 teaspoons and work up. The mixture should hold together when squeezed but not be sticky.
You can, but the texture will be different. Quick oats will create a softer, more tender ball that might not hold together as well. If using quick oats, reduce the amount by ¼ cup and add more only if needed. The balls will also have a slightly pasty texture compared to the pleasant chewiness from old-fashioned oats.
These are quite filling thanks to the protein and healthy fats. For a snack, 1-2 balls is usually perfect. For a pre-workout energy boost, 2-3 balls work well. They're calorie-dense (about 120-150 calories each), so while they're healthy, portion control still matters. Listen to your body – they should satisfy hunger, not leave you wanting more.
Yes! Start by reducing the honey to 2 tablespoons and see if that works for your taste buds. You can also substitute with mashed banana, date paste, or sugar-free syrup. Keep in mind that reducing the sweetener might affect the binding, so you may need to add a teaspoon of water or milk to compensate.
Replace the protein powder with an equal amount of additional oats, or use a combination of ¼ cup oat flour and ¼ cup almond flour. You can also use powdered milk for extra protein without the "protein powder" taste. The balls will be less protein-dense but still nutritious and kid-friendly.
Clean Eating Protein Balls with Peanut Butter and Chocolate
Ingredients
Instructions
- Combine wet ingredients: In a large bowl, mix together peanut butter, honey, and vanilla until smooth.
- Add dry ingredients: Stir in oats, protein powder, flaxseed, and salt until combined. Add water a teaspoon at a time if needed.
- Fold in chocolate: Gently mix in chocolate chips until evenly distributed.
- Test consistency: Squeeze a small amount – it should hold together without crumbling.
- Roll balls: Scoop 2 tablespoons of mixture and roll between palms to form 1-inch balls.
- Chill: Refrigerate on parchment-lined sheet for 30 minutes to firm up.
- Store: Keep refrigerated in airtight container for up to 2 weeks or freeze for 3 months.
Recipe Notes
For best texture, use natural peanut butter that's been stirred well. If your mixture is too dry, add water 1 teaspoon at a time. Too sticky? Add more oats. These travel well and make perfect post-workout snacks!