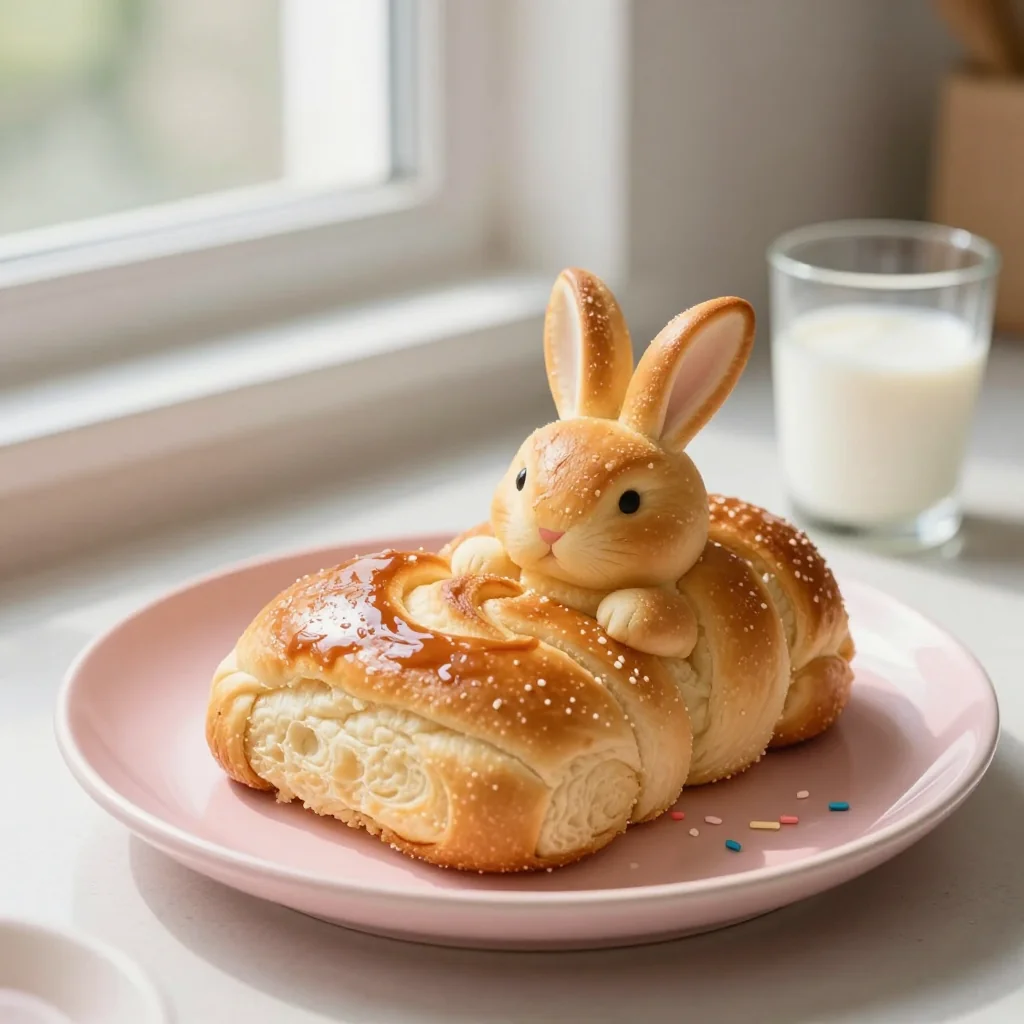
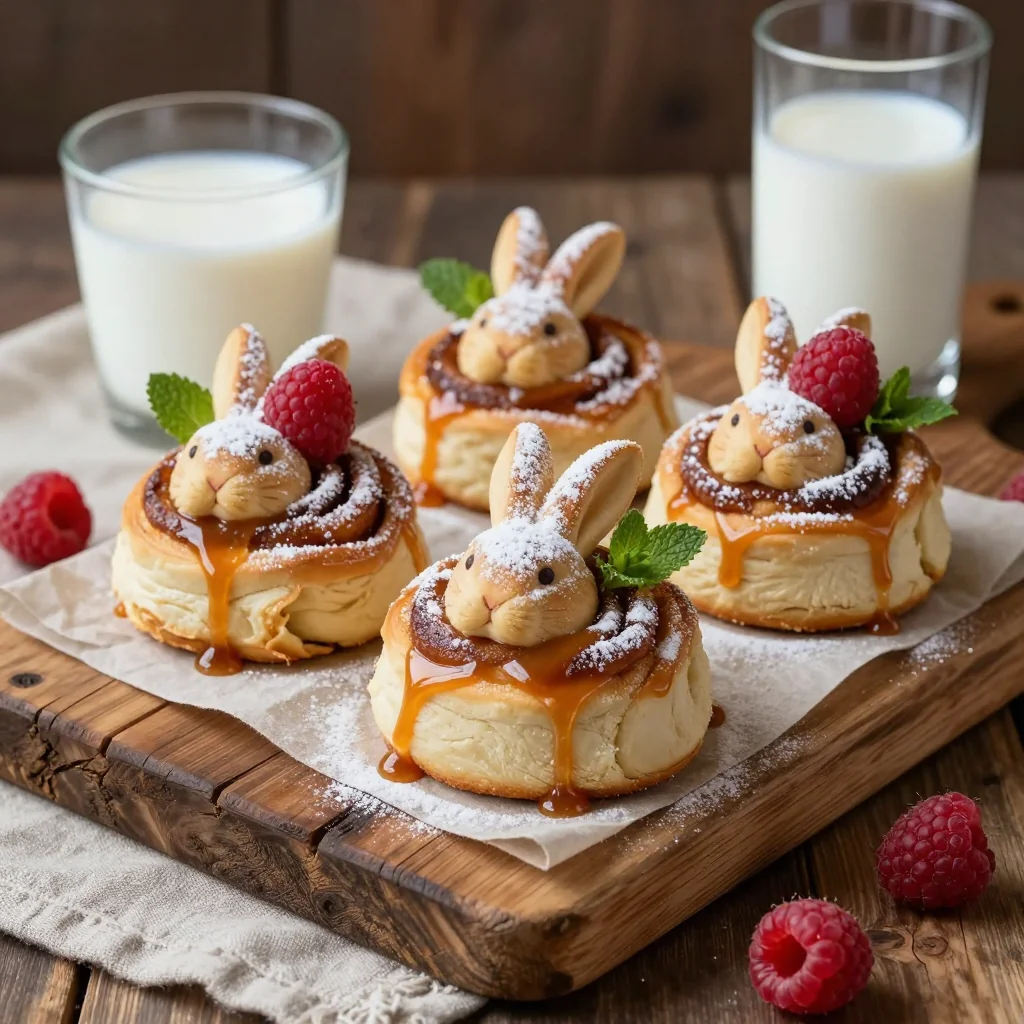
Fluffy, sweet, and irresistibly cute bunny-shaped cinnamon rolls that make breakfast feel like a celebration.
When I was six, my mother would pull a tray of warm, buttery pastries out of the oven on Saturday mornings, and the whole house would fill with the sweet scent of cinnamon and sugar. I can still remember the way the steam curled around the kitchen table, turning the simple act of eating into a magical ritual. One of my favorite memories is shaping those soft dough spirals into playful bunny faces for my younger brother’s birthday. His eyes lit up as soon as he saw the tiny ears and the chocolate‑chip noses, and we spent the rest of the day giggling and pretending the bunnies were hopping around the table.
This whimsical twist on the classic cinnamon roll has its roots in the cozy cafés of Northern Europe, where bakers often experiment with shapes to bring extra joy to their customers. The “Cinnamon Roll Bunnies” we’re sharing today are a tribute to that tradition, blended with a dash of childlike imagination. They’re perfect for brunches, birthday parties, or any occasion where you want a sweet treat that looks as good as it tastes.
In this article, I’ll walk you through every step—from kneading the tender dough to sculpting each bunny, glazing them with a silky vanilla icing, and adding that final touch of chocolate‑chip whiskers. You’ll learn why a short resting period after shaping is essential for fluffy interiors, how to achieve the perfect caramelized crust without burning, and the secret ingredient that makes the glaze shine like a sunrise.
So roll up your sleeves, preheat your oven, and let’s hop into the world of Cinnamon Roll Bunnies. Your kitchen is about to become a wonderland of aroma, color, and pure joy.
🌟 Why This Recipe Will Capture Your Heart
These bunny-shaped rolls aren’t just adorable—they’re a celebration of flavor, texture, and family fun.
- ✨ Irresistible Visual Appeal: Shaped like cute bunnies, they become instant conversation starters and encourage kids to eat more.
- ✨ Perfect Balance of Sweet and Spice: The cinnamon‑brown sugar filling offers warm spice, while the vanilla glaze adds a gentle sweetness.
- ✨ Fluffy, Light Texture: The dough is enriched with butter and a short rise, resulting in a cloud‑like crumb that melts in the mouth.
- ✨ Easy to Scale: The portion‑adjuster lets you serve anywhere from 2 to 20 people without recalculating every ingredient manually.
- ✨ Kid‑Friendly Hands‑On Activity: Shaping the dough into bunnies is a safe, mess‑free activity that encourages culinary creativity.
- ✨ Versatile for Any Season: Whether it’s a winter brunch or a summer picnic, these rolls stay fresh for days and freeze beautifully.
🥗 Ingredients
📝 Complete Ingredient List
For the Dough:
For the Cinnamon Filling:
For the Vanilla Glaze:
For Decoration (Optional):

🔍 Focus on Key Ingredients
Bread Flour
Bread flour provides higher gluten content than all‑purpose flour, which creates a stronger network that traps gas bubbles during fermentation. This results in a light, airy crumb that stays tender even after cooling. When shopping, look for flour labeled “high‑protein” or “bread flour” and store it in an airtight container to maintain freshness.
Unsalted Butter
Butter adds richness and contributes to the tender crumb of the roll. Using unsalted butter gives you precise control over the salt level, ensuring the sweet‑spicy balance isn’t thrown off. For the best flavor, use butter that’s been softened at room temperature for about 30 minutes before mixing.
Brown Sugar & Cinnamon
The combination of brown sugar and cinnamon is the heart of the classic cinnamon roll flavor. Brown sugar’s molasses content adds moisture and a subtle caramel note, while cinnamon provides warm spice that pairs beautifully with the buttery dough. Toasting a pinch of cinnamon before adding it to the filling can deepen its aroma.
🔄 Quick Substitutions
| If you don’t have... | Use instead... |
|---|---|
| Bread flour | All‑purpose flour + 1 tbsp vital wheat gluten per cup |
| Unsalted butter | Salted butter (reduce added salt by ½ tsp) |
| Brown sugar | White sugar + 1 tbsp molasses |
👨🍳 Step‑by‑Step Instructions
Follow these detailed steps to create perfectly shaped, fluffy bunny rolls that will impress both kids and adults alike.
📋 Phase 1: Preparation and Mise en Place
Gather all ingredients, measure precisely, and set up your workstation.
Activate the Yeast
In a small bowl, combine the warm milk (around 38 °C/100 °F) with the instant yeast and a pinch of sugar. Stir gently and let sit for 5‑7 minutes until the mixture becomes foamy. This indicates the yeast is alive and ready to work.
Mix the Dry Ingredients
In a large mixing bowl, whisk together bread flour, granulated sugar, and salt. Create a well in the center for the wet ingredients.
Combine Wet Ingredients
Add the foamy yeast mixture, melted butter, and beaten egg to the flour well. Stir with a wooden spoon until a shaggy dough forms, then turn out onto a lightly floured surface.
Knead the Dough
Knead the dough for about 8‑10 minutes until it becomes smooth, elastic, and slightly tacky. The windowpane test—stretching a small piece until it becomes translucent—confirms proper gluten development.
First Rise
Place the dough in a lightly greased bowl, cover with a damp cloth, and let it rise in a warm spot for 1‑1.5 hours, or until doubled in size.
🔥 Phase 2: Shaping, Filling, and Baking
Roll out the dough, spread the sweet filling, and shape each bunny.
Prepare the Filling
In a medium bowl, blend softened butter, brown sugar, ground cinnamon, and vanilla extract until smooth. Set aside.
Roll Out the Dough
On a floured surface, roll the dough into a rectangle about 30 × 40 cm (12 × 16 in). Aim for a thickness of roughly 0.5 cm (¼ in).
Spread the Filling
Evenly spread the cinnamon‑butter mixture over the rolled dough, leaving a small border around the edges to prevent leakage.
Cut and Shape Bunnies
Using a sharp knife, cut the dough into 8 equal squares (approximately 10 cm each). For each square, pinch the corners together to form a bunny head, then roll the edges inward to create ears. Place a mini chocolate chip at the tip of the nose and press lightly to embed.
Second Rise
Arrange the shaped bunnies on a parchment‑lined baking sheet, leaving a little space between each. Cover loosely with plastic wrap and let them rise for 30‑40 minutes, until puffed.
Bake
Preheat the oven to 190 °C (375 °F). Bake the bunnies for 15‑18 minutes, or until they turn a golden‑brown color and the edges sound hollow when tapped.
✨ Phase 3: Finishing Touches and Serving
Glaze, garnish, and present your bunny rolls.
Prepare the Vanilla Glaze
Whisk together powdered sugar, milk, and vanilla extract until smooth. Adjust consistency with a little more milk if needed; it should drizzle easily but not be runny.
Glaze the Warm Bunnies
Drizzle the glaze over the hot rolls, allowing it to seep into the crevices. Sprinkle shredded coconut on the ears for added texture and visual appeal.
Serve Warm
Transfer the bunnies to a serving platter. They are best enjoyed while still warm, paired with a glass of milk or a cup of herbal tea.
💡 Expert Tips and Tricks
🛒 Choosing the Right Ingredients
When selecting flour, opt for a brand that lists protein content between 11‑13 %. This range ensures enough gluten for lift without making the rolls overly chewy. For butter, choose a European‑style butter with at least 82 % milk fat; it adds richness and a buttery flavor that regular butter can’t match. Fresh, high‑quality yeast is the silent hero—store it in the refrigerator and use within its expiration date for consistent rising.
🔪 Preparation Techniques
To avoid tearing the dough while shaping, keep it chilled for 10 minutes after the first rise. This makes it firmer and easier to handle. When pinching the corners for the bunny’s head, use a gentle but firm pressure to create a smooth seam; a little water on your fingertips can help seal the edges. Finally, always dust the work surface lightly; excess flour can become incorporated into the dough and affect texture.
🌡️ Mastering the Baking Process
Preheat the oven fully before inserting the tray; a sudden temperature change can cause the rolls to collapse. Use an oven thermometer to verify that 190 °C is accurate, as many ovens run hotter or cooler. Rotate the baking sheet halfway through the bake to ensure even browning. If you prefer a softer crust, place a small pan of water on the lower rack to create steam.
🍽️ Presentation and Service
Arrange the bunnies on a rustic wooden board for a charming farmhouse feel. Dust a light sprinkle of powdered sugar over the entire platter for a snowy effect. Pair with fresh fruit such as sliced strawberries or blueberries for a burst of acidity that balances the sweetness. Finally, encourage guests to snap photos—these rolls are Instagram‑ready!
🏆 Pro Tips
Even seasoned bakers can elevate this recipe with a few professional tricks.
- 🎯 Temperature‑Controlled Proofing: Use a proofing box set to 30 °C (86 °F) for the first rise. Consistent warmth speeds up yeast activity, leading to a more uniform crumb and reduced fermentation time.
- 🎯 Butter Layering (Laminate Effect): Fold a thin sheet of cold butter into the dough after the first knead, then roll and fold twice. This creates subtle layers that mimic a croissant’s flakiness while keeping the roll soft.
- 🎯 Sugar Caramelization Insight: The brown sugar in the filling caramelizes at around 170 °C (338 °F). By baking at 190 °C, you ensure a gentle caramelization that adds depth without burning.
- 🎯 Glaze Stability: Adding a pinch of cream of tartar to the glaze stabilizes the icing, preventing it from weeping when applied to warm rolls.
- 🎯 Egg Wash for Shine: Lightly brush the tops with an egg‑white wash before baking; this gives the bunnies a glossy finish that looks bakery‑professional.
- 🎯 Scaling Precision: Use the portion adjuster to double the recipe for a large family gathering. The JavaScript automatically recalculates each ingredient, ensuring flavor balance remains intact.
“Great baking is about love, patience, and the science of chemistry—master it and the kitchen becomes a playground.” — Chef Marco Bellini
🔄 Variations and Adaptations
This recipe is a flexible canvas for creativity. Whether you’re catering to dietary restrictions, craving bold flavors, or simply want a seasonal twist, there’s a version for you.
🥬 Vegetarian/Vegan Version
Swap the egg for a flax‑egg (1 tbsp ground flaxseed mixed with 3 tbsp water) and use plant‑based butter. Replace the milk in the glaze with almond or oat milk. The dough will still rise beautifully thanks to the yeast, and the flavor remains rich.
- Flax‑egg: 1 tbsp ground flaxseed + 3 tbsp water, let sit 5 minutes.
- Vegan butter: Use a 1:1 substitution for the unsalted butter.
🌶️ Flavor Variations
Play with the filling and glaze to explore new taste horizons.
Spicy Mexican Twist:
Add ½ tsp cayenne pepper and a pinch of smoked paprika to the cinnamon filling. Finish with a drizzle of honey‑lime glaze for a sweet‑heat contrast.
Mediterranean Herb Version:
Incorporate dried oregano and rosemary into the dough, and replace the vanilla glaze with a light lemon‑yogurt drizzle. Garnish with toasted pine nuts for crunch.
Asian Matcha Delight:
Mix 1 tsp matcha powder into the glaze and sprinkle toasted sesame seeds over the tops. The earthy green adds a subtle bitterness that balances the sweet dough.
⚠️ Dietary Adaptations
Gluten‑Free:
Use a blend of rice flour, tapioca starch, and xanthan gum (2 cups total, with 1 tsp xanthan gum). Add an extra 2 tbsp of psyllium husk powder to improve elasticity.
Lactose‑Free:
Swap dairy butter for a lactose‑free margarine and use lactose‑free milk (such as almond or soy). The flavor remains buttery without the lactose.
Low‑Calorie:
Reduce butter in the dough by half and replace half the brown sugar with a natural sweetener like erythritol. Use a light glaze made with powdered stevia and skim milk.
👶 Family/Kids Friendly Version
For picky eaters, reduce the cinnamon to 1 tsp and add a touch of vanilla to the filling. Use colorful sprinkles instead of chocolate chips for a playful look, and serve with a side of fresh fruit to add nutrition.
📦 Conservation and Reheating
🧊 Storage
Refrigerator:
- Duration: 3‑4 days
- Container: Airtight plastic container or zip‑lock bag
- Tip: Place a paper towel at the bottom to absorb excess moisture.
Freezer:
- Duration: Up to 2 months
- Method: Freeze baked, cooled rolls in a single layer on a tray, then transfer to a freezer‑safe bag.
- Defrosting: Thaw overnight in the refrigerator, then reheat gently.
💡 For optimal texture, reheat directly from frozen using the oven method below.
♨️ Reheating
🔥 Oven (Recommended):
- Preheat to 160 °C (325 °F).
- Cover the rolls loosely with aluminum foil to prevent over‑browning.
- Heat for 8‑10 minutes.
- Remove foil and heat an additional 2‑3 minutes to crisp the tops.
⚡ Microwave (Quick):
- Place a roll on a microwave‑safe plate.
- Cover with a microwave‑safe lid or damp paper towel.
- Heat on medium power for 30‑45 seconds.
- Check and add 10‑second intervals if needed.
🍳 Skillet:
Heat a non‑stick skillet over medium‑low heat, add a splash of water, and cover with a lid for 3‑4 minutes. This steams the interior while lightly crisping the exterior.
🍷 Perfect Pairings
🥗 Side Dishes
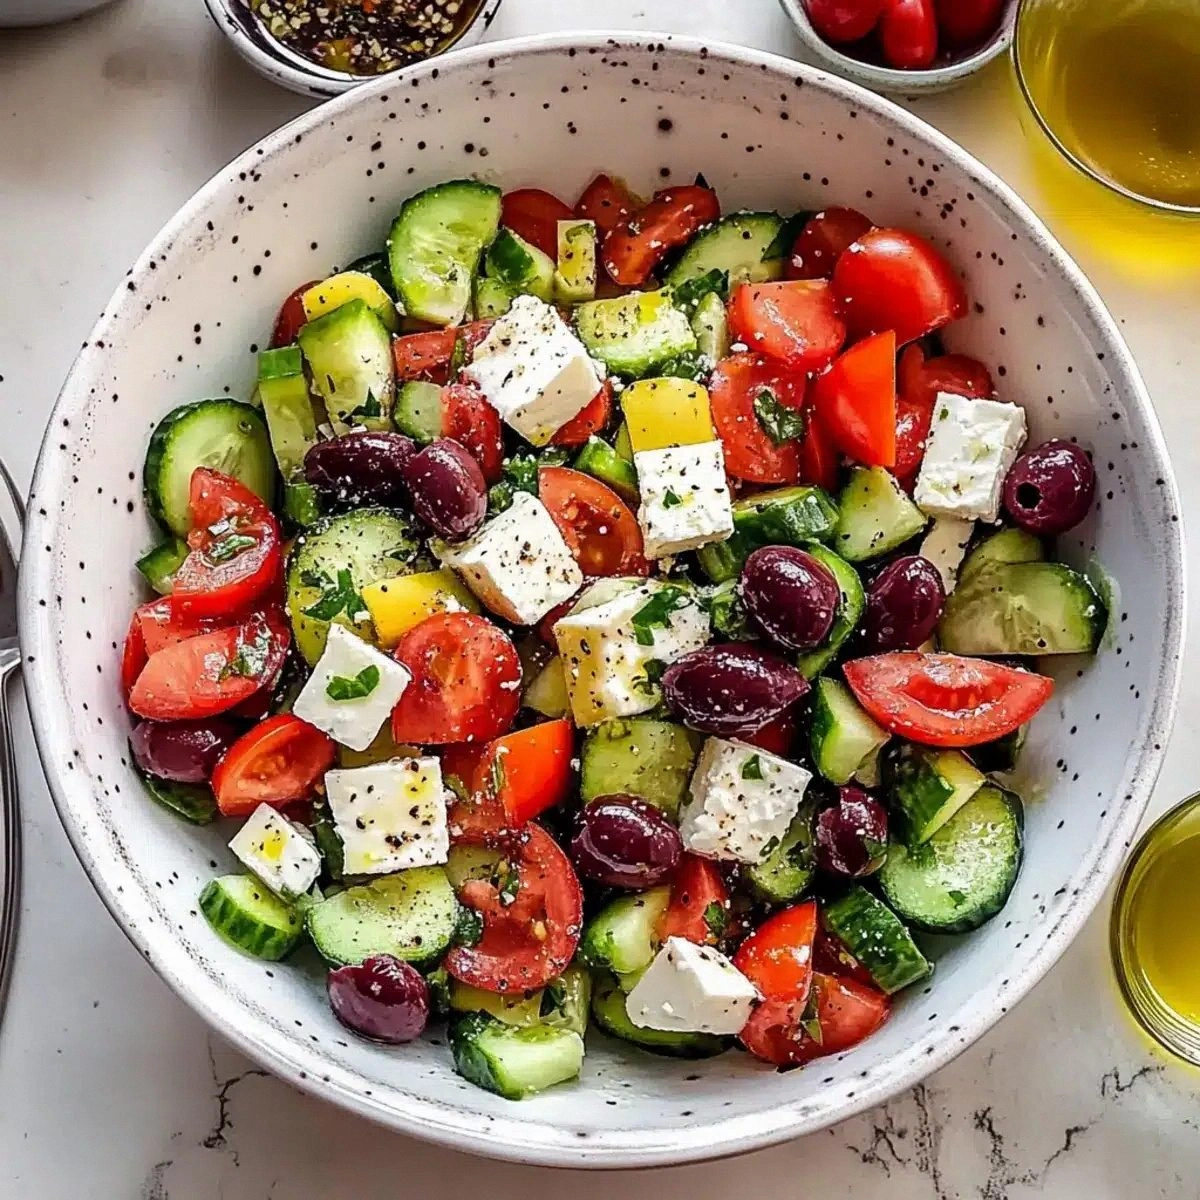
- Fresh Berry Salad: A mix of strawberries, blueberries, and mint provides a refreshing contrast.
- Greek Yogurt Parfait: Layered with granola and honey, it adds creaminess.
- Apple Slices with Caramel Dip: The tartness of apples balances the sweet rolls.
🍷 Wine & Beverage Pairings
- Late Harvest Riesling: Its honeyed notes echo the cinnamon sweetness.
- Chamomile Tea: A soothing, caffeine‑free option for kids.
- Non‑Alcoholic Sparkling Apple Cider: Bubbly and fruity without overpowering the flavor.
🍰 Completing the Meal
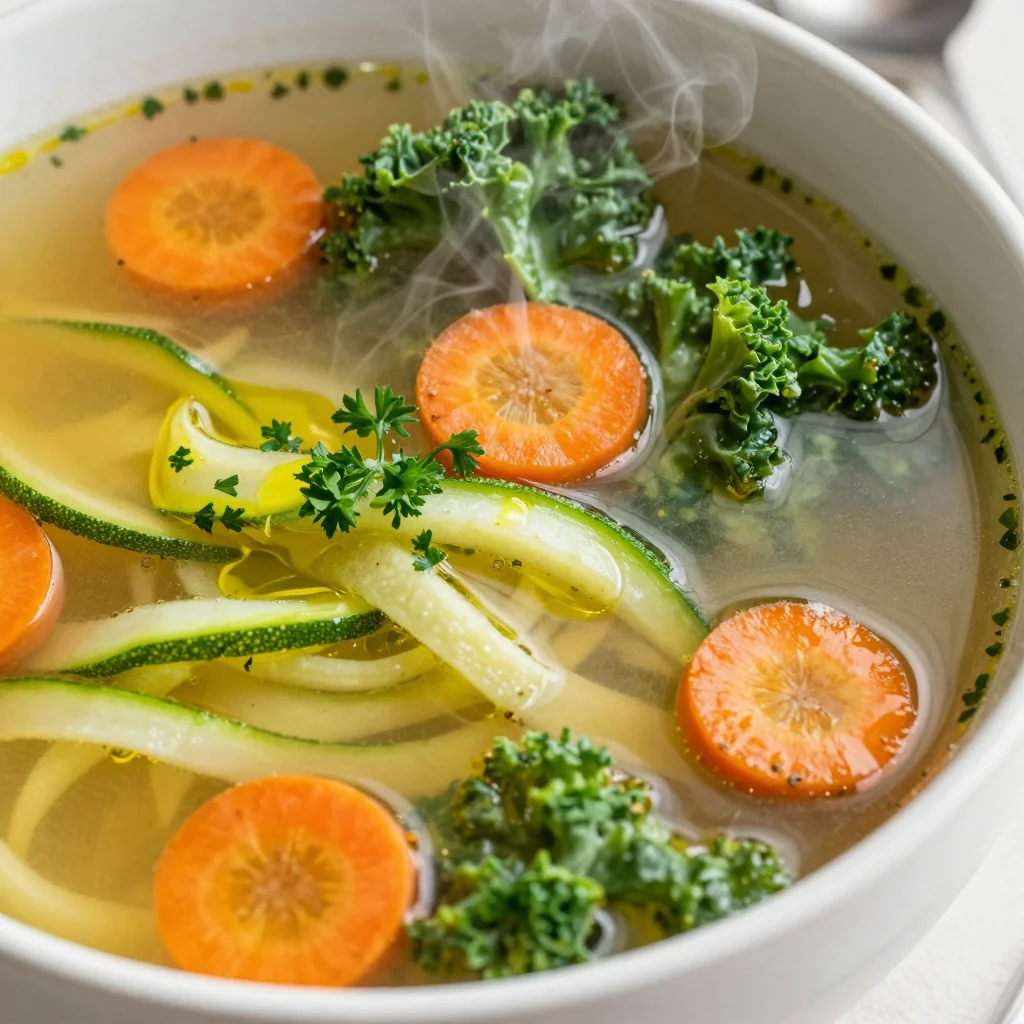
Start with a light citrus soup or a chilled cucumber gazpacho to awaken the palate. Follow the bunnies with a simple vanilla panna cotta topped with caramel drizzle for an elegant finish.
❓ Frequently Asked Questions
Q: Can I make the dough ahead of time?
Yes! After the first rise, you can punch down the dough, shape it into a ball, wrap it tightly in plastic, and refrigerate for up to 24 hours. Let it come to room temperature before the second rise for best results.
Q: What if my dough is too sticky?
Lightly dust the work surface with additional flour, but avoid adding more than 2‑3 tbsp total, as excess flour can make the rolls dense. A short chill in the fridge also firms the dough, making it easier to handle.
Q: How do I prevent the filling from leaking?
Make sure to seal the edges of each bunny tightly after shaping. A gentle press with your fingertips creates a seam that locks in the filling. Using a slightly thicker filling (add 1‑2 tbsp more butter) also reduces run‑off.
Q: Can I use a different sweetener?
Absolutely. Coconut sugar works well in place of brown sugar for a subtle caramel note, while maple syrup can replace part of the liquid in the glaze. Adjust the amount of liquid accordingly to maintain glaze consistency.
Q: My rolls didn’t rise enough—what went wrong?
Possible causes include yeast that’s too old, milk that’s too hot (which can kill yeast), or a drafty proofing environment. Ensure the milk is warm, not hot, and that the yeast is fresh. A proofing box or a turned‑off oven with the light on provides a stable warm spot.
Q: Is it possible to prepare the glaze in advance?
Yes. Store the glaze in an airtight container in the refrigerator for up to 3 days. Before using, whisk it gently to restore smoothness, adding a splash of milk if it has thickened.
🎉 To Your Oven!
These Cinnamon Roll Bunnies bring together the comforting aroma of classic cinnamon rolls with a playful shape that turns breakfast into an adventure. The tender, buttery dough, the caramel‑kissed filling, and the silky vanilla glaze combine to create a bite that’s both nostalgic and fresh. Whether you’re serving them at a family brunch, a birthday party, or simply treating yourself on a lazy weekend, they promise smiles, happy tummies, and a dash of culinary pride.
Remember, the portion adjuster lets you scale the recipe effortlessly, and the interactive ingredient list makes grocery shopping a breeze. Don’t hesitate to experiment with the variations—each one offers a new twist while keeping the core magic intact.
Have you tried this recipe?
Leave a comment and rating below! Share your photos on Instagram with #BunnyRollJoy for a chance to be featured.
Cinnamon Roll Bunnies for Kids
Cute, fluffy bunny-shaped cinnamon rolls that make any breakfast feel festive.
📝 Ingredients
Dough
Cinnamon Filling
Vanilla Glaze
👨🍳 Instructions
- 1 Activate yeast in warm milk with a pinch of sugar; let foam.
- 2 Mix dry ingredients; create a well.
- 3 Add wet ingredients; stir into a shaggy dough.
- 4 Knead 8‑10 minutes until smooth and elastic.
- 5 First rise until doubled, about 1‑1.5 hours.
- 6 Prepare cinnamon butter filling.
- 7 Roll dough into rectangle, spread filling.
- 8 Cut into squares, shape into bunny heads and ears.
- 9 Second rise 30‑40 minutes.
- 10 Bake at 190 °C for 15‑18 minutes.
- 11 Drizzle vanilla glaze and garnish with chocolate chips.
- 12 Serve warm with your favorite beverage.
🥗 Nutritional Information (per serving)
*Nutritional values are estimates based on standard ingredient data.
📚 You Might Also Like