I remember the night my kitchen turned into a battlefield of flour, sugar, and a rogue microwave. A friend dared me to make something that could survive a holiday party, and I had to prove that my culinary prowess wasn’t just a myth. I opened the pantry, scooped out a bag of crispy rice cereal, and felt the familiar crunch in my hand like a secret weapon. The aroma that followed was a promise of sweet, buttery, and unmistakably festive flavor that could make even the most skeptical taste buds swoon. This recipe is not just a cookie; it’s a statement that holiday treats can be both simple and spectacular.
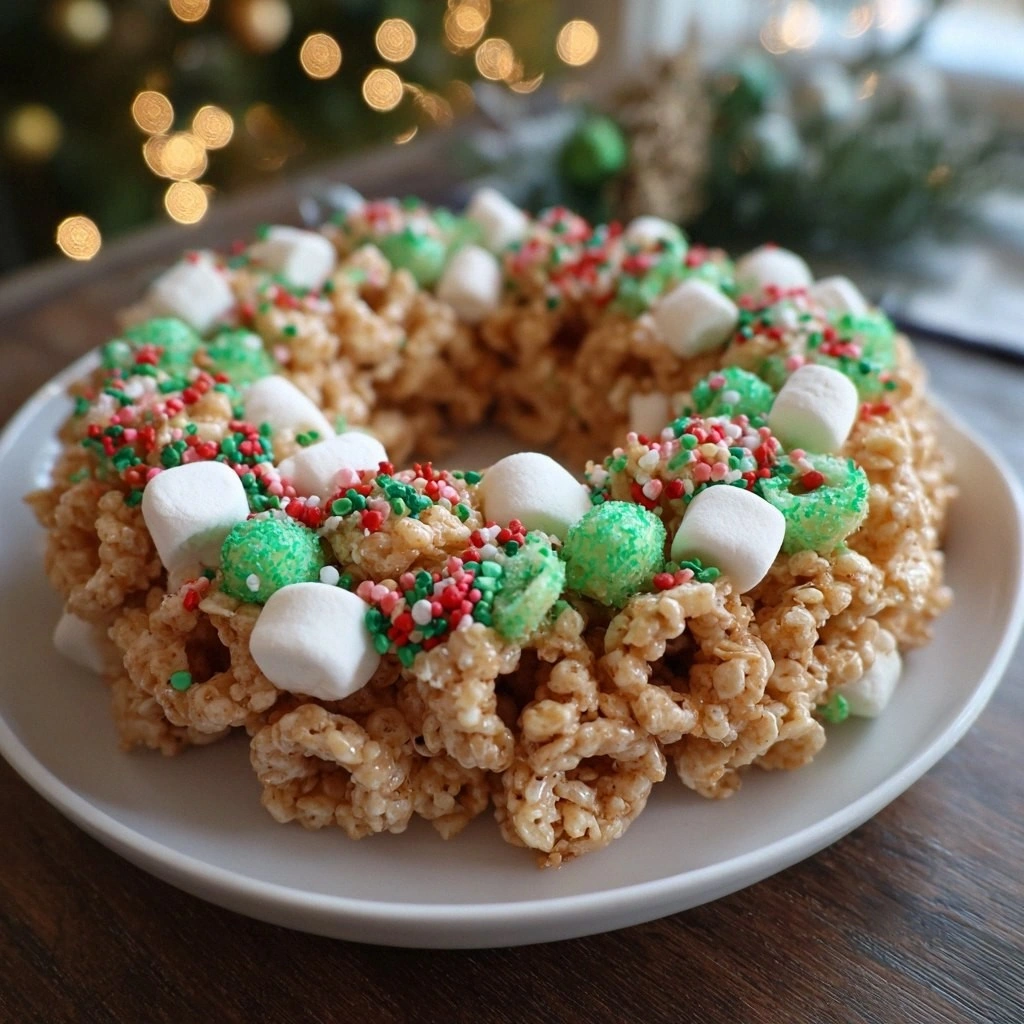
Picture this: a golden wreath of cookies that crackle as you bite, revealing a chewy center of mini marshmallows that melts like a dream. The texture is a dance of crunch and gooeyness, a contrast that feels like a holiday parade in your mouth. The scent is warm, buttery, and tinged with vanilla, like a fireplace on a crisp December evening. The color—deep green with pops of red and green sprinkles—makes it look like a living ornament ready for the mantle. And the best part? You can make it in minutes and it stays fresh for days.
Most people think holiday cookies are a labor of love that requires a dozen ingredients and a lot of time. I’m here to debunk that myth and show you that the best version of these wreath cookies uses only a handful of pantry staples and a dash of creativity. I’ll walk you through every single step, from the moment you open the cereal bag to the last sprinkle on the final cookie, so you’ll never have to wonder why your batch turns out soggy or uneven. Trust me, this is hands down the best version you’ll ever make at home, and I dare you to taste this and not go back for seconds.
If you’ve ever struggled with making holiday cookies that actually taste good, you’re not alone—and I’ve got the fix. The secret lies in the balance of crispness, chewiness, and that unmistakable holiday cheer. I’ll share a technique you won’t expect: using a little green food coloring to transform ordinary cereal into a festive wreath. And I’ll reveal why this version stands out from every other recipe out there, including the ones you’ve seen on Pinterest and YouTube. Ready for the game‑changer? Let me walk you through every single step — by the end, you’ll wonder how you ever made it any other way.
What Makes This Version Stand Out
- Flavor: The combination of vanilla, butter, and marshmallows creates a depth that feels like a holiday hug in every bite. It’s sweet but not cloying, and the vanilla lifts the other flavors to new heights.
- Texture: The crispy rice cereal gives a satisfying crunch that contrasts with the chewy marshmallow core. When baked just right, the edges are crisp while the center remains soft and gooey.
- Ease: No baking sheet prep, no dough kneading, no measuring cups for flour. The recipe is a straight‑forward blend of pantry staples that even novice bakers can master.
- Visual Appeal: The green color and red sprinkles make these wreaths look like living ornaments, instantly recognizable as a holiday treat.
- Crowd‑Pleaser: These cookies are the type that people ask for more of after the first bite. They’re perfect for potlucks, gift baskets, or just a cozy night in.
- Make‑Ahead Friendly: Once baked, they stay fresh for up to a week, and you can even freeze them for future celebrations.
Inside the Ingredient List
The Flavor Base
Mini marshmallows are the heart of these wreaths, providing that signature chewiness that melts in your mouth. They also act as a binder, holding the cereal together when heated. If you skip them, you’ll end up with dry, crumbly bites that lack that iconic texture. For a slightly different twist, try using mini chocolate chips or chopped candy canes for a burst of flavor.
The Texture Crew
Crispy rice cereal is the backbone of the cookie’s structure. It gives that satisfying snap that makes each bite feel like a holiday cheer. The cereal also absorbs the butter, creating a golden, crunchy exterior that contrasts beautifully with the marshmallow center. If you’re looking for a gluten‑free option, look for a brand that’s specifically labeled as such.
The Unexpected Star
Unsalted butter is the secret sauce that adds richness and helps the cereal and marshmallows bind together. It also carries the vanilla flavor throughout the cookie, ensuring each bite is aromatic and warm. A small tip: melt the butter over low heat and let it cool slightly before mixing; this prevents the marshmallows from dissolving too quickly. If you’re watching calories, a light spread of coconut oil can be a substitute, but the flavor will shift slightly.
The Final Flourish
Green food coloring turns ordinary cereal into a festive wreath, while red and green sprinkles add a pop of color that looks like a real ornament. The coloring is neutral, so it won’t alter the taste, but it gives a visual cue that these are holiday cookies. Use a few drops at a time to avoid a too‑bright green that feels artificial. If you’re vegan, look for plant‑based coloring alternatives.
Everything's prepped? Good. Let's get into the real action.
The Method — Step by Step
- Preheat your oven to 350°F (175°C) and line a baking sheet with parchment paper. The parchment prevents sticking and makes cleanup a breeze. As the oven warms, you’ll notice a faint buttery scent that signals the start of something delicious. Keep an eye on the temperature—over‑baking will dry out the cookies.
- In a large mixing bowl, combine the crispy rice cereal with the melted butter. Stir until every grain is coated in a glossy sheen. The mixture should look slightly wet but not soggy. This step is crucial for achieving that perfect crunch.
- Add the mini marshmallows to the cereal mixture, folding them in gently. The marshmallows will begin to soften, creating a sticky, dough‑like consistency. The mixture should feel slightly tacky to the touch, like a sweet, buttery glue. This is the moment of truth—don’t rush it.
- Pour the vanilla extract and a few drops of green food coloring into the bowl. Mix until the color is even—no streaks, just a uniform, festive hue. The vanilla will lift the flavors, while the coloring adds visual appeal. If you prefer a deeper green, add an extra drop, but be careful not to over‑color.
- Using a spoon or a small cookie scoop, form the mixture into wreath shapes and place them on the prepared baking sheet. Each wreath should be about 2 inches in diameter, giving enough room for the marshmallows to expand. Press the edges gently to ensure they hold together during baking.
- Bake for 12–15 minutes, or until the edges turn golden brown and the center is set. The aroma will be intoxicating—warm, buttery, and sweet. Watch for the first signs of browning; this indicates the cookies are ready to come out of the oven.
- While the cookies are still hot, sprinkle them with red and green sprinkles. The heat will slightly melt the sprinkles, making them stick to the wreaths. This decorative touch turns each cookie into a miniature ornament. Let them cool on the sheet for 5 minutes before transferring to a wire rack.
- Once cooled, store the cookies in an airtight container at room temperature. They will stay fresh for up to a week. For extra crispness, add a slice of bread to the container; the bread will absorb moisture and keep the cookies crunchy.
That's it — you did it. But hold on, I've got a few more tricks that'll take this to another level.
Insider Tricks for Flawless Results
The Temperature Rule Nobody Follows
Many bakers set their ovens to the maximum and hope for the best. The truth is, a steady 350°F is the sweet spot for these cookies. Too hot, and the marshmallows will burn; too cool, and the cookies won’t set properly. Use an oven thermometer to verify the temperature, and keep a close eye on the first batch to calibrate your oven.
Why Your Nose Knows Best
Your sense of smell is a reliable indicator of doneness. When the cookies emit a warm, buttery aroma, they’re almost ready. A faint vanilla scent that lingers in the air means the marshmallows are starting to melt. Trust your nose; it’s a seasoned judge of baked goods.
The 5-Minute Rest That Changes Everything
Letting the cookies rest on the baking sheet for 5 minutes before moving them to a rack preserves their structure. The heat continues to cook the interior, allowing the marshmallows to set without drying out. Skipping this step can result in cookies that crumble when you pick them up.
Sprinkle Timing for Maximum Adornment
Sprinkling the cookies while they’re still hot ensures the sprinkles adhere firmly. If you wait until they cool, the sprinkles will fall off or slide around. This small detail turns a plain cookie into a festive decoration that stays put.
Storing for Longevity
Place the cookies in a tightly sealed container with a slice of bread. The bread absorbs excess moisture, keeping the cookies crisp. When you’re ready to serve, remove the bread and give the cookies a quick warm-up in a low‑heat oven for 2 minutes to restore any softness.
Creative Twists and Variations
This recipe is a playground. Here are some of my favorite ways to switch things up:
Candy Cane Crunch
Swap the mini marshmallows for crushed candy canes and add a dash of peppermint extract. The result is a minty, crunchy cookie that feels like a holiday treat straight from a candy shop. The peppermint gives a refreshing contrast to the buttery base.
Chocolatey Wreath
Replace the vanilla with chocolate extract and fold in mini chocolate chips. The chocolate chips melt slightly during baking, creating pockets of gooey chocolate. These are perfect for chocolate lovers who want a richer flavor.
Nutty Twist
Add a handful of chopped almonds or pecans to the mixture before baking. The nuts add a delightful crunch and nutty aroma that complements the sweet base. They also provide a protein boost for the cookie.
Gluten-Free Edition
Use a gluten‑free cereal brand that’s specifically labeled as such. The rest of the recipe remains unchanged. The cookies will still have that classic crunch and chewy center, just without the gluten.
Vegan Version
Replace the butter with coconut oil and use plant‑based marshmallows. The coconut oil gives a subtle tropical note that pairs well with the marshmallows. The texture stays the same, and the cookies remain vegan.
Holiday Gift Pack
Wrap each wreath in clear cellophane and tie with a festive ribbon. Place them in a small wooden box and add a handwritten note. These make the perfect homemade gift for friends, family, or coworkers during the holiday season.
Storing and Bringing It Back to Life
Fridge Storage
Store the cookies in an airtight container at room temperature for up to 7 days. Keep the container in a cool, dry place away from direct sunlight. The cookies will stay crisp and fresh, ready to serve at any time.
Freezer Friendly
Place the cookies in a freezer‑safe bag, pressing out any excess air. Freeze for up to 3 months. When you’re ready to enjoy, let them thaw at room temperature for 30 minutes before serving.
Best Reheating Method
To revive frozen or stale cookies, preheat the oven to 300°F (150°C) and bake for 5–7 minutes. Add a tiny splash of water to the baking sheet; the steam will restore moisture and give the cookies a fresh, warm texture. Let them cool on a rack before serving.