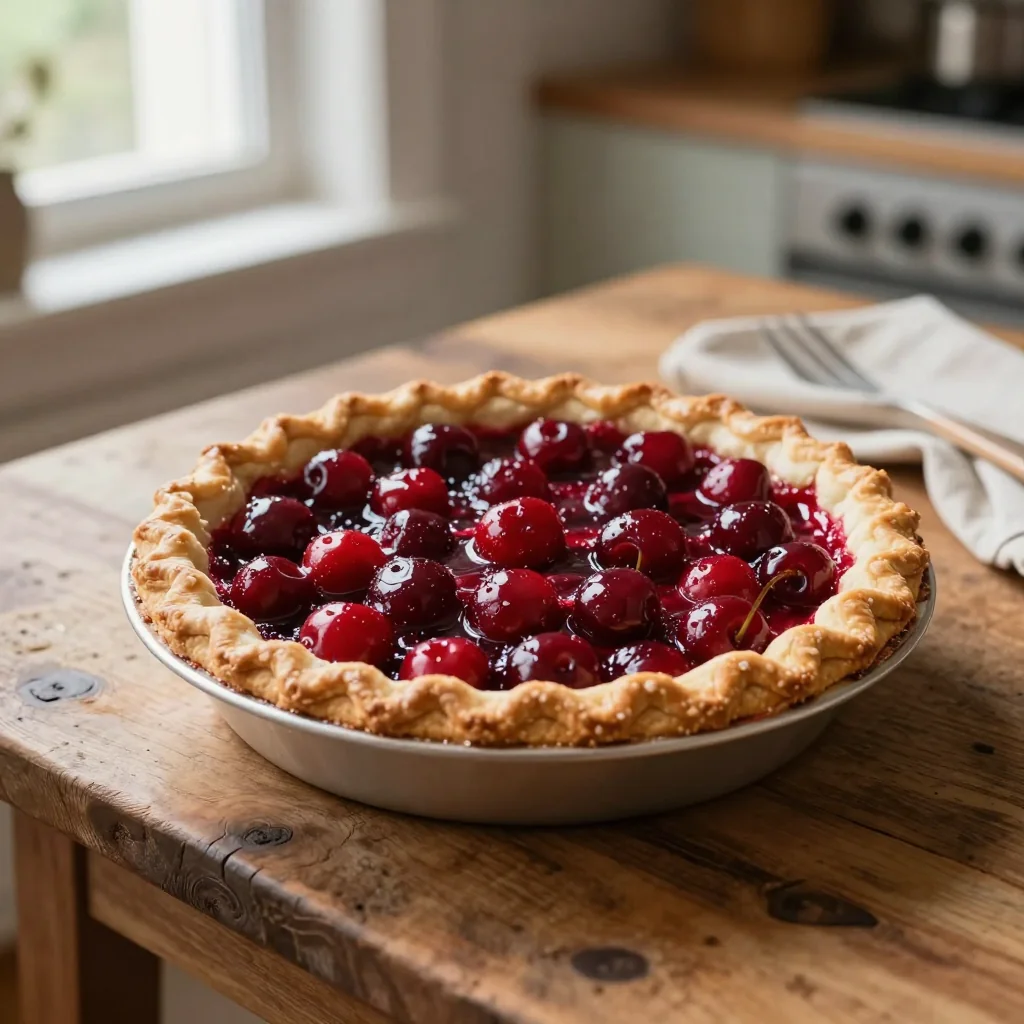
A timeless classic that marries the bright tartness of cherries with a whisper of almond, perfect for any celebration.
My Cherry Memory
When I was ten, my grandmother would pull a fresh‑baked cherry pie out of the oven every Sunday afternoon, the scent of sweet fruit and almond drifting through the kitchen like a warm hug. I remember sitting on the kitchen stool, eyes wide, as she brushed the top with a glossy egg‑white glaze that caught the light just right. The first bite was a perfect balance of tart cherries, buttery crust, and that subtle almond whisper that made the whole experience feel magical. That memory sparked a lifelong love for fruit pies, and over the years I’ve refined the recipe, swapping out generic extracts for pure almond essence and perfecting the crust to be flaky yet sturdy enough to hold a generous filling.
This cherry pie belongs to the tradition of French pâtisserie, where fruit and nut flavors often dance together. The addition of almond extract pays homage to the classic “tarte aux cerises” found in the Provence region, yet the recipe is adaptable for any kitchen that loves a burst of color and flavor. Whether you’re serving it at a holiday dinner or a casual brunch, the pie’s bright ruby filling and buttery golden crust are sure to become the star of the table.
In this guide, I’ll walk you through every step—from crafting a buttery, tender crust to preparing a glossy, perfectly thickened cherry filling that doesn’t turn watery. You’ll also learn pro‑tips for achieving a flawless glaze and tricks for scaling the recipe up or down without compromising texture. By the end, you’ll have a reliable, crowd‑pleasing cherry pie that feels both elegant and comfortingly familiar.
So preheat your oven, gather your ingredients, and let’s create a cherry‑laden masterpiece together!
🌟 Why This Recipe Will Capture Your Heart
This cherry pie isn’t just another dessert; it’s a celebration of texture, aroma, and the joy of sharing homemade goodness.
- ✨ Perfect Balance of Sweet and Tart: The natural acidity of fresh cherries is softened by just the right amount of sugar, creating a harmonious flavor that never feels cloying.
- ✨ Almond Elegance: A splash of pure almond extract adds depth without overpowering the fruit, echoing classic French patisserie notes.
- ✨ Flaky, Buttery Crust: The cold‑butter technique yields layers that melt in your mouth while still supporting a generous filling.
- ✨ Glossy, Professional Finish: An egg‑white glaze gives the pie a restaurant‑style shine that impresses guests instantly.
- ✨ Scalable for Any Occasion: The built‑in portion adjuster lets you easily double for a holiday feast or halve for an intimate dessert.
- ✨ All‑Year Versatility: Fresh or frozen cherries work equally well, making this recipe viable regardless of season.
🥗 Ingredients
📝 Complete Ingredient List
For the Crust:
- 250 g all‑purpose flour
- 115 g unsalted butter, cold and cubed
- 50 g granulated sugar
- 0.25 tsp salt
- 1 egg yolk
- 2 tbsp ice water (as needed)
For the Filling:
- 600 g fresh cherries, pitted
- 150 g granulated sugar
- 15 g cornstarch
- 15 ml almond extract
- 5 ml vanilla extract
- 15 ml lemon juice
For the Glaze:
- 1 egg white
- 15 ml milk
🔍 Focus on Key Ingredients
Fresh Cherries
Cherries provide the vibrant color and natural tartness that defines this pie. Look for deep‑red, plump cherries; they should feel heavy for their size, indicating juiciness. If using frozen cherries, thaw them completely and pat dry to avoid excess moisture that could make the filling runny.
Almond Extract
Pure almond extract adds a fragrant, nutty undertone that complements the fruit without making the pie taste overtly nutty. A little goes a long way—15 ml is enough to perfume the entire filling while still letting the cherries shine.
Unsalted Butter
Cold, unsalted butter creates the flaky layers in the crust. The lack of salt lets you control seasoning precisely, and the cold temperature prevents the butter from melting into the flour before baking, preserving those delicate layers.
🔄 Quick Substitutions
| If you don’t have... | Use instead... |
|---|---|
| Fresh cherries | Frozen, thawed and drained cherries |
| Almond extract | Almond essence or 1 tsp almond liqueur (reduce sugar slightly) |
| All‑purpose flour | Pastry flour (for an even more tender crust) |
👨🍳 Step‑by‑Step Instructions
Follow these detailed phases to build a flawless cherry pie from scratch, ensuring each component is perfectly prepared.
📋 Phase 1: Preparation and Mise en Place
Start by gathering all ingredients and preparing the crust dough.
Combine Dry Ingredients
In a large mixing bowl, whisk together the flour, granulated sugar, and salt until evenly distributed. This ensures that the salt and sugar are fully incorporated, preventing pockets of seasoning later on.
Cut in the Butter
Add the cold butter cubes to the dry mixture. Using a pastry cutter or two forks, cut the butter until the mixture resembles coarse crumbs with pea‑size pieces of butter still visible. This creates the layers that will puff up during baking.
Form the Dough
Drizzle the ice water over the crumbly mixture, one tablespoon at a time, mixing gently with a spatula until the dough just comes together. Avoid over‑mixing; the dough should be slightly shaggy but hold when pressed.
Chill the Dough
Shape the dough into a flat disc, wrap it in plastic wrap, and refrigerate for at least 30 minutes. Chilling relaxes gluten and firms the butter, both essential for a flaky texture.
🔥 Phase 2: Filling and Baking
While the dough rests, prepare the cherry filling and assemble the pie.
Prepare the Cherry Filling
In a saucepan, combine pitted cherries, sugar, cornstarch, almond extract, vanilla extract, and lemon juice. Cook over medium heat, stirring constantly, until the mixture thickens and becomes glossy—about 8‑10 minutes. The cornstarch will gelatinize, giving the filling a smooth, jam‑like consistency.
Roll Out the Crust
On a lightly floured surface, roll the chilled dough into a 12‑inch circle, about ¼‑inch thick. Carefully transfer it to a 9‑inch pie pan, gently pressing the edges and trimming excess dough.
Fill the Pie
Pour the warm cherry filling into the crust, spreading it evenly with a spatula. The warmth helps the crust settle without sagging.
Apply the Glaze
Whisk together the egg white and milk until slightly frothy. Brush the mixture over the exposed edges of the crust, creating a glossy, golden finish once baked.
Bake the Pie
Preheat the oven to 190 °C (375 °F). Place the pie on the middle rack and bake for 45 minutes, or until the crust is deep golden brown and the filling is bubbling around the edges.
✨ Phase 3: Finishing Touches and Serving
Allow the pie to rest before serving for optimal texture.
Cool and Set
Remove the pie from the oven and let it cool on a wire rack for at least 20 minutes. This resting period allows the filling to set, making slicing easier.
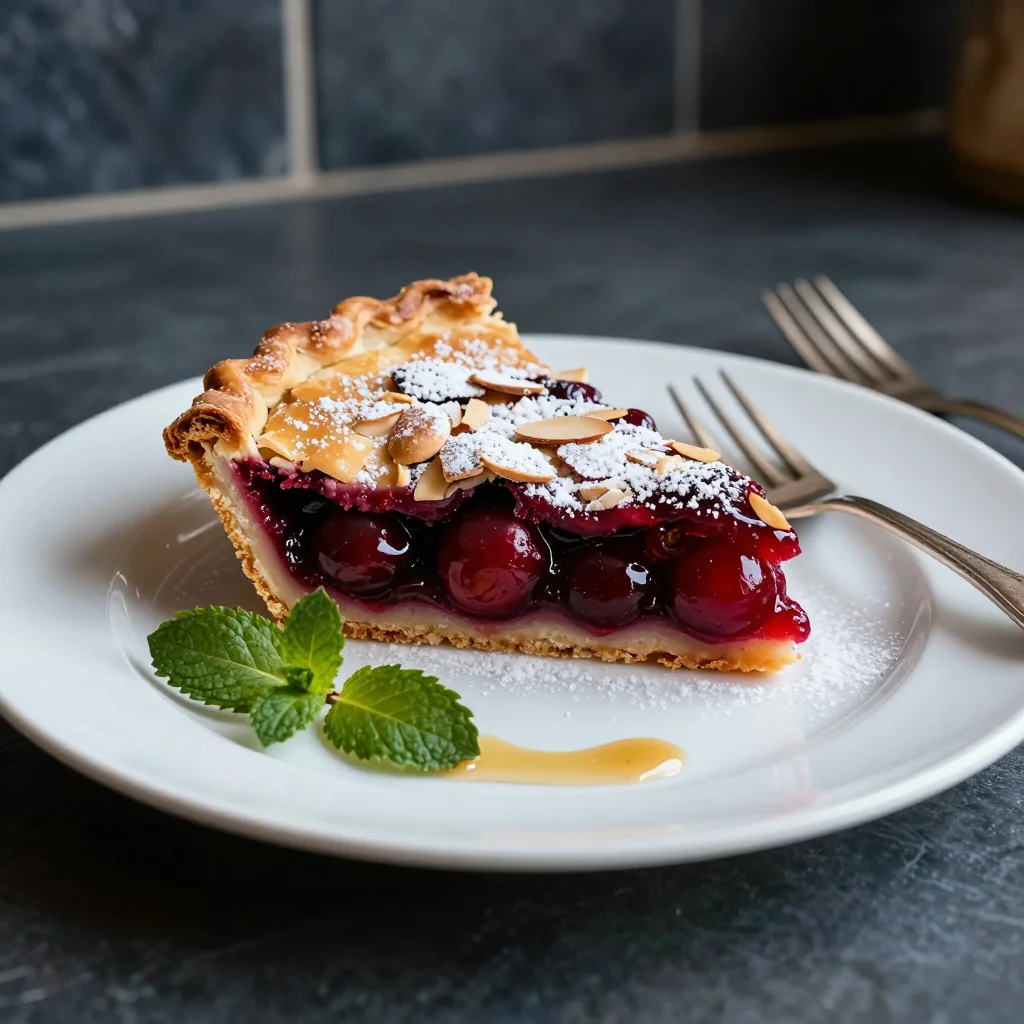
Slice and Serve
Using a sharp, serrated knife, cut the pie into wedges. Serve warm or at room temperature, optionally with a dollop of vanilla‑flavored whipped cream or a scoop of vanilla ice cream.
💡 Expert Tips and Tricks
🛒 Choosing the Right Ingredients
When selecting cherries, look for firm, glossy fruit with no cracks or bruises. The skin should be taut and the flesh dense; this ensures maximum juice without excess water. For the butter, always use high‑fat European‑style butter if possible—it yields a richer crust. Finally, opt for pure almond extract rather than imitation; the natural oils give a cleaner flavor that integrates seamlessly with the fruit.
🔪 Preparation Techniques
Keep all cold ingredients (butter, water, even the mixing bowl) chilled. This prevents the butter from melting prematurely, which would eliminate the flaky layers. When cutting the butter into flour, aim for a mixture that looks like coarse sand with pea‑size butter pieces. This distribution is the secret to a tender, buttery crust.
🌡️ Mastering the Cooking Process
Maintain a steady oven temperature; opening the door too often causes temperature fluctuations that can lead to a soggy crust. If you notice the edges browning too fast, loosely tent the pie with aluminum foil. The filling should bubble gently—if it boils vigorously, the cornstarch may be over‑cooked, resulting in a gummy texture.
🍽️ Presentation and Service
For a polished look, dust the cooled pie lightly with powdered sugar or garnish with a few fresh almond slices. Serve each slice on a warm plate to keep the filling supple. Pair with a scoop of vanilla bean ice cream to balance the tartness, or a dollop of lightly sweetened whipped cream for a lighter finish.
🏆 Pro Tips
Elevate your cherry pie from home‑cooked comfort to restaurant‑level excellence with these professional insights.
- 🎯 Temperature‑Controlled Butter: Chill the butter in the freezer for 10 minutes before cutting. The colder the butter, the more distinct the layers in the crust, because the butter stays solid longer during mixing and baking, creating steam pockets that lift the dough.
- 🎯 Use a Pie Shield: A silicone pie shield protects the crust edges from over‑browning while allowing the center to bake fully. This ensures an even golden hue without sacrificing the delicate texture of the rim.
- 🎯 Pre‑Cook the Filling Slightly: Cooking the cherry mixture for just a minute or two before adding cornstarch reduces the risk of raw starch taste and helps the filling set faster once baked.
- 🎯 Brush with Melted Butter Before Glazing: A thin layer of melted butter under the egg‑white glaze adds extra shine and a subtle buttery flavor that deepens the crust’s aroma.
- 🎯 Rest the Pie Overnight: If you can plan ahead, let the baked pie cool completely, then refrigerate it overnight. The flavors meld, and the crust becomes even flakier. Warm gently before serving.
- 🎯 Slice with a Hot Knife: Dip a sharp knife in hot water, wipe dry, and slice. The heat cuts through the crust cleanly, preventing crumbling and giving each slice a crisp edge.
"A perfect cherry pie is the epitome of balance—sweet, tart, buttery, and glossy—all in one bite." — Pierre Gagnaire
🔄 Variations and Adaptations
This recipe is a versatile canvas; feel free to explore these creative twists.
🥬 Vegetarian / Vegan Version
Swap the butter for a 1:1 vegan butter alternative and replace the egg yolk with 2 tablespoons of cold water mixed with 1 tablespoon of ground flaxseed. Use a plant‑based milk (such as oat or almond) for the glaze. The result remains flaky while respecting a vegan lifestyle.
- Vegan butter: ensures the same fat content for a tender crust.
- Flaxseed “egg”: provides binding without animal products.
🌶️ Flavor Variations
Play with complementary flavors to tailor the pie to your palate or the season.
Spicy Version:
Add ¼ tsp of ground cinnamon and a pinch of cayenne pepper to the filling. The warmth of cinnamon pairs beautifully with cherries, while cayenne adds a subtle kick.
Mediterranean Version:
Incorporate 2 tablespoons of finely chopped toasted almonds into the crust and drizzle a light honey glaze over the finished pie. The almond crunch adds texture, and honey deepens the sweetness.
Asian Inspired Version:
Replace almond extract with 1 tsp of yuzu juice and add a splash of ginger-infused simple syrup to the filling. This gives the pie a bright citrus‑ginger profile reminiscent of Japanese desserts.
⚠️ Dietary Adaptations
Gluten‑Free:
Use a blend of rice flour, almond flour, and tapioca starch (2 cups total) for the crust. Add 1 tbsp xanthan gum to mimic gluten’s elasticity.
Lactose‑Free:
Swap butter for lactose‑free margarine and use oat milk in the glaze. The texture remains comparable, and the flavor stays rich.
Low‑Calorie:
Reduce sugar in the filling to 100 g, use a light butter substitute (such as a 50/50 butter‑olive oil blend), and serve smaller slices. Pair with a dollop of low‑fat Greek yogurt instead of cream.
👶 Family / Kids Friendly Version
Kids often prefer a sweeter profile. Increase the sugar in the filling to 180 g and add a pinch of vanilla bean paste. You can also top each slice with a drizzle of chocolate ganache for an extra treat.
📦 Storage and Reheating
🧊 Conservation
Refrigerator:
- Duration: 4 days
- Container: airtight glass or plastic container
- Tip: Cover the top with plastic wrap to prevent the crust from drying out.
Freezer:
- Duration: 2 months
- Method: Freeze the whole pie uncovered on a baking sheet, then wrap tightly in foil and place in a freezer bag.
- Defrost: Thaw overnight in the refrigerator before reheating.
💡 For best texture, reheat from frozen rather than thawed to avoid soggy crust.
♨️ Reheating
🔥 Oven (Recommended):
- Preheat to 175 °C (350 °F).
- Cover the pie loosely with aluminum foil.
- Heat for 15 minutes.
- Remove foil and continue heating for 5‑7 minutes until the crust regains its crispness.
⚡ Microwave (Quick):
- Place a slice on a microwave‑safe plate.
- Cover with a microwave‑safe lid.
- Heat on medium power for 45 seconds, then check and add 15‑second increments if needed.
🍳 Stovetop:
Heat a slice in a non‑stick skillet over low heat, covered, for 3‑4 minutes, flipping once. This revives the crust while keeping the filling moist.
🍷 Perfect Pairings
🥗 Side Dishes
- Light Arugula Salad: The peppery bite of arugula balances the sweetness of the pie.
- Vanilla‑Infused Yogurt: A cool, creamy dollop adds contrast without overwhelming flavors.
- Caramelized Pears: Their subtle sweetness complements the cherry’s tartness.
🍷 Wine & Beverage Pairings
- Brachetto d'Acqui (Sparkling Red): Light bubbles and fruity notes echo the cherry flavor.
- Late Harvest Riesling: Sweetness and acidity mirror the pie’s balance.
- Non‑Alcoholic: Sparkling elderflower soda with a splash of lemon.
🍰 Complementary Courses
Start the meal with a crisp goat cheese and beet salad, follow with the cherry pie for dessert, and finish with a palate‑cleansing espresso or a glass of chilled chamomile tea.
❓ Frequently Asked Questions
Q: Can I use frozen cherries instead of fresh?
A: Absolutely. Thaw the frozen cherries completely, then pat them dry with paper towels to remove excess moisture. This prevents the filling from becoming watery. The flavor remains vibrant, and the texture stays pleasant after baking.
Q: How do I prevent the crust from becoming soggy?
A: First, ensure the filling is thickened properly with cornstarch; a runny filling will seep into the crust. Second, blind‑bake the crust for 10 minutes before adding the filling, or brush the crust with a thin layer of melted butter and egg‑white glaze, which creates a barrier.
Q: What if I don’t have almond extract?
A: You can substitute with almond essence, a teaspoon of almond liqueur (reduce the sugar slightly), or even a handful of finely ground toasted almonds for a texture change. The flavor will differ slightly but still be delicious.
Q: My crust shrank during baking—what went wrong?
A: Shrinkage often occurs when the dough is over‑handled or not chilled enough. Keep the butter cold, avoid over‑mixing, and chill the dough for at least 30 minutes. Also, line the crust with parchment paper and use pie weights when blind‑baking to maintain shape.
Q: Can I make this pie ahead of time?
A: Yes. Prepare the crust and filling, assemble the pie, and store it unbaked in the refrigerator for up to 24 hours. When ready, bake as directed, adding a few extra minutes to account for the chilled temperature.
Q: How do I adjust the recipe for more or fewer servings?
A: Use the portion adjuster on the recipe card (see below) to scale ingredient quantities automatically. The script recalculates each numeric amount while keeping non‑numeric items (like “a pinch”) unchanged.
🎉 Let’s Get Baking!
This Cherry Pie with Almond Extract combines the nostalgic comfort of a classic fruit pie with refined touches that make it suitable for any special occasion. From the buttery, flaky crust to the glossy, almond‑kissed cherry filling, every bite offers a perfect harmony of texture and flavor. Whether you’re serving it at a holiday dinner, a casual brunch, or simply treating yourself, the recipe’s flexibility and the built‑in portion adjuster ensure it fits any crowd.
Give it a try, share your beautiful results, and feel free to ask any questions in the comments. Your feedback helps me refine the recipe further, and I love seeing how you personalize it!
Have you tried this recipe?
Leave a comment and rating below! Share your photos on Instagram with #CherryAlmondPie to be featured.
Cherry Pie with Almond Extract
A timeless classic marrying tart cherries with fragrant almond for any celebration.
📝 Ingredients
Crust
Filling
Glaze
👨🍳 Instructions
- 1
Mix flour, sugar, and salt; cut in cold butter until crumbly.
- 2
Add ice water gradually, form a dough ball, wrap, and chill 30 minutes.
- 3
Combine cherries, sugar, cornstarch, almond extract, vanilla, and lemon juice; cook until thick.
- 4
Roll dough, line a 9‑inch pie pan, and trim edges.
- 5
Fill crust with the cherry mixture, spreading evenly.
- 6
Brush egg‑white‑milk glaze over crust edges.
- 7
Bake at 190 °C (375 °F) for 45 minutes, covering edges if needed.
- 8
Cool 20 minutes, then slice and serve with optional whipped cream.
- 9
Store leftovers in the refrigerator for up to 4 days or freeze for longer.
- 10
Enjoy and share your creation with friends and family!
🥗 Nutrition (per serving)
*Nutritional values are estimates based on standard ingredients.
📚 You Might Also Like
Blueberry Pie with Lemon Zest
Apricot Tart with Almond Cream
Rhubarb Crumble with Oat Topping
Pumpkin Cream Pie with Spiced Whipped Cream
💬 Comments and Reviews
No comments yet. Be the first to share your thoughts!


Leave a Comment